Learning how to make a very easy mini handbag in 30 minutes is not just a quick sewing win—it’s also a fantastic way to dive into the world of DIY fashion without stress. Whether you’re new to sewing or just short on time, this mini handbag project offers big results with minimal effort. With a few basic tools and materials, you can create a stylish, functional accessory that looks professionally made.
The beauty of this project lies in its simplicity. From cutting to final stitches, the process is streamlined and fun. You’ll use only a few pieces of fabric, a handle, and a closure mechanism—yet the finished product is chic, sturdy, and ready to wear or gift.
This tutorial is perfect for those looking to make a handbag quickly, perhaps for a last-minute gift, market item, or personal use. You don’t need to be an expert; this pattern is approachable and ideal for beginners. Now, let’s get started!
Materials and Preparation
Before sewing, it’s essential to gather all materials and prepare your workspace. Having everything ready will ensure your 30-minute handbag stays on schedule. The star of this project is the fabric—choose something strong yet flexible.
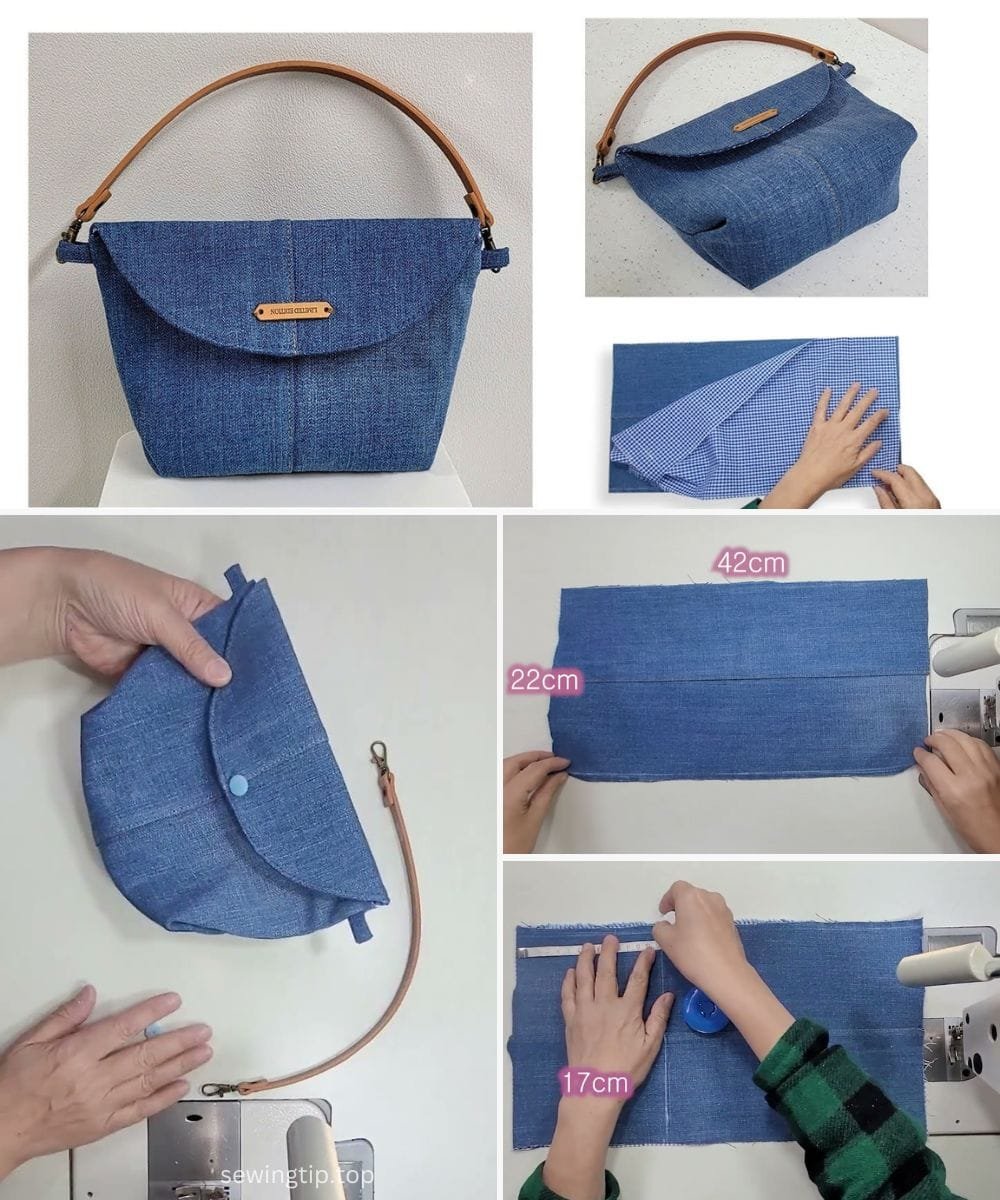
You’ll need a main fabric measuring 42cm wide and 22cm tall. Denim or canvas works well, especially if you want durability. You can also add a lining fabric in the same size if you want a more polished interior. Consider fusible interfacing for added structure if your fabric is soft.
A magnetic snap or button is needed for the closure. These are easy to install and make the bag more secure. You’ll also need a handle—preferably one with loops or clips so you can attach it quickly without extra sewing.
Don’t forget your tools: scissors, sewing machine, pins or clips, thread, an iron, and optionally a fabric marker. With everything prepped, you’re ready to sew your easy mini handbag in 30 minutes.
Start by cutting your fabric to size. If you’re lining the bag or using interfacing, make sure they’re cut identically. Iron any wrinkles out so everything lies flat. Fold your rectangle in half lengthwise and decide which end will be the flap.
On the flap side, use a curved template or freehand to draw a half-circle shape and cut it. This gives the handbag its signature soft flap. Keep your cuts smooth and symmetrical for the best finish.
Now you’re ready to sew. Let’s move on to the construction phase.
Sewing the Bag Body and Flap
With your fabric folded right sides together, you’ll begin constructing the bag’s main body. Start by pinning the sides—this helps everything stay aligned while you sew. Leave the top and curved flap open for now.
Stitch down both sides of the rectangle using a straight stitch. A 1cm seam allowance is ideal. Be sure to reinforce the top and bottom of each seam by backstitching a few times. This ensures your bag can hold weight without tearing at the seams.
Once both sides are sewn, trim any excess threads and turn the bag right side out. Use a blunt tool like a chopstick or the back of scissors to push out the corners. Press the bag flat with an iron to make it neat and crisp.
Now let’s add shape. Mark a line 17cm from the base—this defines the handbag’s storage area and separates it from the flap. You can press this line lightly to keep the flap folded down properly.
At this stage, you can also add the magnetic snap. Measure the center of the flap and install one half of the snap there. Then, fold the flap down and align the second half on the body, marking where it should go. Attach it following the manufacturer’s instructions.
If you’re using a lining, sew it in before this step. Place the lining right sides together inside the bag and sew along the top edge. Leave a small gap to turn it inside out, then press and topstitch the seam for a clean finish.
Now the bag is nearly complete. Time to give it a handle!
Attaching the Handle and Final Details
Attaching the handle is a quick but crucial step. If you’ve purchased a pre-made handle with clips, this part is easy—just secure each end of the strap to the bag’s top sides using the built-in loops.
If your handle is fabric or requires sewing, you can make loops out of scrap fabric. Cut two small strips, fold them lengthwise, and sew into loops. Attach these loops to the inside of the top corners of the bag. Then feed your handle through or sew it directly into place.
Once the handle is secured, test its strength. Hold the bag by the strap and gently shake it to ensure it’s stable and well-attached. If it shifts or pulls, reinforce it with additional stitches.
Check your seams again, trimming any loose threads. You may want to add a topstitch along the flap or the bag’s top edge. This not only gives a finished look but also strengthens the construction.
Some crafters like to embellish their mini handbags with buttons, patches, or embroidery. This is totally optional, but if you want a unique touch, now’s the time to add it.
Give the bag a final press with the iron to smooth everything out. Congratulations—your mini handbag made in 30 minutes is ready to go!
Customization Ideas and Practical Uses
One of the best things about this easy mini handbag is how versatile it is. Even though the tutorial is simple, the end result can be customized in endless ways to suit your style or needs.
Try different fabrics for unique looks. Floral cotton for spring, faux leather for a modern vibe, or even upcycled denim from old jeans for a rustic, eco-friendly twist. You can also play with size by adjusting the original 42cm x 22cm rectangle to be bigger or smaller.
Want more structure? Add interfacing or quilted padding to make the bag more rigid. This is ideal if you’re planning to carry heavier items or want a more professional finish.
Another great idea is adding interior pockets. Cut small rectangles and sew them onto the lining before assembling the bag. It’s a handy upgrade for holding cards, lip balm, or keys.
These mini handbags are perfect for gifts. Personalize each one with initials, fabric choices, or colors. They’re ideal for birthdays, Mother’s Day, or bridesmaid favors.
You can also use this design for small business purposes. Since they only take 30 minutes to make, you could easily produce several in a day and sell them at craft fairs or online shops.
FAQ – Frequently Asked Questions
Can I make this bag without a sewing machine?
Yes, but it will take longer. Hand-stitching is possible but requires patience. Use small, even backstitches to ensure strength.
What fabric is best for this handbag?
Sturdy materials like denim, canvas, or upholstery fabric work best. Soft cotton can be used with interfacing.
How do I clean the mini handbag after use?
Spot clean with a damp cloth or hand wash gently in cold water. Avoid the washing machine unless your fabric is pre-shrunk and durable.
Can I make this larger or smaller?
Absolutely! Just adjust the size of the rectangle. Keep proportions similar for the best results.
Is interfacing required?
No, but it helps the bag hold its shape. If your fabric is thin, interfacing is highly recommended.
Can I sell bags made from this tutorial?
Yes! This simple pattern is great for handmade sales. Just make sure to source your materials ethically and give it your personal touch.
Conclusion
Now you know exactly how to make a very easy mini handbag in 30 minutes—a fun, quick, and satisfying sewing project that anyone can tackle. With just one piece of fabric, a closure, and a strap, you can create a professional-looking bag perfect for daily use or gifting.
We’ve covered every step from cutting and sewing to customizing and troubleshooting. This project is ideal for practicing your sewing skills, trying new fabrics, or building up your handmade gift stash.
If you tried this tutorial, we’d love to hear your thoughts! Was it easy? Did you make changes? Leave a comment with your honest opinion, share your photos, and tell us what kind of tutorials you’d love to see next. Your feedback inspires more fun projects like this one!

