Starting your creative journey with a handmade backpack pattern is not only a rewarding experience but also a unique way to express your personal style. Whether you’re a sewing beginner or a seasoned craft lover, designing your own backpack using a custom pattern lets you combine functionality with artistic flair. From choosing the right fabric to stitching the final seam, every step of this process is packed with excitement and satisfaction.
Many people today are turning to DIY accessories for everyday use, and the handmade backpack pattern has become one of the most popular trends. It’s a practical item that’s always needed, yet highly customizable—making it perfect for people who love to add a personal touch to what they wear or carry. By following the right techniques and using quality materials, you can create a stylish, durable backpack that’s totally yours.
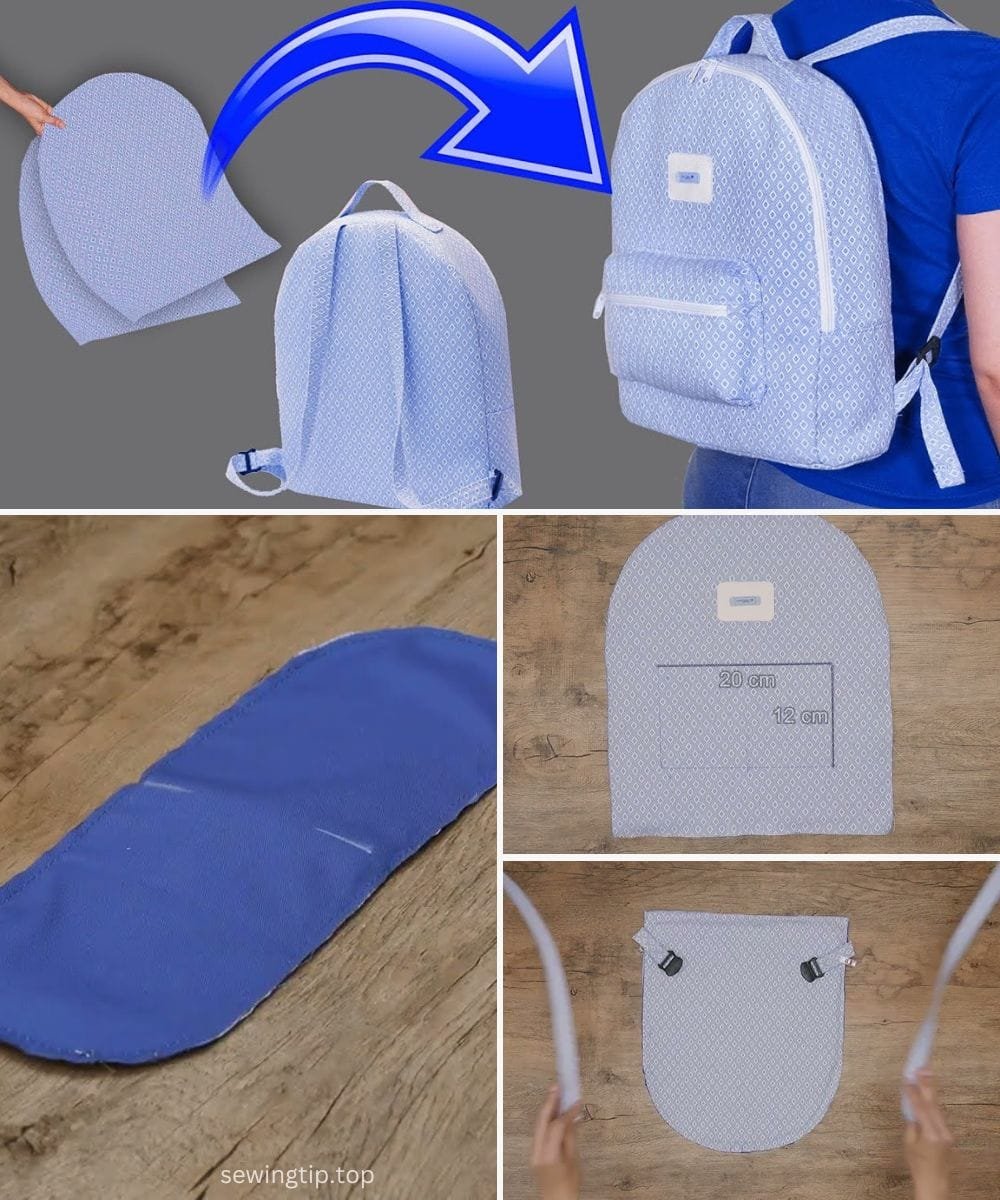
In this guide, we’ll walk you through the essentials of crafting your own backpack. You’ll learn the importance of picking the right materials, tools you’ll need, how to cut and assemble your fabric, and how to add those final finishing details that give your backpack that polished, professional look. Whether you’re making it for daily use, as a gift, or even to sell, this handmade backpack pattern tutorial is designed to set you up for success.
Choosing the Right Materials for Your Handmade Backpack Pattern
When beginning your backpack project, the material you choose will directly impact the durability and aesthetic of your final piece. The most common and recommended fabrics include canvas, denim, faux leather, and heavy cotton. Each of these options offers great structure, making them ideal for backpacks that hold shape and support weight.
Canvas is a top pick for many crafters due to its strength and availability in various colors. It’s easy to work with and stitches well even on standard sewing machines. For a more urban or fashion-forward look, faux leather can elevate your handmade backpack pattern while still being budget-friendly and animal-friendly.
Don’t forget to choose a quality lining fabric. Cotton is commonly used for lining as it’s soft, breathable, and comes in endless designs. A fun lining can add personality to your backpack and make it more enjoyable to use. Waterproof lining options are also great for protecting contents from the elements.
Interfacing is another crucial material when using a handmade backpack pattern. It provides structure and helps your backpack stand upright. Choose a medium- to heavy-weight interfacing depending on your outer fabric’s stiffness. For example, canvas may need lighter interfacing, while denim might pair well with thicker support.
You’ll also need quality hardware like zippers, D-rings, adjustable straps, and snap buttons. These not only improve functionality but give your backpack a store-bought finish. Investing in stainless steel or brass hardware can greatly improve longevity.
Finally, pick strong thread—polyester or nylon—since your seams will need to withstand daily wear and tear. Using contrasting thread can add a design element, while matching thread creates a more seamless appearance.
Tools and Preparation Steps Before Sewing
Before diving into your handmade backpack pattern, make sure you have the necessary tools to complete the job smoothly. Basic sewing supplies include sharp scissors, measuring tape, pins, seam ripper, and of course, a reliable sewing machine. Some advanced patterns may require additional tools like rivet setters or a walking foot attachment.
Print and cut out your backpack pattern pieces. If you’re using a digital template, ensure it’s printed to scale. Tape the pattern pieces together if necessary, and double-check the seam allowance before cutting your fabric. Accurate cutting is key to ensuring all pieces align perfectly during assembly.
Take the time to wash and iron your fabric before cutting. Pre-washing removes any factory coatings or shrinkage, and ironing helps you make cleaner cuts and sharper seams. This step is especially important if you’re using cotton or denim.
Set up a dedicated workspace where you can lay out fabric, tools, and instructions. Having enough room to spread out your materials avoids confusion and errors later. Keeping your area organized will also make the sewing process more enjoyable and efficient.
Check your sewing machine settings, especially your stitch length and tension. Practice on a fabric scrap to confirm that your stitches are even and secure. If you’re using thicker materials like canvas or faux leather, consider using a heavy-duty needle.
Lastly, read through the entire handmade backpack pattern instructions before sewing anything. Understanding the full process helps prevent mistakes and gives you a clear roadmap of what steps to follow in what order.
Assembling and Sewing Your Backpack
Once your materials and tools are ready, it’s time to begin the actual sewing. Start by attaching the lining and interfacing to each fabric piece. This provides structure and ensures all pieces retain their shape throughout the construction process. Iron the interfacing onto the fabric to activate the adhesive.
Sew your main body panels together, usually starting with the front and back sections. Be sure to align the seams carefully and backstitch at the beginning and end for durability. The bottom panel often requires attaching curves, so go slowly and use lots of pins to hold your fabric in place.
Next, install your zippers. This step may seem tricky, but with patience and the right foot on your sewing machine, it’s manageable. A top zipper gives your backpack a sleek finish and keeps items secure. Inside pockets or compartments can also be added now for additional functionality.
Assemble the straps and handles. These may be padded or adjustable depending on your pattern. Reinforce them well, especially where they join the backpack, as these areas will bear the most weight. Double stitching and using bar tacks can make a big difference in strength.
Attach all exterior pockets. These are great for storing smaller items like phones, keys, or wallets. You can choose open-top pockets, flap styles, or zippered pockets depending on your preference and skill level.
Finally, assemble the backpack by connecting the front, back, and bottom panels together. Close up the seams, turn the bag right side out, and inspect for any areas that need reinforcement. Add any final touches like snaps, toggles, or custom labels to personalize your design.
Personalizing Your Handmade Backpack Pattern
Personalization is one of the biggest advantages of using a handmade backpack pattern. You’re not limited to a specific color or shape—you have full creative control. Whether it’s embroidery, patchwork, or fabric paint, adding custom details makes your backpack one-of-a-kind.
Embroidery is a timeless way to personalize fabric. You can stitch your initials, a name, or a design onto the front pocket or flap. Hand embroidery adds a charming, handmade quality that elevates your final piece.
Using multiple fabrics is another stylish approach. Color-blocking or mixing patterns can create visual interest and make your backpack more dynamic. Just make sure all fabrics have similar weights for consistent construction.
Consider adding reflective strips or neon accents if the backpack will be used for biking or walking at night. This is especially useful for kids’ backpacks or commuting bags, blending safety with design.
Another fun idea is incorporating a patch or applique. These can be sewn or ironed on, and are available in endless styles—from vintage florals to quirky cartoons. They’re perfect for hiding imperfections or adding a playful twist.
You could also line your backpack with a surprise print—something colorful or humorous. It’s a small detail, but it adds joy every time you open the bag. Plus, it makes your project feel truly unique from top to bottom.
Finally, add a personalized label or tag inside the backpack. Whether it’s your name, a short quote, or a handmade brand logo, it’s a special touch that makes your project feel professional and heartfelt.
FAQ: Handmade Backpack Pattern
1. What fabric is best for a handmade backpack?
Canvas, denim, and faux leather are among the most popular choices due to their durability and structure. Pair them with a cotton or waterproof lining.
2. Do I need a special sewing machine for backpacks?
Not necessarily. A regular sewing machine with a heavy-duty needle and strong thread works well for most patterns, though a walking foot can help with thicker materials.
3. How long does it take to sew a backpack?
Depending on the complexity of your handmade backpack pattern, it can take anywhere from a few hours to a full weekend. Beginners should set aside extra time.
4. Can I sell backpacks made from these patterns?
Yes, as long as the pattern permits commercial use. Always check the designer’s license or create your own original pattern for full freedom.
5. How can I make my backpack waterproof?
Use waterproof fabrics or add a water-resistant lining. You can also apply fabric sealant spray for extra protection against moisture.
6. What size should my backpack be?
It depends on the purpose. Daily backpacks typically range from 12 to 18 inches in height. Customize the dimensions to suit your needs—school, hiking, or casual use.
7. Are backpack patterns beginner-friendly?
Some are, especially those with simple shapes and fewer compartments. Look for “beginner” tags or start with a mini backpack to practice techniques.
8. How do I reinforce the straps?
Use double stitching, bar tacks, and strong thread. Consider adding interfacing or padding inside the straps for added strength and comfort.
9. Can I line the backpack with patterned fabric?
Absolutely! Lining is a great place to showcase your personality. Just ensure the fabric is durable and complements the outer fabric.
10. Is it cheaper to make a backpack or buy one?
Making your own may cost more upfront due to materials and tools, but the quality, customization, and satisfaction often outweigh store-bought options.
Conclusion
Creating your own handmade backpack pattern is a deeply fulfilling project that blends creativity, practicality, and craftsmanship. With the right materials, tools, and step-by-step approach, anyone can create a backpack that reflects their style and meets their needs. From choosing fabrics to adding personal details, every decision you make helps shape something truly unique.
We hope this guide has inspired you to start your own backpack-making journey. If you’ve enjoyed the process or learned something new, feel free to leave a sincere opinion or suggestion. Your feedback helps us continue to provide valuable, engaging content for makers like you.

