If you’re looking for a crochet phone pouch pattern, you’re in the right place. This article will walk you through everything you need to know to create a stylish, functional, and personalized pouch to protect your phone. Whether you’re a beginner or an experienced crocheter, a well-designed crochet phone pouch pattern is the perfect small project to practice your skills, try new stitches, or create handmade gifts.
A crochet phone pouch is not only practical—it’s also a beautiful accessory. With the increasing use of smartphones, keeping your device safe while maintaining your personal style has never been more important. By using a thoughtfully crafted crochet phone pouch pattern, you can create a one-of-a-kind piece that reflects your taste, fits your phone perfectly, and adds a handmade charm to your daily routine.
In this article, we will explore everything from materials and techniques to customization ideas and finishing tips. By the end, you’ll have all the knowledge needed to confidently follow or even design your own crochet phone pouch pattern, even if you’ve never crocheted a phone accessory before.
Choosing the Right Yarn and Hook for Your Pouch
Selecting the right yarn is the first step toward creating a successful crochet phone pouch pattern. You want a material that’s soft to the touch but strong enough to protect your device.
Cotton yarn is one of the best choices for phone pouches. It’s durable, breathable, and provides a sturdy structure that holds shape well. Cotton also absorbs less moisture than other fibers, which helps protect your phone from accidental splashes or sweat.
You’ll also want to consider hook size. A smaller hook, such as a 3.5mm or 4mm, will give your pouch a tighter stitch and firmer finish. This ensures the pouch won’t stretch out over time and keeps your phone secure.
The color and texture of the yarn also play a role. Choose colors that match your personality or gift recipient’s style. Variegated yarns or gradient effects can create unique visual interest even in simple stitch patterns.
If you’re aiming for extra protection, consider lining the pouch with felt or fabric after crocheting. This adds a layer of cushioning and can be sewn or glued inside the pouch for a clean finish.
Don’t forget to check your gauge before starting. Crocheting a small swatch helps you ensure your pouch will be the right size, especially if you’re adjusting a crochet phone pouch pattern for a specific phone model.
Finally, keep your tools handy—scissors, a yarn needle, stitch markers, and a measuring tape are essentials for this kind of project. With these materials and the right mindset, you’re ready to dive into your project.
Basic Stitch Techniques for a Clean Finish
Understanding which stitches work best for your crochet phone pouch pattern makes a big difference in the outcome. A pouch that is too loose may not hold your phone securely, while a very tight pattern might be hard to insert your phone into.
The single crochet (sc) stitch is a go-to for phone pouches. It’s dense and creates a firm fabric with minimal gaps. This stitch helps ensure your phone doesn’t slip out and offers a uniform texture for decorating.
Half double crochet (hdc) is another great option. It works up slightly faster than single crochet and gives your pouch a bit of stretch without losing structure. It’s ideal if you prefer a more flexible design.
Some patterns include ribbing or textured details using front post and back post stitches. These add both beauty and grip, making the pouch easier to hold. However, if you’re a beginner, stick to basic stitches at first.
You’ll also need to understand how to increase and decrease stitches to shape your pouch, especially around the edges or for a flap. Most patterns will include these steps clearly, and once mastered, they open doors to more advanced designs.
Don’t forget to seam your pouch properly. Use a whip stitch or mattress stitch to close the sides for a neat, durable finish. A messy seam can affect the shape and look of your pouch.
Lastly, blocking your pouch gently—especially if it curls—can help smooth out edges and give a more professional look. Even a simple crochet phone pouch pattern benefits from that final touch of polish.
Creative Customizations and Functional Additions
Once you’ve mastered the basic crochet phone pouch pattern, it’s time to explore personalization options. This is where your creativity truly shines.
Start by choosing a color scheme or theme. Whether you go for pastel tones, bold colors, or minimalist black and white, the color can make your pouch stand out or blend in with your outfits or accessories.
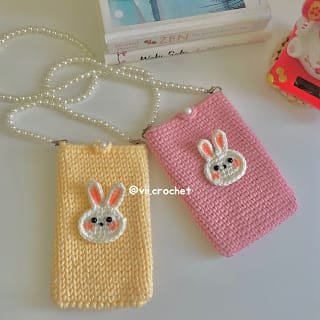
Add buttons or toggles for closure. A loop and button closure is both stylish and functional. You can also try using a snap, Velcro, or a flap-over design for extra protection.
Consider adding a strap or wristlet. You can crochet a matching strap or attach a keychain ring for easy carrying. This turns your pouch into a mini crossbody or wrist bag—perfect for travel, festivals, or quick errands.
Use embroidery or appliqué techniques to embellish your pouch. Simple designs like hearts, stars, or initials add personality. For a more advanced touch, try adding small granny squares or motifs.
Want to level up even more? Create compartments by crocheting or stitching extra pockets onto the front or inside of the pouch. These are perfect for holding cards, cash, or earbuds.
Finally, keep your target phone size in mind when customizing. A crochet phone pouch pattern can easily be adjusted by increasing or decreasing stitch counts and rows to match any device.
Common Mistakes and How to Avoid Them
Even experienced crafters make mistakes when following a crochet phone pouch pattern. Knowing what to watch for helps ensure a smoother, more enjoyable project.
One common error is not checking your gauge. If your stitches are too loose or too tight, your pouch may end up too small or overly stretchy. Always crochet a test swatch and measure it.
Another issue is using the wrong yarn type. Acrylic yarns may stretch or feel too slippery, which isn’t ideal for phone safety. Cotton or blends with a bit of grip are better suited for this type of project.
Misreading the pattern instructions can also lead to frustration. Make sure to follow stitch counts, turning rows, and increase/decrease notes carefully. If something seems off, count your stitches again before moving forward.
Skipping the seaming process or rushing through it may result in uneven sides or holes. Take your time when joining parts of your pouch—precision matters in the final look and function.
Beginners may forget to reinforce the opening or flap, which can lead to the pouch loosening with time. A tighter stitch at the top or a secure closure can help avoid this.
Lastly, some crocheters forget to test the fit mid-project. Slide your phone in partway through to ensure the width and length are appropriate. Making adjustments early saves time and yarn in the long run.
FAQ – Frequently Asked Questions
1. What is the best yarn for a crochet phone pouch pattern?
Cotton yarn is usually the best choice due to its durability, minimal stretch, and clean finish. It provides the structure needed to protect your phone without losing shape.
2. Can beginners follow a crochet phone pouch pattern?
Yes! Many patterns are beginner-friendly and use only basic stitches like single crochet and half double crochet. With a little practice, even first-time crocheters can complete this project.
3. How do I adjust the pattern for different phone sizes?
Measure your phone’s width and height, then adjust your foundation chain and row count accordingly. Remember to leave a little extra space for ease and seam allowance.
4. Do I need to line my crochet phone pouch?
Lining is optional but recommended for added durability and protection. You can use felt or soft fabric and hand-sew or glue it inside the pouch after crocheting.
5. What kind of closure works best?
A button and loop closure is popular and easy to make. You can also use snaps, magnetic clasps, or Velcro, depending on your preference and skill level.
6. Can I add a strap to my crochet phone pouch?
Absolutely! You can crochet a matching strap or use leather or fabric alternatives. Just make sure it’s securely attached to support the weight of your phone.
7. How long does it take to make a crochet phone pouch?
On average, it takes 1–3 hours depending on the complexity of the pattern, your crochet speed, and any added features like linings or decorations.
8. Is it safe to use a crochet pouch for my phone?
Yes, if it’s well-made. A tightly stitched pouch using quality yarn offers a good level of protection. Adding a lining or padding can make it even safer.
9. Can I sell the phone pouches I make using this pattern?
Yes, handmade phone pouches are popular at craft fairs, online shops, and local markets. Just ensure the pattern you’re using allows for commercial use if it’s not your own.
10. Where can I find inspiration for my next crochet phone pouch pattern?
Inspiration can come from color palettes, seasonal trends, nature, or your own imagination. Keeping a crochet journal can help you track your favorite designs and variations.
Conclusion
Creating your own crochet phone pouch pattern is a fun, functional, and deeply satisfying project for any crochet enthusiast. From choosing the right materials and stitches to adding personal touches and avoiding common mistakes, this article has provided a complete guide to crafting the perfect pouch.

