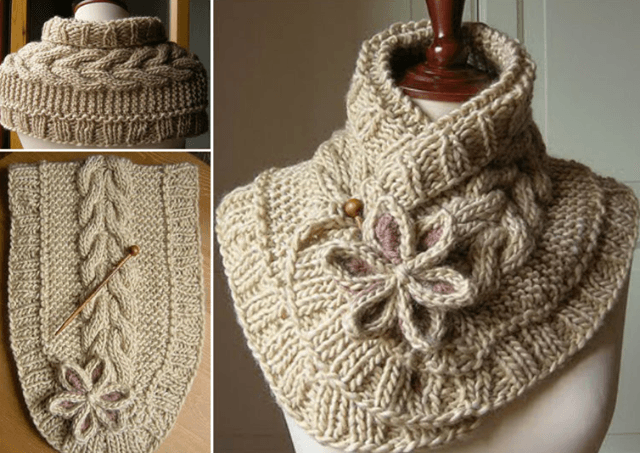
The DIY Pretty Cable Knitted Scarfette Knitting Pattern is a charming and practical project that’s perfect for knitters who want to create something cozy, fashionable, and timeless. Whether you’re a beginner exploring cables or a seasoned maker looking for a quick and satisfying knit, this pattern is an excellent choice. Using basic techniques with a stylish twist, this scarfette is designed to offer warmth without the bulk, making it an ideal accessory for layering during cooler months.
The appeal of a cable knitted scarfette knitting project lies in its versatility. Not only does it make a lovely handmade gift, but it also gives you the creative freedom to play with yarn textures, colors, and patterns. A scarfette, by definition, is a smaller, often buttoned or tied version of a full scarf, typically worn snugly around the neck. When paired with classic cable patterns, the result is an elegant and textured piece that instantly elevates any outfit.
This article will guide you through everything you need to know to start your own DIY pretty cable knitted scarfette knitting pattern project. From selecting the best yarn to understanding cable stitches, we’ve broken it down into manageable sections. Whether you knit for fun, fashion, or function, this pattern is sure to become a favorite in your handmade collection.
Understanding the Cable Knitting Technique
Cable knitting is a method used to create twisted, rope-like designs in your fabric. It may look complicated at first, but once you grasp the concept, it’s surprisingly approachable.
To make a cable, you typically knit stitches out of order by placing a few on a cable needle, holding them to the front or back, then knitting the next stitches before returning to those on the cable needle. This creates the iconic twist in the fabric. With practice, your fingers will learn the rhythm and flow of cable stitches naturally.
One key to mastering cable knitted scarfette knitting is consistency. The tension of your stitches should remain even to ensure that the cables don’t pull too tight or sag. Blocking your finished piece helps the cables pop and keeps the overall shape smooth.
Cable patterns are often symmetrical and easy to memorize, especially in a project like a scarfette. This makes it perfect for a calm evening of knitting or for working on-the-go. Once you get into the groove, you’ll find it relaxing and rewarding.
There are various cable styles, from simple 4-stitch twists to more complex braided designs. For a scarfette, a small repeating cable adds charm without overwhelming the compact size of the accessory.
When choosing your pattern, consider how the cable design will sit on the neck. A centered cable with a neat border gives a polished and balanced finish to your cable knitted scarfette knitting project.
Choosing the Right Yarn and Tools
Yarn selection plays a big role in how your DIY pretty cable knitted scarfette turns out. Opt for yarns with good stitch definition, such as wool or wool-blend fibers.
Avoid fluffy or textured yarns that obscure the cables. The goal is to highlight the structure and shape of the twists. Worsted weight or DK yarns work wonderfully for scarfettes, offering a blend of warmth and flexibility.
Color also matters. Solid or lightly heathered yarns are ideal to showcase the detail of the cables. Variegated yarns might distract from the intricate stitch work, especially in a small accessory like a scarfette.
When it comes to needles, use circular or straight needles depending on your preference. Cable needles, either traditional or hook-style, are essential for holding stitches temporarily during the twisting process.
Make sure to knit a swatch before starting the actual piece. This helps you check gauge and see how your yarn behaves with the cable pattern. Adjust needle size as needed for comfort and consistency.
Keep handy a row counter, stitch markers, and a darning needle for weaving in ends. A tape measure and scissors will round out your knitting kit. All these tools together will support a smooth and enjoyable cable knitted scarfette knitting experience.
Step-by-Step Guide to Knitting Your Scarfette
Start by casting on your stitches. For most scarfettes, a cast-on of 30–40 stitches is sufficient, depending on the width you desire and the size of your cables.
Begin with a few rows of ribbing or garter stitch to create a clean edge. This sets the stage for the cable panel and keeps the scarfette from curling.
Move into your cable repeat pattern. For beginners, a simple 6-row repeat with a central cable flanked by stockinette or garter edges is perfect. This design is visually appealing without being overwhelming.
As you work through the rows, keep track of which row you’re on in the cable repeat. This ensures your twists are spaced evenly and consistently.
After reaching your desired length, add a matching border on the other end. This could be the same as your beginning rows or a variation to give a unique finish.
Bind off loosely to maintain flexibility and ease of wear. Weave in your ends and block your finished scarfette gently to shape the cables and smooth the fabric.
Styling and Gifting Your Cable Knitted Scarfette
A cable knitted scarfette knitting project makes for a delightful accessory. Its shorter length and snug fit offer warmth without the fuss of a long scarf.
Wear it tucked into a coat collar, buttoned or tied at the side for a vintage-inspired look. Pair it with a matching hat or mittens for a complete ensemble.
Scarfettes are also ideal gifts. They knit up quickly and are lightweight to ship or carry. Personalize them with buttons, tags, or embroidery for added charm.
If you’re selling handmade items, scarfettes with cable designs often appeal to customers for their elegant yet functional style. Keep a few ready for craft fairs or online shops.
Choose seasonal colors or yarns for themed versions—deep reds and greens for holidays, or soft pastels for springtime. This gives your project a timeless yet versatile feel.
No matter how you style or gift it, your DIY pretty cable knitted scarfette knitting pattern will bring joy to the maker and the wearer alike.
FAQ – Frequently Asked Questions
What is a scarfette and how is it different from a scarf?
A scarfette is a smaller version of a scarf, typically worn snug around the neck and often secured with a button or tie. It’s lighter, more compact, and great for layering.
Are cable patterns hard for beginners?
Not at all! While cables may look complex, they are just a matter of rearranging stitches. With a bit of practice, even a beginner can master simple cable repeats.
What yarn works best for a cable knitted scarfette knitting project?
Wool or wool-blend yarns with good stitch definition are best. Avoid fuzzy yarns that hide the cable details.
How long does it take to knit a scarfette?
Most knitters can complete a scarfette in a few hours to a couple of days, depending on experience and the complexity of the cable pattern.
Do I need special needles to knit cables?
You’ll need a cable needle to hold stitches temporarily while twisting. Standard knitting needles and basic tools will suffice for the rest.
Can I modify the pattern to add buttons or ties?
Absolutely! Adding closures is a great way to personalize your project. You can sew on a decorative button or create an i-cord tie to secure the scarfette.
Conclusion
In this article, you’ve learned how to start your own DIY pretty cable knitted scarfette knitting pattern, from understanding cable techniques to choosing the right yarn and tools, and finally how to style or gift your finished piece. This project blends classic knitting charm with modern elegance, offering something rewarding for crafters of all levels.
If you’ve enjoyed this guide or tried the pattern yourself, we’d love to hear your honest opinion and any creative suggestions you might have. Share your experience and help inspire other knitters in the community!

