The Hidden Wells Quilt Pattern is one of those magical designs that captivates quilters with its illusion of complexity while offering a surprisingly achievable method. It’s a beautiful blend of symmetry, color play, and clever construction techniques that make it a favorite for both beginners and experienced quilters. Whether you’re exploring new quilt layouts or simply want to create a striking visual piece, this pattern is a must-try.
In recent years, the Hidden Wells Quilt Pattern has surged in popularity not just for its beauty but for the creative freedom it offers. You start with simple strips, yet the outcome is an intricate layout that resembles a woven or dimensional texture. The pattern’s name is quite fitting—at first glance, it looks like a mysterious maze, but as you build it block by block, the “hidden wells” come to life.
This pattern isn’t just a feast for the eyes; it’s also an exercise in smart quilting. With the right color placement and thoughtful cutting, even a modest stash of fabric can turn into something spectacular. The technique is economical, efficient, and incredibly fun to experiment with.
Understanding the Hidden Wells Quilt Pattern
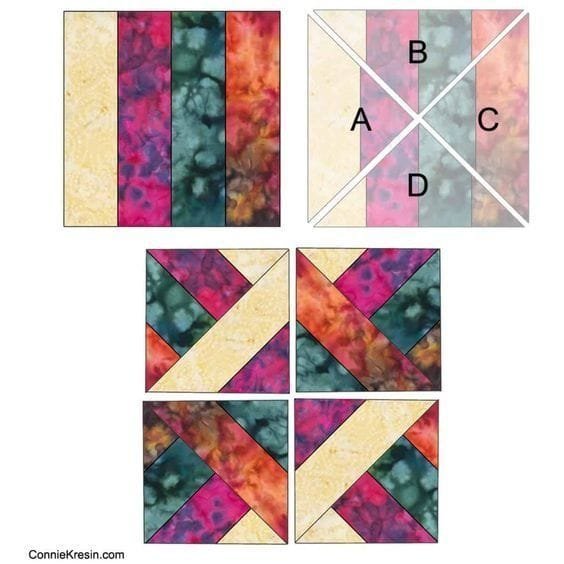
The Hidden Wells Quilt Pattern typically begins with strip sets sewn together in a specific color order. These strip sets are then cut into squares, rotated, and reassembled in a manner that creates a kaleidoscopic effect. This method allows for endless design variations depending on fabric choices and the direction of the cuts.
This pattern works wonderfully with vibrant, contrasting fabrics as well as with more subtle, tonal prints. You can tailor your color scheme to evoke specific moods—bright and playful, soft and calming, or bold and dramatic. Each version of the Hidden Wells Quilt becomes a unique expression of the quilter’s vision.
What makes this pattern especially appealing is its accessibility. Despite its complex appearance, the actual sewing process involves straightforward piecing techniques. Once you understand the cutting and reassembling sequence, the rest flows naturally. This makes it an excellent confidence-builder for those wanting to improve their quilting skills.
Another perk is the efficient use of fabric. There’s minimal waste involved when constructing a Hidden Wells Quilt Pattern, which makes it a great choice for those working from their fabric stash. You don’t need specialty tools or templates—just your rotary cutter, mat, ruler, and imagination.
Quilters also enjoy how forgiving this pattern is. Even with minor misalignments or unintentional fabric shifts, the overall design remains impressive. The visual movement and layered effect distract the eye from small imperfections, making it a stress-free project.
And let’s not forget the satisfaction of the final reveal. Watching the pattern emerge from what starts as a humble set of strips is deeply rewarding. It’s a design that celebrates the process as much as the product.
Choosing Fabrics for Maximum Impact
One of the most exciting parts of working with the Hidden Wells Quilt Pattern is selecting your fabrics. The right combination can bring the quilt to life and amplify the pattern’s illusion of depth and motion. The key is contrast—both in color and value.
Consider using a combination of lights, mediums, and darks. This dynamic range helps emphasize the crisscrossing pathways that give the pattern its distinctive “wells.” High-contrast fabrics create bold visual statements, while low-contrast selections can produce a more subtle, watercolor-like effect.
Fabric prints also play a role in the final look. While solids and tone-on-tone fabrics offer a cleaner, more modern result, bold prints can add energy and personality to the design. Just be careful not to choose prints that are too busy, as they may disrupt the overall pattern.
Don’t be afraid to experiment with unexpected color pairings. The Hidden Wells Quilt Pattern is forgiving and often benefits from playful or unconventional choices. You can also use seasonal or themed fabrics to create quilts tailored for holidays or special occasions.
For a more controlled design, you might consider planning your layout in advance using digital tools or colored pencils. Mapping out your fabric placement before cutting can help ensure a balanced and harmonious composition. However, many quilters enjoy the spontaneous approach and allow the design to unfold naturally.
Scrap fabrics work surprisingly well with this pattern too. If you have leftover strips from previous projects, this is a wonderful way to give them new life. The variety in prints and tones often adds to the quilt’s charm and complexity.
Above all, trust your instincts and personal style. Whether your taste leans toward vintage florals or modern minimalism, your Hidden Wells Quilt will reflect your unique voice as a maker.
Piecing and Cutting Techniques
Once your fabric strips are selected and sewn together, the next step in the Hidden Wells Quilt Pattern involves precise cutting and strategic placement. This is where the magic really begins. The key is maintaining accuracy with your rotary cutting to ensure the final blocks fit together seamlessly.
The typical construction process begins with sewing together strip sets—usually four to six fabrics wide. These sets are then pressed, typically with seams in one direction to reduce bulk, and cut into equal squares. Each square is then rotated in a predefined sequence to build the final layout.
Rotating the blocks is what creates the mesmerizing “woven” look that defines the Hidden Wells Quilt Pattern. Depending on the rotation method, the visual outcome can shift dramatically, which adds to the excitement and creative flexibility of this design.
It’s helpful to keep each block laid out and labeled as you work, especially if you’re aiming for symmetry or a specific flow. A design wall or even a large floor space can be useful for arranging the blocks before sewing them together.
When assembling the quilt top, use consistent seam allowances—usually ¼ inch—and press your seams thoughtfully. Some quilters prefer pressing seams open for a flatter quilt, while others press to the side for added strength. Both methods work well with this pattern.
If you’re adding borders, choose fabrics that enhance the central design rather than compete with it. A narrow inner border in a strong color followed by a wider, more neutral outer border can help frame the quilt beautifully.
With careful piecing and attention to alignment, your final product will look impressively intricate, even if the steps were relatively simple. That’s the joy of this pattern—elegance made accessible.
Quilting and Finishing Touches
Quilting the finished top of a Hidden Wells Quilt Pattern can elevate your work from beautiful to breathtaking. Because the pieced design already contains strong visual movement, your quilting choices should either enhance or soften the effect, depending on your desired outcome.
Free-motion quilting works well with this pattern. Swirls, feathers, or echo lines can add texture without overwhelming the design. Alternatively, straight-line quilting can reinforce the geometric structure and add a crisp, modern edge.
If you’re a beginner, don’t worry about elaborate quilting patterns. Even simple stitch-in-the-ditch or crosshatch quilting will complement the Hidden Wells Quilt Pattern beautifully. The piecing does much of the visual work already.
Choosing the right batting is also important. A low-loft cotton or bamboo batting provides a flatter look, while high-loft polyester can make the quilt more puffy and textured. Consider how the quilt will be used—displayed, gifted, or cuddled under—and choose accordingly.
Binding the quilt is your final opportunity to make a statement. A bold binding can add contrast and frame the quilt effectively, while a subtle binding allows the central design to remain the focus. You can also add a label with your name, date, and title for a personalized finish.
Blocking and squaring your quilt before binding ensures that the final product lies flat and looks professional. Take time to trim any uneven edges and press the quilt well before completing the final steps.
Whether you hand-quilt or machine-quilt your piece, the process of finishing your Hidden Wells Quilt Pattern is incredibly satisfying. It’s the last step in a creative journey that begins with strips and ends with art.
FAQ: Hidden Wells Quilt Pattern
What is the Hidden Wells Quilt Pattern?
It’s a strip-based quilt design that creates a woven or dimensional effect through block rotation and color placement. Despite its intricate look, it’s beginner-friendly.
Can beginners try the Hidden Wells Quilt Pattern?
Yes, this pattern is great for beginners! It uses basic strip piecing techniques and doesn’t require complex shapes or templates.
How much fabric do I need for a Hidden Wells Quilt?
It depends on the quilt size, but typically you’ll need multiple strips of 2.5” fabric, often referred to as “jelly rolls” or self-cut strips from yardage.
Do I need a specific fabric type?
No, but 100% cotton quilting fabric works best. Choose a mix of solids and small prints for best results.
Can I use scraps for this quilt?
Absolutely! Scrap strips can create a beautiful, eclectic effect, making this a great stash-busting project.
What’s the best quilting method for this pattern?
Straight-line quilting or free-motion quilting both work well. The pieced design is the star, so your quilting should enhance rather than overpower it.
Conclusion
The Hidden Wells Quilt Pattern is more than just a technique—it’s a rewarding experience that turns simple fabric strips into a visually stunning masterpiece. Through thoughtful fabric selection, careful piecing, and personal touches in quilting, you can create a one-of-a-kind project that reflects your creativity and skill.

