If you’re searching for a project that’s both hilarious and heartwarming, the Crochet Bathroom Gnome with Plunger Pattern is exactly what you need. This quirky and adorable creation brings a bit of humor into an often-overlooked space—the bathroom. Whether you’re a seasoned crocheter or just getting started, this pattern is a delightful way to combine fun and functionality in your next handmade décor piece.
The Bathroom Gnome with Plunger is more than just a novelty; it’s a fantastic conversation starter that adds personality to your home. Many crafters find joy in creating unique bathroom decorations, and this gnome—with his floppy hat, fluffy beard, and trusty little plunger—is one of the most original ideas to bring yarn to life. It’s the kind of thing that makes guests smile and kids giggle, while also allowing you to practice new techniques and stitches in a playful way.
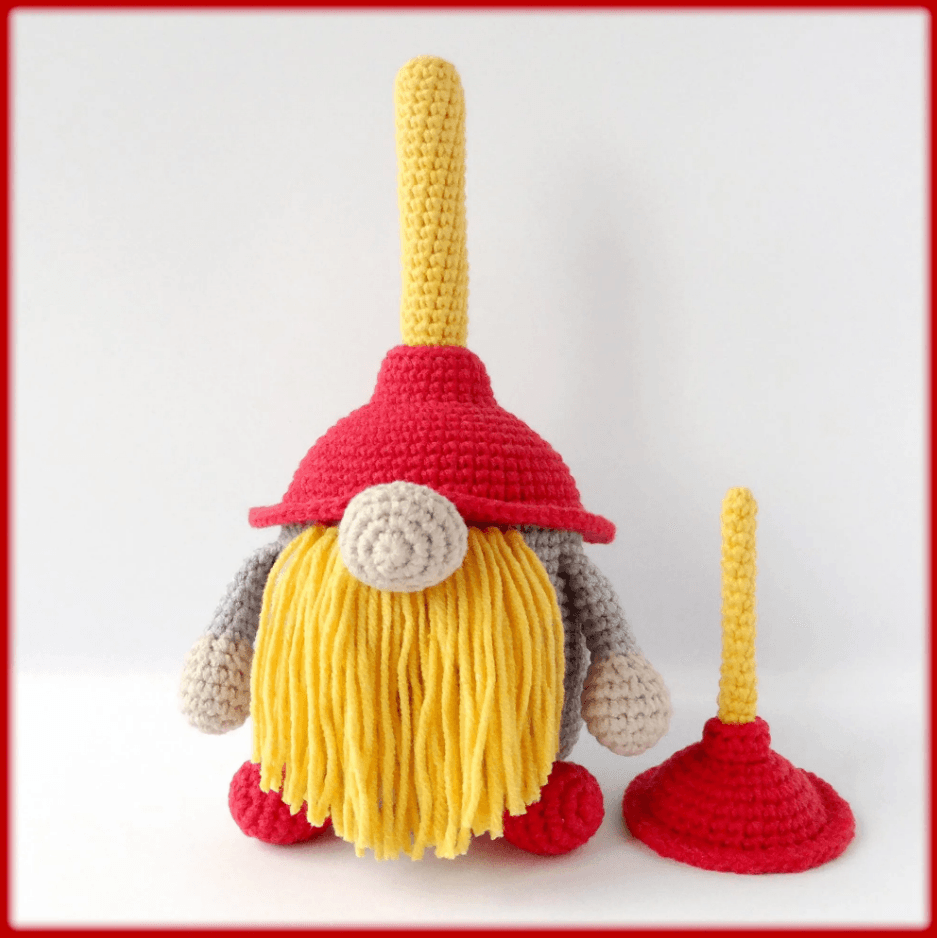
From crafting the hat to assembling the plunger, this Crochet Bathroom Gnome with Plunger Pattern is filled with charming details that make the final product unforgettable. Plus, it’s a great stash-busting project, letting you use up leftover yarn in creative ways. Whether it sits on the toilet tank, a shelf, or even guards the sink, this little guy is ready to serve—cute, handy, and just a little cheeky.
Getting Started with the Crochet Bathroom Gnome with Plunger Pattern
Before diving into stitches and shaping, gather your materials. Most Crochet Bathroom Gnome with Plunger Patterns require basic supplies you likely already have at home. This includes worsted weight yarn in several colors (like beige, brown, red, white, or gray), a 4mm or 5mm crochet hook, stuffing, and optional safety eyes or buttons. For the plunger, you’ll use a small wooden dowel or a rolled-up bit of felt.
Make sure to keep your tension consistent while working, as the body and hat of the gnome are usually formed in continuous rounds. You’ll start from the base and work your way up. Many patterns begin with a magic ring and then expand outward, gradually shaping the base of the gnome.
Next, the body is worked in spirals. You’ll shape it using increases and decreases to create that classic gnome silhouette. Most creators prefer to stuff the body as they go, especially after completing about two-thirds of the shape. Don’t overstuff—just enough to give it shape and stability.
The nose and beard are crucial features for your Bathroom Gnome with Plunger. The nose can be a simple crocheted ball, and the beard is often created using loops, fringe, or brushed-out yarn. This is where you can get creative—make it long and flowing, or keep it neat and short.
When you start the hat, you’ll usually work from the tip down, increasing to give it that droopy gnome-hat curve. The hat is what gives the gnome his personality, so feel free to add embellishments like stripes or even tiny flowers or leaves for a whimsical touch.
The plunger is often attached last. Use stiff felt or foam for the cup and a small stick or dowel for the handle. Secure it in the gnome’s hand or beside him as a prop. This little detail is what turns a standard gnome into a hilarious Bathroom Gnome with Plunger, so have fun with it.
Creative Customizations for Your Bathroom Gnome with Plunger
Once you’ve got the basic Crochet Bathroom Gnome with Plunger Pattern down, it’s time to think outside the box. The beauty of crochet is how adaptable it is, and your gnome can reflect any personality or theme you dream up.
For example, use pastel colors for a soft, cottagecore vibe, or bold primary colors for something that pops. Seasonal gnomes are also popular—think a Santa-style gnome with a red hat for the holidays or a floral beard for spring.
Want your Bathroom Gnome with Plunger to match your home’s color scheme? No problem! Choose yarns that complement your bathroom tile, walls, or shower curtain. A monochromatic gnome in white and gray can look surprisingly elegant.
Some crafters love adding accessories to their gnomes. Consider a little soap bottle, a toothbrush, or even a roll of crocheted toilet paper to go with the plunger. These fun extras can be made in miniature and add a big personality boost.
You can also personalize your gnome with embroidered initials or a crocheted name tag. This is a great idea if you’re making the gnome as a gift—add the recipient’s name and a fun message like “Plunger Patrol on Duty!”
If you’re into mixed media, try combining yarn with other materials. A felted beard, plastic button eyes, or even beads and ribbons on the hat can add extra charm and variety to your Crochet Bathroom Gnome with Plunger Pattern.
And of course, don’t be afraid to create a whole gnome family. You can have one holding a brush, another with a mini towel, and a third guarding the toilet paper. The possibilities are endless when you mix humor with creativity.
Displaying and Gifting the Bathroom Gnome with Plunger
Once you’ve finished your gnome, it’s time to show him off! Whether you’re decorating your own home or giving it as a gift, there are plenty of ways to make your Bathroom Gnome with Plunger shine.
Place your gnome in a visible yet safe spot. The top of the toilet tank is classic, but you could also use a corner shelf, windowsill, or even the edge of the bathtub (as long as he stays dry!). If you have multiple gnomes, group them together for a fun little “bathroom brigade.”
For added charm, set up a mini scene around your gnome. A tiny rubber duck, a crochet bath mat, or a fake soap bubble effect can make the scene even cuter. These visual stories make your gnome not just décor, but an artistic setup.
If gifting your Bathroom Gnome with Plunger, wrap him in tissue paper and place him in a decorative box. Add a little tag that says something like “At your service!” or “For emergency plunging only.” It’s sure to get a laugh and plenty of appreciation.
Homemade crochet items always feel more personal. When you gift a bathroom gnome, you’re not just handing over yarn—you’re giving time, thought, and creativity. It’s especially perfect for housewarmings, bridal showers, or just-because gifts.
You can also bring your gnome to the office bathroom or craft fair booth. People love clever and funny displays, and a gnome with a plunger definitely gets attention. Just be prepared to get lots of requests to make more!
Whether you keep it or give it away, your Crochet Bathroom Gnome with Plunger Pattern masterpiece is guaranteed to bring a smile. And isn’t that what crafting is all about?
Tips for Beginners Using the Crochet Bathroom Gnome with Plunger Pattern
If you’re new to crochet, don’t worry—the Crochet Bathroom Gnome with Plunger Pattern is a great project to learn as you go. It’s forgiving, modular, and most importantly, fun. Here are a few tips to help beginners succeed.
Start with a simple version of the pattern. Skip any extra details like facial features or accessories until you’re comfortable with the basic body, nose, beard, and hat. Once that’s solid, move on to the plunger and embellishments.
Use stitch markers to help keep track of rounds, especially when working in spirals. This helps avoid losing your place and keeps the shape consistent. It also helps reduce frustration and makes your work look cleaner.
When choosing yarn, go for something soft and sturdy—acrylic is a popular choice because it holds shape well and is easy to wash. For stuffing, polyester fiberfill is perfect. Make sure to stuff gently and evenly to avoid lumpy spots.
Don’t stress over perfection. Gnomes are whimsical and a little wonky by nature, so if your stitches aren’t perfect or your beard is a bit wild, it only adds to the charm. Embrace those quirks!
Take breaks when needed. Projects like these can be detailed and involve a lot of small pieces. Step away when you feel tired, and come back with fresh eyes—it makes a big difference.
And finally, enjoy the process. The Bathroom Gnome with Plunger isn’t just a craft—it’s a creative journey filled with laughs, learning, and maybe a few “oops” moments. That’s the magic of handmade creations.
FAQ: Crochet Bathroom Gnome with Plunger Pattern
What skill level is required to make a bathroom gnome with plunger?
Most patterns are suitable for beginners to intermediates. Basic crochet skills such as single crochet, increases, and decreases are usually enough.
How long does it take to complete the gnome?
Depending on your speed and the level of detail, the project can take anywhere from 4 to 10 hours in total.
Can I wash the gnome?
Yes, but it’s recommended to hand wash and air dry, especially if you’ve used safety eyes, felt, or other delicate accessories.
What yarn is best for this project?
Worsted weight acrylic yarn is a great choice due to its durability and wide color selection.
Do I have to include the plunger?
Not at all! The plunger adds a fun twist, but you can skip it or replace it with another bathroom item like a brush or towel.
Is this a good gift idea?
Absolutely. It’s handmade, humorous, and one-of-a-kind—perfect for housewarmings, birthdays, or anyone who enjoys quirky décor.
Can I sell gnomes I make using this pattern?
That depends on the pattern creator’s permissions. Always check whether the pattern allows selling finished items.
How do I make the beard fluffy?
You can brush out the yarn with a pet slicker brush or use loop stitches and trim them for a fuzzy effect.
What kind of plunger should I use?
Crochet one or use felt and a small stick. Just ensure it’s lightweight so it doesn’t pull your gnome over.
Where should I place my bathroom gnome?
Anywhere dry and visible—on a shelf, toilet tank, or even in a bathroom-themed basket!
Conclusion
Creating your very own Crochet Bathroom Gnome with Plunger Pattern is more than just a weekend project—it’s a joyful, humorous, and surprisingly satisfying experience. From the pointy hat to the silly little plunger, every stitch is packed with personality.