The Chandelier Quilt Pattern is a timeless and elegant quilting design that continues to captivate both beginner and experienced quilters. Recognized for its cascading diamond shapes and balanced symmetry, this pattern brings a sophisticated touch to any quilting project. Whether you’re designing a cozy throw, a decorative wall hanging, or a full-sized bed quilt, the Chandelier Quilt is a versatile and rewarding option.
From its eye-catching layout to the way it can showcase a range of fabrics, the Chandelier Quilt Pattern is an excellent choice for those looking to create a modern heirloom. Its simplicity in structure, combined with the striking visual impact, has made it a favorite among quilting communities around the world. If you’re seeking a design that’s both easy to follow and beautiful to display, this might just be the perfect pattern for you.
In this article, we’ll explore the ins and outs of the Chandelier Quilt, from its origins and structure to fabric selection, color coordination, and sewing techniques. You’ll also find tips to optimize your results and troubleshoot common issues, all while staying within Google AdSense’s content policies. Let’s dive into the glowing charm of the Chandelier Quilt Pattern.
Understanding the Chandelier Quilt Structure
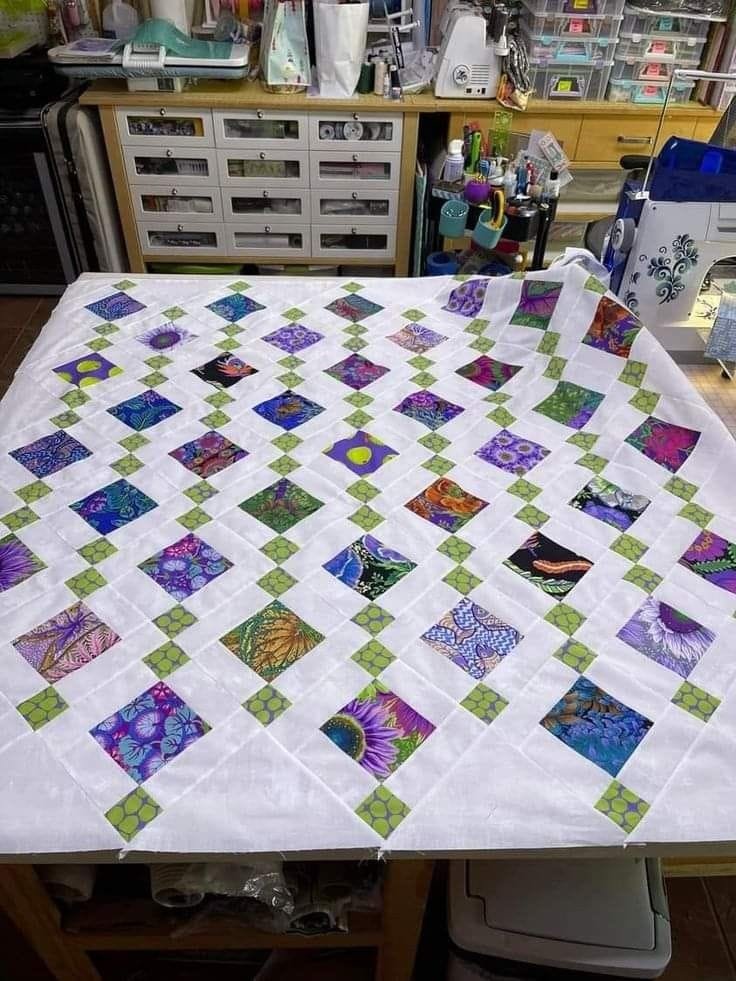
At its core, the Chandelier Quilt Pattern is made up of repeated diamond or square-in-diamond blocks, arranged to mimic the drop and sparkle of a real chandelier. This signature layout creates a cascading visual flow, which is both rhythmic and soothing.
Each block in the Chandelier Quilt typically consists of one main print fabric, often a floral or bold geometric, paired with a neutral or low-volume background. This combination enhances the “dangling jewel” effect that gives the quilt its name and character.
When arranged correctly, the quilt’s design appears to shimmer, much like light reflecting through a chandelier’s crystal prisms. This makes fabric placement a key element of the process and one of the more artistic decisions you’ll make during construction.
Another standout feature of the Chandelier Quilt Pattern is its adaptability to different sizes and color schemes. You can easily scale the pattern up or down depending on your desired finished size, making it ideal for everything from table runners to king-size bedspreads.
The straightforward block construction also makes it beginner-friendly, while still offering opportunities for experienced quilters to experiment with color gradients, ombré effects, or fussy cutting for added detail.
Ultimately, the Chandelier Quilt Pattern provides a rewarding balance of structure and creativity. Whether you choose traditional tones or a bright, modern palette, the result is always striking.
Choosing Fabrics and Colors
When starting a Chandelier Quilt, fabric choice is one of the most exciting and essential steps. Because this pattern highlights both background and feature fabrics, you’ll want to select prints and solids that contrast well with one another.
Start by choosing your focal fabrics—these will be the “gems” of your chandelier. Look for prints that stand out but aren’t too busy, such as florals, polka dots, or subtle geometric patterns. A coordinated color scheme will help maintain harmony throughout the quilt.
Next, consider your background fabric. Solid white, ivory, or soft gray are popular choices because they allow the chandelier shapes to pop. However, don’t shy away from using darker or colored backgrounds for a dramatic effect.
Fabric quality is also important. Since the Chandelier Quilt Pattern features clean lines and precise cuts, using quilting cottons with minimal stretch will help maintain shape and reduce fraying.
Pre-washing your fabric is always a good idea to avoid shrinkage after quilting. It can also help soften the fabric slightly, making it easier to handle during piecing.
You may also want to incorporate a few accent fabrics—perhaps metallics or textured solids—to enhance the visual “sparkle” of the quilt. Think of it like adding extra crystals to a chandelier.
Lastly, lay out your fabrics before cutting. Viewing how the prints interact in natural light can help you make final decisions about placement and balance.
Cutting and Piecing Techniques
Precision is key when working with the Chandelier Quilt Pattern, especially during the cutting and piecing stages. Accurate measurements and consistent seam allowances will ensure your blocks align perfectly and your quilt top lies flat.
Start by organizing your fabric into labeled stacks for each block. Many quilters find it helpful to cut all pieces at once before beginning to piece. Use a rotary cutter, acrylic ruler, and cutting mat to achieve clean, even edges.
Each block usually consists of one central square (your focal fabric), surrounded by two or more contrasting triangles or rectangles. Depending on the variation you choose, there might be cornerstones or half-square triangles involved.
When piecing your blocks, maintain a consistent 1/4-inch seam allowance. This is standard for quilting and will help all your blocks come together smoothly during final assembly.
Use pins or clips to keep edges aligned, especially when working with longer seams or bias edges that may stretch. Press each seam flat or open, depending on your preference, and use an iron to set your seams as you go.
Chain piecing is a great time-saving method for this pattern. It involves sewing multiple units in a continuous sequence without cutting the thread between them—ideal for quilts with repetitive block structures like the Chandelier Quilt.
After piecing your blocks, lay them out on a design wall or large flat surface to check the overall balance and alignment. Rearranging blocks at this stage can help fine-tune the finished design.
Quilting and Finishing Touches
Once your quilt top is complete, it’s time to quilt and bind. The quilting stage brings your Chandelier Quilt Pattern to life, adding texture and depth to your already beautiful design.
Choose a batting that complements your project’s purpose. For bed quilts, a soft and warm cotton batting is ideal. For wall hangings or lighter throws, a polyester or blended batting may offer the loft and structure you need.
When it comes to quilting, you can go as simple or intricate as you like. Straight-line quilting, echo quilting around each block, or free-motion swirls are all popular options that enhance the chandelier effect without distracting from it.
Marking your quilting lines beforehand can help you stay on track, especially if you’re working with a domestic sewing machine. Use chalk, washable pens, or other quilting-friendly marking tools.
Binding your quilt is the final step. Choose a binding fabric that frames the design nicely—either a solid that matches your background or a bold print that coordinates with your focal fabrics.
Before binding, trim all edges and square up the corners. A walking foot or quilting clips can help you attach the binding evenly and securely.
After finishing, don’t forget to label your quilt. Whether you gift it, sell it, or keep it for yourself, adding your name and the date makes it extra special and personal.
FAQ – Chandelier Quilt Pattern
What is a Chandelier Quilt?
A Chandelier Quilt is a type of quilt that features a cascading layout of blocks resembling the dangling elements of a chandelier. It uses contrast between focal and background fabrics to create visual interest.
Is the Chandelier Quilt Pattern suitable for beginners?
Yes, it’s very beginner-friendly due to its repetitive block structure and straightforward piecing. However, attention to cutting accuracy and consistent seam allowances is important.
What size should my blocks be?
Block sizes can vary depending on the pattern or tutorial you follow, but common sizes include 6-inch or 9-inch finished blocks. You can adjust the scale based on your quilt’s final dimensions.
Do I need special fabric for this quilt?
No special fabric is required. Standard quilting cottons work well, though you can enhance the design with accent prints or metallic fabrics for added shimmer.
How long does it take to make a Chandelier Quilt?
Time varies depending on size, experience level, and whether you’re hand or machine sewing. A lap-size quilt might take a few weekends, while a full bed quilt could take several weeks.
Can I machine quilt the Chandelier Quilt?
Absolutely! Many quilters machine quilt this pattern using straight-line or free-motion techniques. A walking foot or darning foot is helpful for smooth quilting.
Conclusion
The Chandelier Quilt Pattern offers a beautiful blend of elegance and simplicity that appeals to quilters of all skill levels. From choosing fabrics and cutting precise pieces to piecing and quilting the final masterpiece, each step provides an opportunity to create something uniquely yours. Its adaptable design, beginner-friendly construction, and stunning visual impact make it a standout in the quilting world.

