If you’re on the hunt for something cozy, playful, and practical, the Cow Slippers Pattern might just be the perfect project. Whether you’re crafting for yourself, a friend, or a little one who loves barnyard animals, these handmade slippers add a delightful touch of charm and warmth to your daily routine. In this article, we’ll guide you through everything you need to know about creating your very own cow-themed slippers — from the basics to customization ideas.
What makes the Cow Slippers Pattern so popular is its blend of comfort and creativity. You’re not just crocheting or sewing a pair of slippers — you’re bringing a little personality into your project. These slippers often feature cute cow ears, embroidered eyes, and even tiny horns. The pattern has grown in popularity among crafters of all levels due to its fun nature and adorable results.
If you’re looking for a project that balances functionality and fun, this is it. You don’t need to be an expert to try the Cow Slippers Pattern, and it’s an ideal way to use leftover yarn or scrap fabric. Plus, it makes for an excellent gift idea — handmade items like these always stand out and are cherished.
What You Need to Start Your Cow Slippers Pattern
Before diving into your Cow Slippers Pattern, it’s essential to gather the right materials. Depending on whether you’re crocheting, knitting, or sewing them, your materials may differ slightly. Most commonly, crocheted cow slippers require medium-weight yarn, a matching hook size, a yarn needle, stuffing for certain features, and optional non-slip soles.
Choose yarn colors that match the look you’re going for — traditional black and white for a Holstein-style cow or perhaps brown and cream for something warmer. You’ll also want some pink for the nose and ears to give your slippers that extra cute factor. Soft and washable yarn is best, especially for slippers that will see regular use.
If you’re sewing your slippers, fleece or felt are great options. They’re soft, cozy, and easy to work with. You’ll need a basic slipper template, black and white fabric, and decorative items like buttons or felt cutouts for the facial features of your cow design.
Plan your sizing in advance. The Cow Slippers Pattern can usually be scaled up or down easily by adjusting your stitch count or enlarging your template. Keep your recipient in mind — are these slippers for kids or adults? A good pattern will provide multiple size options or at least tips for resizing.
Don’t forget the soles. Adding a non-slip bottom is a good idea, especially for hardwood or tile floors. You can buy ready-made slipper soles or create your own using puff paint or silicone. This is especially important for safety if the slippers are meant for children or elderly users.
Lastly, organize your tools. Keep scissors, stitch markers, glue (if using embellishments), and stuffing on hand. Having everything ready before you start ensures a smooth crafting experience without unnecessary interruptions.
Crafting the Cow Face: Bringing Character to Life
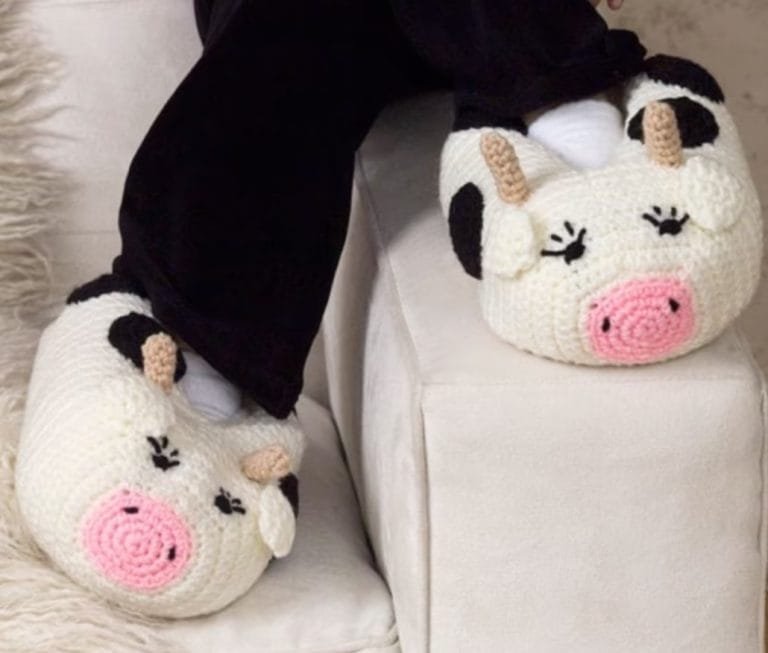
The standout feature of the Cow Slippers Pattern is undoubtedly the cow’s face. It’s what gives the slippers their adorable charm and makes them a conversation piece. The face usually includes wide-set eyes, a snout, ears, and tiny horns — all of which can be made from yarn, fabric, or felt depending on your approach.
Start by attaching the snout piece. This is often an oval shape stitched in a contrasting color, usually pink or tan. It sits at the toe of the slipper and sets the base for the rest of the face. Use tight stitches to secure it, and if you’re crocheting, a slight stuffing can help it pop out a bit.
Next come the eyes. Some crafters use safety eyes for a clean, professional look, while others prefer embroidered or felt eyes for a softer finish. Positioning is key — too close together and the cow looks squished; too far apart and it may look off-balance. Play around before final stitching to find the most appealing placement.
The ears can be sewn or crocheted separately and then stitched onto the sides. These should be slightly floppy, giving that endearing, cuddly appearance. If you want to add dimension, consider using a double-layer technique — with a pink inner ear and white outer ear for added realism.
Tiny horns add a cute but subtle touch to your Cow Slippers Pattern. You can roll up small bits of felt or crochet tight little cones to stitch on top of the slipper, right between the ears. They don’t need to be big — just enough to suggest a baby cow or cartoon-style design.
To make your slippers even more expressive, consider adding blush spots or little nostrils with embroidery thread or puff paint. These small details bring your cow’s personality to life and give your project a handcrafted charm.
Remember, crafting the cow face is where you can really let your creativity shine. You can go as realistic or cartoonish as you like, depending on who the slippers are for and your personal taste.
Adjusting the Pattern for Different Ages and Sizes
One of the biggest perks of working with a flexible Cow Slippers Pattern is the ability to customize it for anyone. Whether you’re making a baby shower gift or a cozy pair for grandpa, you can adjust the sizing with a few easy tricks.
For babies and toddlers, soft yarn and stretchy stitches are ideal. Stick to lightweight materials and ensure the soles are soft yet sturdy. Avoid using buttons or small parts that could pose a choking hazard. Instead, opt for embroidered features to keep the design safe and secure.
For kids, let them pick their favorite colors! A cow doesn’t have to be black and white. Pink cows, blue spots, or even rainbow horns can make the project more fun and personalized. Involving children in the color selection can get them excited about wearing handmade items.
Adults usually prefer a more neutral or classic look, but that doesn’t mean you have to go boring. A warm brown or beige slipper with minimal features can still give off the cow aesthetic without being too playful. For adult sizing, focus on adding extra cushioning and making the sole more durable.
To scale your Cow Slippers Pattern, most patterns allow for easy stitch count modifications. You can add or remove rows or increase the width based on foot length. Templates for fabric slippers can be enlarged using a printer or drawn freehand using measurements.
If you’re making multiple pairs, consider creating a master template or saving your pattern changes. This will save time on future projects and ensure consistency in your results.
Finally, make sure each pair is tailored for comfort. The fit should be snug but not tight, with enough space at the toe and a secure heel. A good fit is what turns cute slippers into daily favorites.
Custom Touches and Finishing Ideas
Once your basic Cow Slippers Pattern is complete, you can start thinking about the finishing touches that make your slippers uniquely yours. These little additions are where personality and creativity really come into play.
Add a name tag or initials to personalize the slippers. Embroider the wearer’s name on the inside cuff or use a small patch. This is especially helpful for families where multiple people might have similar slippers lying around.
Think about seasonal variations. Add a Santa hat during Christmas or pastel colors for spring. You can even create themed versions — a cow unicorn hybrid, anyone? These ideas are perfect if you’re selling your creations or giving them as holiday gifts.
Use different textures of yarn or fabric for contrast. Faux fur, velvet, or textured yarn can make certain features like ears or snouts stand out. Mixing materials adds a layer of interest and gives your slippers a luxurious feel.
Another idea is to add sound elements — a small bell stitched inside the ear or a squeaker in the toe can make them extra fun for kids. Just be mindful of safety and make sure everything is securely fastened.
Consider packaging. If you’re gifting or selling your cow slippers, a cute farm-themed tag or reusable fabric bag adds charm. Presentation makes a big difference in how your work is received and appreciated.
And don’t forget to test them out. Walk around your home with your finished slippers to ensure comfort, fit, and durability. This final check helps guarantee that they’ll be loved and worn — not just admired.
FAQ: Cow Slippers Pattern
What skill level is needed to make cow slippers?
Most Cow Slippers Pattern designs are beginner-friendly or intermediate. If you know basic stitches and techniques, you’ll do great.
Can I machine wash the finished slippers?
Yes, if you use machine-washable yarn or fabric. Always check the label and consider using a delicate bag when washing.
How long does it take to complete a pair?
On average, about 4–6 hours for a crochet pair, depending on complexity and your experience level.
Are cow slippers suitable for all seasons?
They’re best for cooler months, but lighter materials can make them comfortable year-round indoors.
Can I sell slippers made with this pattern?
Yes, if the pattern allows it. Always check if the designer offers a commercial license or allows handmade sales.
What sizes does the pattern cover?
Many patterns provide instructions for multiple sizes, from toddlers to adults. You can also adjust the size manually using measurements.
Conclusion
The Cow Slippers Pattern is more than just a cozy footwear project — it’s an invitation to add a touch of whimsy and comfort to your everyday life. With its adorable features and customizable options, it’s no wonder this pattern continues to capture the hearts of crafters around the world.
We’ve explored the materials needed, how to craft the signature cow face, ways to adapt for all ages, and creative ideas for personalization. Whether you’re making a gift or a pair for yourself, the Cow Slippers Pattern offers both fun and function.

