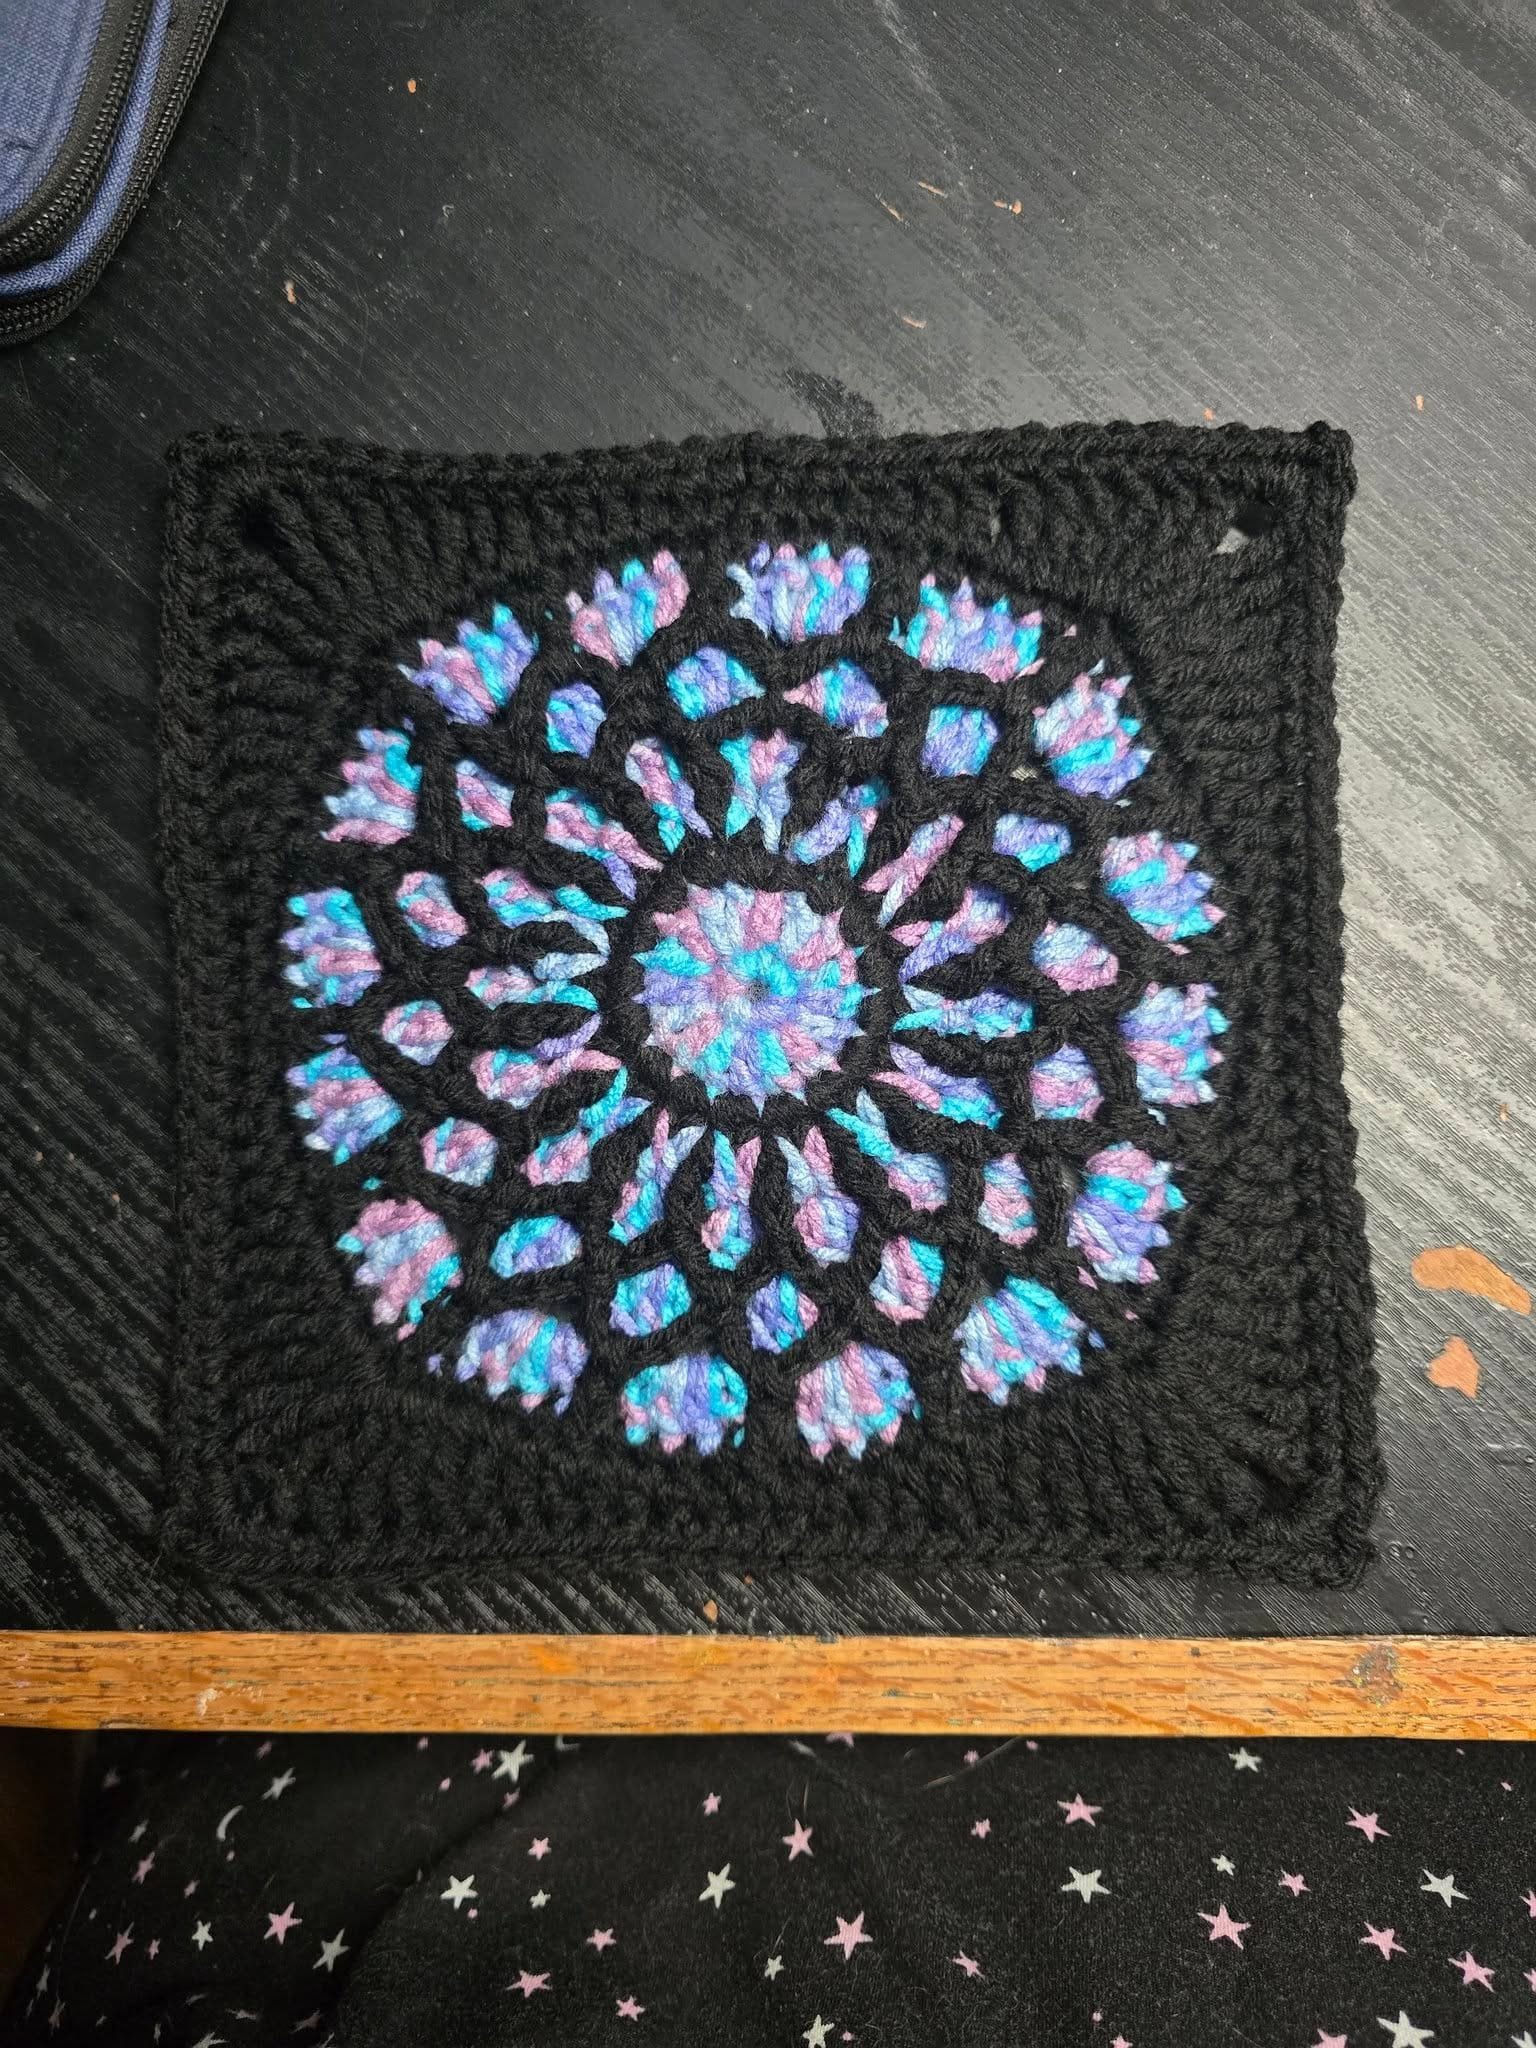
The Crochet Stained Glass Granny Square Pattern is a stunning blend of classic crochet and vibrant color design, mimicking the look of stained glass windows. This pattern has become increasingly popular among crochet lovers because of its unique visual appeal and versatility. Whether you are crafting a decorative blanket, a cushion cover, or a beautiful wall hanging, this pattern offers endless creative opportunities.
What makes the Crochet Stained Glass Granny Square so special is the bold outlines created by using black yarn that contrast beautifully against bright and colorful inner motifs. The result resembles the intricate beauty of stained glass artwork, and the technique is surprisingly beginner-friendly. You don’t need to be an advanced crocheter to achieve professional-looking results.
In this article, we’ll explore how to create the Crochet Stained Glass Granny Square Pattern, what materials you’ll need, creative ideas to use it, and why it has become a favorite in the crochet community. If you’re looking to add something eye-catching and meaningful to your handmade collection, this is the perfect place to begin.
Understanding the Basics of the Crochet Stained Glass Granny Square
The foundation of the Crochet Stained Glass Granny Square is based on traditional granny square construction. However, the stained glass effect is achieved through a clever use of color blocking and black outlines. This gives the appearance of colored glass bordered by leading lines, just like in real stained glass.
To create this effect, crocheters typically use bright, bold colors for the interior shapes and outline them using black yarn. The outlines are often made using surface slip stitches or back post crochet techniques. These techniques may sound advanced, but they can be mastered with a bit of practice and patience.
One of the key elements in achieving a successful Crochet Stained Glass Granny Square Pattern is the selection of yarn. Using high-contrast shades ensures that the design pops. Cotton or acrylic yarns work well, and it’s best to use yarns of the same weight for consistency. The black outline yarn should have the same texture and thickness to create a cohesive look.
The pattern usually starts from the center and works outward in rounds. Each round introduces a new color or shape, which is then later outlined. The structure follows a rhythm that becomes intuitive after a few squares, making it ideal for working in batches.
You don’t need any special tools beyond your standard crochet hook, yarn needle, and scissors. Blocking the squares after completion helps them lay flat and enhances the final visual effect. It’s also important to maintain even tension so the outlines remain crisp and clean.
Beginners often find joy in experimenting with this pattern because it combines the satisfaction of color play with the elegance of traditional crochet techniques. Once you make a few squares, you’ll find endless ways to use them in creative projects.
How to Crochet the Stained Glass Effect
Creating the stained glass effect in your Crochet Stained Glass Granny Square starts with color selection. Choose four to five bright colors that contrast well with black. Think about combinations like blue, yellow, red, and green — bold choices that mimic real stained glass windows.
Begin by crocheting your inner motif with a selected color. This could be a flower, a starburst, or even abstract geometric shapes. Once the motif is complete, switch to black yarn and create the border using either surface crochet or post stitches.
Surface slip stitching involves crocheting on the top surface of your square. It adds a raised outline that emphasizes the design. This method requires precision, but it’s what gives the Crochet Stained Glass Granny Square Pattern its dimensional beauty.
Another method is to use the back post double crochet to raise the black outline around certain stitches. This approach keeps the black stitching integrated into the structure and is less bulky than surface crochet.
After completing one outlined square, you can continue making more using different inner color combinations. This allows each square to stand on its own while still matching the overall design theme. Many crocheters enjoy laying out the squares in different arrangements before joining them to see which layout looks best.
Joining your squares is the final step. Most crafters prefer to use black yarn to connect the squares, maintaining the stained glass illusion. You can use whip stitch or single crochet to join the edges — just keep it clean and consistent.
Once everything is joined, block your finished piece once again. This step makes a huge difference, especially when the squares have been handled a lot. Your final project will have a polished, professional finish.
Creative Uses for the Crochet Stained Glass Granny Square
The Crochet Stained Glass Granny Square Pattern is incredibly versatile. You can use it to create items ranging from wearable art to home decor. One of the most popular uses is in making afghans and throws. The bright and dark contrast gives your couch or bed a striking focal point.
Another idea is to make wall art. Frame a series of stained glass squares in a shadowbox and hang it in your craft room or living space. It’s a unique, handmade piece that reflects both creativity and craftsmanship.
Pillow covers are another great way to showcase the Crochet Stained Glass Granny Square. By combining four or nine squares, you can create an eye-catching front panel for a pillow. Pair it with a solid fabric back and a zipper or buttons for functionality.
For those who love fashion, try incorporating the stained glass squares into wearable items. They can be joined to make a statement vest, a funky scarf, or even a stylish tote bag. These pieces always get compliments and spark conversation.
You can also downscale the pattern to create smaller items like pot holders, coasters, or bookmarks. These are ideal as gifts and can be made in less than an hour. Adding a loop or edging in metallic yarn can make them even more special.
Lastly, think about making a full-size blanket with alternating stained glass squares and solid black or white squares. The contrast and rhythm can make the piece look like a modern art installation, but it’s entirely handmade.
Tips for Mastering the Crochet Stained Glass Granny Square Pattern
Consistency is key when working on the Crochet Stained Glass Granny Square Pattern. Try to maintain the same tension throughout the square, especially when switching between colored yarns and black yarn. Uneven tension can distort the outlines and diminish the stained glass effect.
Use stitch markers to help you identify starting points, especially when doing surface slip stitching. These small tools can prevent mistakes and make your work more efficient.
Always count your stitches. Because the pattern builds outwards, a missed or added stitch can throw off the entire design. Take your time, especially when working on the border outlines.
Keep your yarn ends tidy. With multiple color changes, you’ll have a lot of tails to weave in. Doing this as you go will save time and avoid a messy finish.
Experiment with different motifs in the center. While flowers and stars are popular, geometric patterns and even freeform shapes can give your Crochet Stained Glass Granny Square a personal touch. Be bold in your creativity.
Lastly, don’t be afraid to block aggressively. Blocking helps your square take shape and ensures that your outlines sit flat and even. It’s the final polish your artwork deserves.
FAQ: Frequently Asked Questions
What yarn is best for the Crochet Stained Glass Granny Square Pattern?
Worsted weight cotton or acrylic yarns work best. Choose bright colors for the interior and a solid black for the outlines.
Is this pattern beginner-friendly?
Yes, especially for those familiar with basic granny square construction. The stained glass effect may require some practice, but it’s manageable.
Can I use other colors besides black for the outline?
You can, but black creates the strongest stained glass illusion. Dark navy or charcoal are alternatives that still give good contrast.
Do I need special tools to make this pattern?
No, just your usual crochet hook, yarn needle, and scissors. Stitch markers can be helpful, and a blocking board is recommended.
How do I join the squares together?
Use a whip stitch or single crochet in black yarn. This keeps the stained glass effect consistent throughout your project.
What are the most common mistakes to avoid?
Uneven tension, skipping stitches, and not blocking your work. Take your time and double-check each round.
Conclusion
The Crochet Stained Glass Granny Square Pattern is more than just a crochet technique — it’s a visual experience that transforms yarn into art. With its bold contrasts and captivating colorwork, it offers both beginners and experienced crocheters a rewarding project with endless creative possibilities.
From blankets to wall art, pillows to fashion pieces, this pattern adds a unique flair wherever it’s used. By mastering the stitches and color combinations, you can create truly show-stopping crochet works.
We hope this guide helped you understand and appreciate the magic of the Crochet Stained Glass Granny Square Pattern. If you’ve made something beautiful using this technique, we’d love to hear from you. Leave a sincere comment sharing your thoughts, challenges, and creative suggestions!

