The 3D Tumbling Quilt Blocks Pattern is one of the most visually captivating designs in the quilting world. With its clever use of color, contrast, and geometry, this pattern creates an optical illusion that gives the impression of cubes tumbling across the quilt surface. Whether you’re a beginner looking to challenge your skills or an experienced quilter wanting to add drama to your next piece, mastering this pattern can be a highly rewarding experience.
What sets the 3D Tumbling Quilt Blocks Pattern apart from other block styles is its illusion of depth. By strategically placing light, medium, and dark fabrics in each block, quilters can simulate three-dimensional shapes that appear to leap off the quilt top. This visual trick is not only impressive but also gives the quilt a dynamic, modern edge—perfect for both decorative and functional quilting projects.
In this comprehensive guide, we’ll explore everything you need to know to create your own 3D Tumbling Quilt Blocks Pattern masterpiece. From understanding the basic layout and choosing fabrics to piecing your blocks and finishing your quilt, we’ll break down each step in detail. Along the way, we’ll also provide expert tips to enhance your design and improve the illusion effect.
Understanding the Geometry Behind the Design
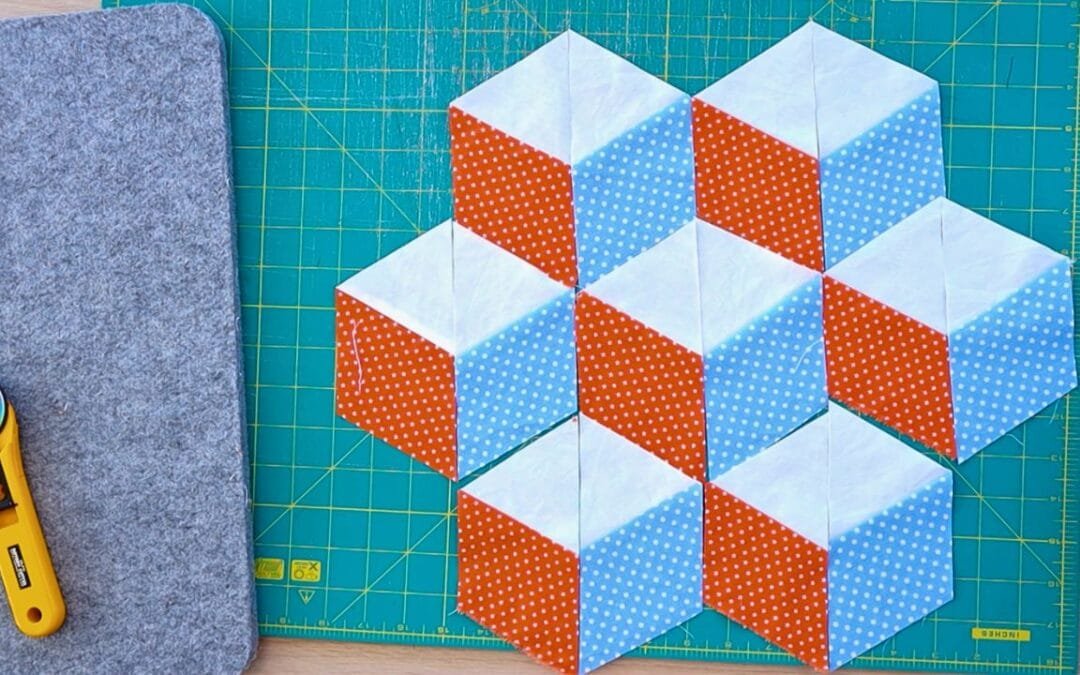
At the heart of the 3D Tumbling Quilt Blocks Pattern is a simple hexagonal block that mimics a cube when constructed with the right color placement. Each block is made up of three rhombus shapes, which are sewn together to form a hexagon. These rhombuses represent the three visible sides of a cube: the light, medium, and dark sides.
When placed together, the blocks create a tessellated design, making it look like a stack of cubes. This layout is not random—the orientation of each cube must be deliberate to maintain the overall 3D effect across the quilt top.
To enhance the illusion, contrast is key. Using sharply contrasting fabrics helps emphasize the cube’s edges and gives the illusion of depth. Tone-on-tone prints or solid fabrics are often ideal choices because they keep the focus on the geometry rather than distracting with busy patterns.
Measuring and cutting accurately is critical in this pattern. Even slight deviations in angle or size can throw off the alignment, breaking the illusion and causing frustration later in assembly. Precision cutting tools like a 60-degree ruler are extremely helpful for cutting rhombus shapes consistently.
As you become more familiar with the geometry of the pattern, you can begin to experiment with variations. Some quilters play with shadow effects or even alter the block orientation to simulate falling or stacked cubes. These advanced adaptations allow for even more creativity while still staying true to the core concept of the 3D Tumbling Quilt Blocks Pattern.
Ultimately, understanding the basic structure is the first major step toward mastering this mesmerizing quilt design. With a solid foundation in geometry and color theory, the rest of the process becomes much more approachable and enjoyable.
Choosing the Right Fabrics and Colors
Color selection plays a vital role in the 3D Tumbling Quilt Blocks Pattern, as the three-dimensional effect relies entirely on how light, medium, and dark values interact. Without proper value contrast, the illusion simply won’t work.
Start by picking three distinct fabric tones from the same color family—for example, light gray, medium gray, and charcoal. This maintains color harmony while still delivering the required contrast. Alternatively, for a more vibrant look, try using three tones of blue, red, or even bold prints, as long as the values are clearly distinguishable.
When auditioning fabrics, lay them side by side and take a photo in black and white. This helps strip away color bias and allows you to clearly see the differences in value. If two fabrics blend too closely, choose another to ensure the cube edges remain defined.
Texture also plays a subtle role. While prints can add interest, they should not compete with the block’s lines. Small-scale prints, batiks, or tone-on-tone patterns usually work best. Avoid large florals or busy motifs, as these can break up the visual continuity and weaken the 3D effect.
Many quilters choose to use pre-cut fabric bundles like fat quarters or jelly rolls. These can be convenient if the bundle includes value gradation, but be mindful—bundles are often curated by color, not by contrast. Always double-check values before committing to a set.
Planning your layout is also important. You may opt for a repeating color sequence or a random arrangement. Repeating sequences create a more orderly, architectural look, while random placements can give the quilt a fun, dynamic appearance—almost like cubes are tumbling in chaos.
As a final tip, remember that lighting can affect how fabrics appear in your workspace. Natural daylight gives the truest sense of color and value, so choose your fabrics in good light to make the best decisions for your 3D Tumbling Quilt Blocks Pattern.
Piecing the Blocks with Precision
Constructing the 3D Tumbling Quilt Blocks Pattern begins with piecing together the rhombuses that form each cube. Each rhombus must be cut with precision using a 60-degree angle, and accurate seam allowances are critical for perfect alignment.
To begin, cut your fabric into strips wide enough for your desired cube size. Use a 60-degree ruler or template to cut rhombuses from each strip. Cut equal numbers of light, medium, and dark rhombuses to maintain balance in your design.
When sewing the rhombuses, always press the seams carefully and consistently. Pressing toward the dark side can help reduce visible seam lines and maintain a crisp block appearance. Using pins or clips can also help keep edges aligned during sewing.
After the three rhombuses are joined into a hexagon, you may need to trim the block slightly to square it up, depending on your technique. Consistent sizing across all blocks is essential to ensure a smooth quilt top assembly.
Next, arrange your hexagon blocks on a design wall or flat surface before sewing them together. This step is crucial to visualize the overall effect and make adjustments to the layout or color flow before committing to the final structure.
As you sew the blocks into rows and then join the rows, take care with the angles. Set-in seams (or Y-seams) may be required depending on the layout. While they may seem intimidating at first, slow stitching and proper pinning make them manageable even for intermediate quilters.
Keep in mind that the illusion will only work if your seams align well and the angles remain sharp. Take your time during this step and don’t rush—precision will pay off in the end, making your 3D Tumbling Quilt Blocks Pattern quilt a true visual masterpiece.
Finishing the Quilt and Showcasing the Design
Once the quilt top is assembled, the finishing touches will enhance your 3D Tumbling Quilt Blocks Pattern and bring it to life. Start with a batting and backing fabric that won’t overshadow your design—solid colors or subtle textures work best.
For the quilting itself, consider whether to echo the block shapes or use an all-over design. Echo quilting around each cube side can dramatically reinforce the 3D illusion, adding depth and shadow. Alternatively, simple straight-line quilting can keep the focus on the piecing.
Thread color should be chosen with care. Using a thread that blends into the top fabrics helps keep the emphasis on the block shapes. Contrasting threads can be effective but may distract from the optical effect.
Binding should also complement the quilt. A neutral binding gives a clean finish, while a darker binding can frame the design, enhancing the tumbling effect. Scalloped or specialty edges can be beautiful but are best avoided for geometric quilts like this where straight lines dominate the aesthetic.
Label your quilt with the name of the pattern, your name, and date of completion. This adds a personal touch and helps preserve your work for future generations. Many quilters also enjoy sharing their quilts in shows, online groups, or gifting them to loved ones.
Finally, photograph your finished 3D Tumbling Quilt Blocks Pattern quilt in good lighting to capture the illusion. Whether displayed on a bed, wall, or folded over a chair, your quilt will stand out as a testament to your craftsmanship and creativity.
FAQ: 3D Tumbling Quilt Blocks Pattern
What is the best fabric type for this pattern?
Quilters often prefer cotton quilting fabric due to its stability, ease of use, and wide variety of colors and prints. Tone-on-tone and solids are ideal for achieving the 3D effect.
Do I need a special ruler to cut the blocks?
While it’s possible to use a standard ruler with angle markings, a 60-degree triangle or rhombus ruler makes the process faster and more accurate, especially for beginners.
Can beginners try the 3D Tumbling Quilt Blocks Pattern?
Yes, beginners can absolutely attempt this pattern, especially if they start with a small project like a pillow or table runner before progressing to a full quilt.
Is it necessary to use three different colors?
You must use three distinct values—light, medium, and dark—to create the 3D effect. These can be different tones of the same color or entirely different hues, depending on your desired style.
How do I avoid misaligned seams in the hexagons?
Accurate cutting, consistent seam allowances, and careful pressing are key. Using pins and slowing down at the sewing machine will help improve alignment.
What’s the best quilting method for this pattern?
Echo quilting around the cube shapes works beautifully to highlight the design. However, straight-line quilting also maintains the modern feel of the pattern.
Conclusion
The 3D Tumbling Quilt Blocks Pattern is more than just a quilting technique—it’s a work of visual art. From selecting the perfect fabrics to executing flawless geometry, each step contributes to a quilt that feels alive with dimension and motion. Whether you’re creating a modern statement piece or exploring optical illusions in your quilting journey, this pattern offers a rewarding and impressive result.
We hope this guide has inspired and equipped you to take on your own 3D quilt project. If you’ve already tried this pattern or plan to start soon, we’d love to hear from you. Share your thoughts, ideas, and suggestions—your feedback helps us create even better content for fellow quilters like you.

