If you’re passionate about crochet and looking for a fun, nostalgic project, the Amigurumi Ninja Turtles Pattern is the perfect choice. This creative pattern combines the art of amigurumi with the charm of the beloved Ninja Turtles, making it a favorite among crafters of all levels. In this article, we’ll explore everything you need to know about creating your own Amigurumi Ninja Turtles Pattern, from the materials needed to essential tips for achieving the best results.
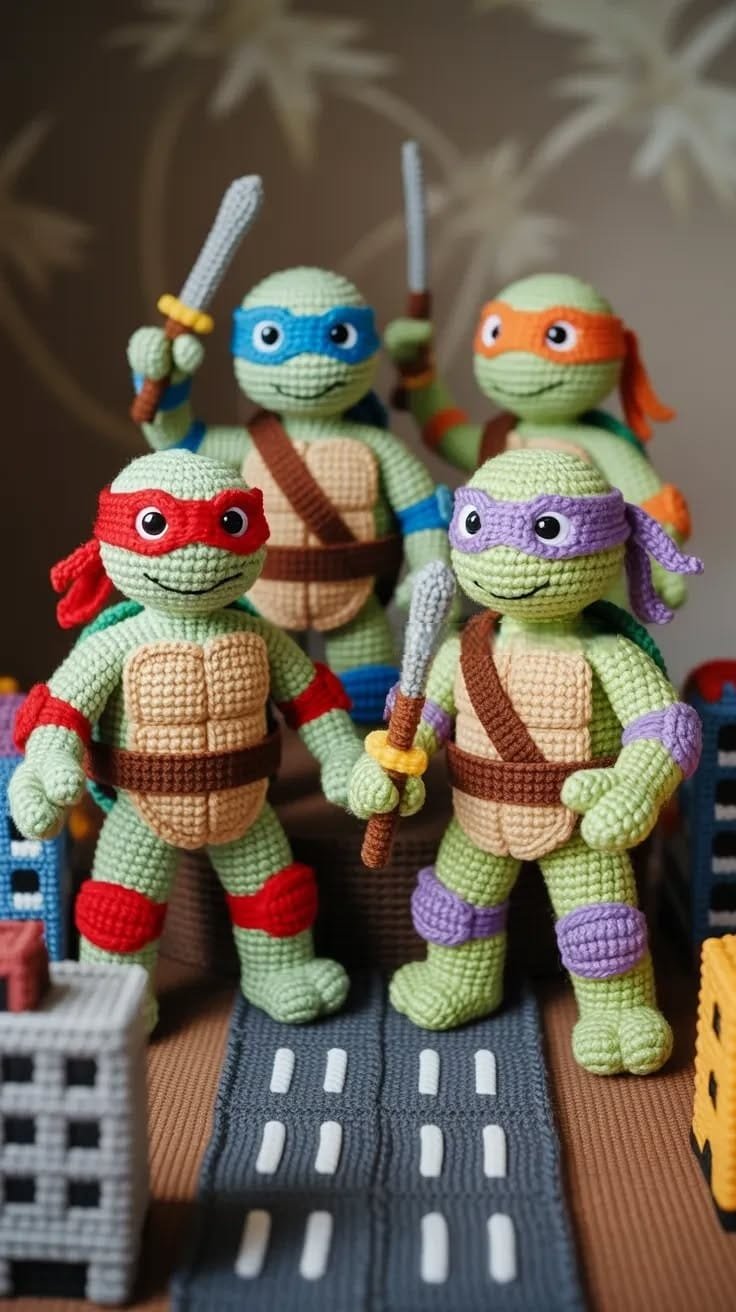
The Amigurumi Ninja Turtles Pattern allows crochet fans to bring to life the iconic characters of Leonardo, Michelangelo, Donatello, and Raphael. Whether you are creating these figures for yourself, as a gift, or for sale, this pattern offers a rewarding and enjoyable experience. The process involves careful stitching, color work, and a bit of creativity to make each turtle unique and full of personality.
With the growing popularity of handmade crafts, the Amigurumi Ninja Turtles Pattern has become a sought-after project. Many crochet lovers appreciate how this pattern challenges their skills while offering endless customization options. In the sections below, we’ll dive deeper into how to start, what you’ll need, and how to make your Ninja Turtles truly stand out.
Choosing the Right Materials for Your Amigurumi Ninja Turtles Pattern
SEE MORE PATTERNS
When starting your Amigurumi Ninja Turtles Pattern, selecting the right materials is crucial for success. The quality of your yarn will have a significant impact on the final appearance of your turtles. It’s recommended to use 100% cotton yarn for its durability and smooth finish, which helps highlight the detailed stitches that define amigurumi projects.
In addition to the yarn, you’ll need crochet hooks that match your yarn’s weight. A smaller hook size is typically preferred for amigurumi, as it helps create tight stitches that keep the stuffing securely inside your turtle figures. Pay attention to your tension, as consistent stitching ensures that your Ninja Turtles look polished and uniform.
Safety eyes or embroidered features are an essential part of bringing your Amigurumi Ninja Turtles Pattern to life. While safety eyes give your turtles a classic, toy-like appearance, embroidery offers a softer, more child-friendly option. Choose according to the age group you are crafting for and the style you want to achieve.
Stuffing is another key element of your Amigurumi Ninja Turtles Pattern. Polyester fiberfill is widely used because it is lightweight, washable, and easy to work with. Make sure to stuff evenly and firmly to give your turtles a sturdy, balanced shape.
A tapestry needle will be necessary for sewing the different parts of your Ninja Turtles together. From attaching limbs to securing accessories like belts or weapons, having the right needle makes assembly easier and cleaner. Consider investing in a high-quality needle that can handle thicker yarn without bending.
Finally, don’t forget to gather accessories such as felt, buttons, or embroidery thread for the small details that make each turtle unique. These finishing touches truly elevate your Amigurumi Ninja Turtles Pattern and give your figures personality and charm.
Essential Techniques for the Amigurumi Ninja Turtles Pattern
Mastering a few key techniques will make working on your Amigurumi Ninja Turtles Pattern much more enjoyable. The magic ring is the foundation of most amigurumi projects. It allows you to start crocheting in the round with a closed center, preventing gaps in your stitches and giving your turtles a professional look.
Single crochet stitches are the most commonly used stitch in amigurumi. When working your Amigurumi Ninja Turtles Pattern, focus on keeping your stitches tight and even. This ensures that your finished turtles hold their shape well and that no stuffing shows through the fabric.
Increasing and decreasing stitches are vital for shaping your Ninja Turtles. Increases help build out parts like the head and body, while decreases taper areas like the arms and legs. Practice these techniques on a small swatch before starting your main project to gain confidence.
Color changes are another important part of the Amigurumi Ninja Turtles Pattern, as each turtle has distinct bandanas and accessories. To achieve clean color transitions, switch yarn colors at the final pull-through of a stitch. This method helps avoid visible seams and keeps your work neat.
Joining parts seamlessly is a skill that takes practice but makes a big difference in your final result. When assembling your Ninja Turtles, pin the pieces in place before sewing to ensure proper alignment. This extra step helps avoid crooked arms or uneven heads.
Lastly, weaving in ends securely is essential for durability, especially if your amigurumi will be handled frequently. Use your tapestry needle to hide yarn tails inside the work, minimizing the risk of unraveling and keeping your Amigurumi Ninja Turtles Pattern looking neat.
Customization Ideas for Your Amigurumi Ninja Turtles Pattern
One of the best things about the Amigurumi Ninja Turtles Pattern is how customizable it is. You can choose from various shades of green for the turtles’ bodies, giving each character a slightly different look or sticking to a uniform shade for a cohesive set.
The bandanas and belts offer another opportunity for personalization. While the classic red, orange, blue, and purple are traditional, feel free to experiment with other colors or even patterns to create a fun twist on the original Ninja Turtles. This is a great way to make your turtles stand out.
Consider adding small accessories like tiny weapons, pizza slices, or skateboards to your Amigurumi Ninja Turtles Pattern. These elements add character and charm, making your figures even more appealing. They also make great props for photos or displays.
You can also play with the size of your amigurumi turtles. By adjusting the yarn weight and hook size, you can create miniature turtles perfect for keychains or larger plush versions for cuddling. This flexibility makes the Amigurumi Ninja Turtles Pattern suitable for many purposes.
Adding facial expressions or unique eye shapes is another way to make your turtles distinct. From mischievous grins to serious warrior looks, small changes in the placement of eyes or mouth embroidery can change the entire feel of your turtle.
Finally, consider creating themed sets based on different versions of the Ninja Turtles. Whether inspired by the original comics, the 1980s cartoon, or modern adaptations, the Amigurumi Ninja Turtles Pattern allows you to capture the essence of each era in yarn form.
Tips for Finishing and Displaying Your Amigurumi Ninja Turtles Pattern
Finishing your Amigurumi Ninja Turtles Pattern carefully ensures that your hard work pays off. Start by checking for loose ends or uneven stuffing, and make any necessary adjustments before assembling your turtles. Taking the time to tidy up small details will give your project a professional finish.
When sewing parts together, use matching yarn colors whenever possible. This helps hide the stitches and gives your Ninja Turtles a seamless look. It’s these small considerations that elevate your Amigurumi Ninja Turtles Pattern from good to great.
Blocking isn’t always necessary for amigurumi, but if your turtles have flattened areas or misshapen parts, gentle steam blocking can help. Be cautious with heat and always test on a scrap piece first to avoid damaging your work.
For display, consider creating small dioramas or scenes for your Amigurumi Ninja Turtles Pattern. Adding a background or themed base enhances the presentation and makes your figures even more engaging. This is especially fun if you plan to photograph or gift your creations.
If you’re selling or gifting your turtles, packaging them thoughtfully makes a big difference. Use tissue paper, boxes, or bags that complement the theme, and include a tag describing your handmade process. People appreciate the extra care that goes into handcrafted items.
Lastly, always store your finished amigurumi turtles in a dry, clean space. Protect them from dust and sunlight to preserve the vibrant colors and soft texture of your Amigurumi Ninja Turtles Pattern for years to come.
FAQ about Amigurumi Ninja Turtles Pattern
What is the best yarn for the Amigurumi Ninja Turtles Pattern?
The best yarn is 100% cotton or a cotton blend, as it holds shape well and shows off stitches beautifully.
Can beginners try the Amigurumi Ninja Turtles Pattern?
Yes, the pattern is beginner-friendly, especially if you are familiar with basic amigurumi techniques like single crochet and the magic ring.
How long does it take to complete an Amigurumi Ninja Turtle?
Depending on your skill level and time availability, each turtle can take anywhere from a few hours to several days.
Is it safe to give the amigurumi turtles to young children?
Yes, as long as you use child-safe materials like embroidered eyes instead of plastic safety eyes, your Amigurumi Ninja Turtles Pattern will be suitable for children.
Can I sell items made from the Amigurumi Ninja Turtles Pattern?
Many crafters sell finished products made from this pattern, but it’s important to respect copyright guidelines related to the Ninja Turtles brand.
What size are the finished turtles?
The size depends on your yarn and hook choice, but typically, amigurumi turtles measure between 5 to 8 inches tall.
Conclusion
Creating your own Amigurumi Ninja Turtles Pattern is a fun and rewarding project for crochet enthusiasts of all levels. From selecting the right materials to adding personal touches, this pattern offers endless possibilities for creativity. We explored essential techniques, customization ideas, and tips for finishing and displaying your turtles to help you achieve the best results.
free PATTERN here
I hope this guide has inspired you to try the Amigurumi Ninja Turtles Pattern and bring these beloved characters to life in yarn form. If you enjoyed this article or have suggestions for future topics, please leave your sincere opinion and share your ideas. Happy crocheting!