Decorating your home with Creative Crochet Photo Frame Ideas: Stylish DIY Projects for Your Home is a great way to add a personal touch to your living space.
These handmade frames not only showcase your favorite memories but also serve as unique decorative pieces.
Whether you are an experienced crocheter or a beginner looking for a fun project, creating crochet photo frames can be a rewarding and enjoyable craft.
One of the best things about crochet photo frames is their versatility. You can customize them in various colors, patterns, and sizes to match your home decor.
Additionally, they make wonderful handmade gifts for friends and family. By using different crochet techniques and materials, you can create truly stunning and stylish pieces.
If you’re searching for inspiration to start your crochet photo frame project, this guide will provide you with creative ideas and step-by-step instructions. Get ready to enhance your home with these charming DIY crafts!
1. Choosing the Right Materials for Crochet Photo Frames
When starting with Creative Crochet Photo Frame Ideas, selecting the right materials is crucial for achieving the best results.
- Yarn Selection: Choose high-quality yarn that is durable and flexible. Cotton yarn works well for sturdy frames, while acrylic yarn adds a softer touch.
- Frame Base: You can crochet around existing photo frames or create a standalone frame using a cardboard base.
- Crochet Hooks: The hook size depends on your yarn choice. A smaller hook provides a tighter stitch, while a larger hook results in a looser, more textured appearance.
- Embellishments: Add beads, buttons, or ribbons to personalize your crochet frames and make them stand out.
- Glue or Stitching: Secure your crochet pieces onto the frame using fabric glue or by sewing them together.
- Color Combinations: Experiment with different shades to match your home decor or create a contrast for a bold statement.
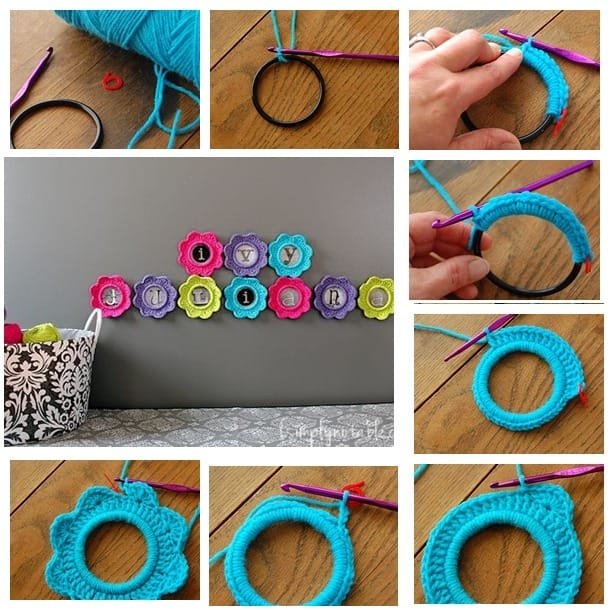
2. Step-by-Step Guide to Creating a Basic Crochet Photo Frame
Now that you have your materials ready, let’s dive into the process of making a simple yet stylish crochet photo frame.
- Step 1: Create the Base: Start by crocheting a rectangular or circular shape that fits your chosen photo dimensions.
- Step 2: Add a Border: Use decorative crochet stitches such as picot or scallop edging to enhance the frame’s appearance.
- Step 3: Make an Opening: Leave a space in the center where the photo will be placed, ensuring the edges are neatly finished.
- Step 4: Secure the Backing: Attach a backing fabric or a stiff cardboard cutout to hold the photo in place.
- Step 5: Add a Hanging Loop: If you want to hang your frame, crochet a small loop at the top for easy display.
- Step 6: Final Touches: Attach embellishments like pearls, lace, or embroidery to give your frame a unique flair.
3. Creative Crochet Photo Frame Designs to Try
There are countless ways to style your crochet photo frames, depending on your aesthetic preference and skill level.
- Vintage Lace Frame: Use fine lace-like crochet patterns for an elegant and classic look.
- Floral-Inspired Frame: Crochet flower appliqués and attach them around the frame’s border.
- Rainbow Stripes Frame: Use vibrant yarn colors in striped patterns for a fun, playful design.
- Boho-Chic Macramé Frame: Combine crochet with macramé knots for a trendy bohemian style.
- Minimalist Monochrome Frame: Stick to a single color palette for a modern and sophisticated touch.
- Holiday-Themed Frames: Create seasonal frames for Christmas, Halloween, or Valentine’s Day, incorporating themed embellishments.
4. Tips for Displaying and Gifting Crochet Photo Frames
Once you’ve created your beautiful crochet photo frames, it’s time to showcase them or give them as meaningful gifts.
- Wall Gallery: Arrange multiple frames on a wall to create an eye-catching gallery.
- Tabletop Display: Use small easels or stands to prop up frames on shelves and tables.
- Gift Packaging: Wrap your handmade frame in decorative paper and add a heartfelt note.
- Themed Gift Sets: Pair a crochet photo frame with a matching crochet item, such as a doily or pillow cover.
- Personalized Messages: Embroider the recipient’s name or initials onto the frame for a customized touch.
- Lighting Effects: Place LED fairy lights around your frames for a warm, cozy ambiance.
FAQ: Frequently Asked Questions About Crochet Photo Frames
1. What type of yarn is best for crochet photo frames?
Cotton yarn is ideal for durability, while acrylic yarn offers a softer texture. Choose yarn based on the desired stiffness and aesthetic of your frame.
2. How do I attach the crochet frame to an actual photo?
You can use fabric glue, sew it onto a backing fabric, or create a pocket-like structure to slide the photo in place.
3. Can I make crochet photo frames without an existing frame?
Yes, you can crochet an entire frame structure using a sturdy base, such as thick yarn or reinforced stitches.
4. What crochet stitches work best for frames?
Basic stitches like single crochet and double crochet provide a clean look, while decorative stitches such as bobble, shell, or picot add texture.
5. Are crochet photo frames suitable for beginners?
Absolutely! Start with simple patterns and gradually experiment with decorative elements as you gain confidence.
Join our VIP broadcast list and gain access to exclusive patterns, all for free. As a VIP member, you’ll receive the best patterns daily, delivered directly to your device. ✨📱 It’s a unique opportunity to stay up-to-date with the latest trends and designs, curated just for you. Don’t miss out on enhancing your projects and discovering new inspirations with the best patterns every day! 🎨🔝
Conclusion
Creative Crochet Photo Frame Ideas: Stylish DIY Projects for Your Home offer a fantastic way to showcase cherished memories while adding handmade charm to your decor.
With endless customization options, these crochet projects can be as simple or intricate as you like. Whether you are making them for yourself or as heartfelt gifts, these frames are sure to impress.
Have you tried making your own crochet photo frame? Share your experience and let us know your favorite design ideas in the comments below!

