Creating the Amigurumi Cute Butterfly – Free Pattern is a delightful project for crochet enthusiasts of all skill levels.
This adorable design is perfect for adding a touch of whimsy to any space, whether as a decorative piece, a thoughtful gift, or a playful toy.
With its charming details and easy-to-follow instructions, this pattern has quickly become a favorite among the amigurumi community.
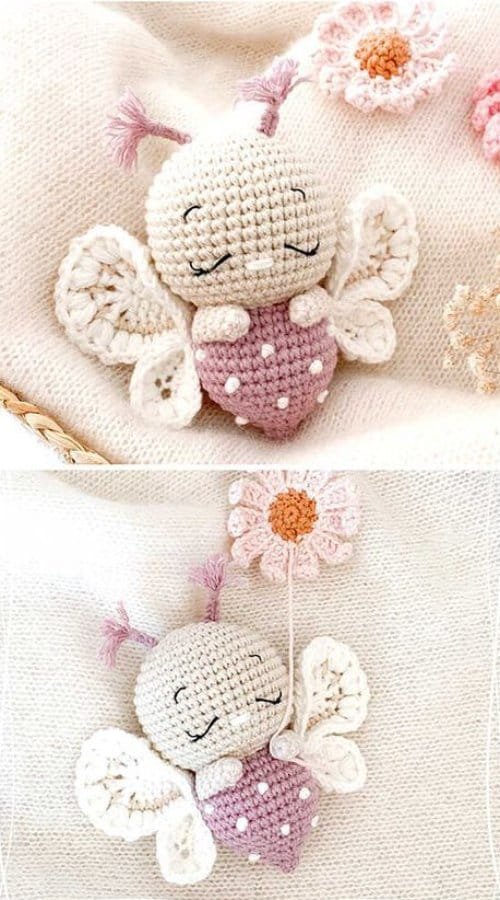
The beauty of the Amigurumi Cute Butterfly lies in its versatility. You can customize its colors, size, and details to suit your preferences or match a specific theme.
Whether you’re crafting a vibrant butterfly to celebrate spring or a pastel one for a baby shower, the possibilities are endless.
Plus, the free pattern makes it accessible for anyone ready to embark on a fun and creative journey.
This guide will walk you through the steps to create your own Amigurumi Cute Butterfly – Free Pattern, offer tips for customization, and answer common questions to ensure your project turns out beautifully.
1. Materials and Tools for the Amigurumi Cute Butterfly
Before starting your Amigurumi Cute Butterfly – Free Pattern, gather the following materials and tools:
- Yarn
Select a soft, high-quality yarn in at least three colors: one for the body, one for the wings, and an accent color for detailing. - Crochet Hook
Use a hook size appropriate for your yarn to achieve tight, even stitches. - Stuffing
Polyester fiberfill is ideal for giving the butterfly its plush, three-dimensional shape. - Stitch Markers
These are essential for keeping track of your rounds and ensuring accuracy. - Safety Eyes or Embroidery Thread
Safety eyes add a cute touch, but embroidery thread works well for creating eyes and facial features. - Scissors and Tapestry Needle
These are necessary for cutting yarn and weaving in loose ends.
2. Step-by-Step Instructions for Crafting the Butterfly
The Amigurumi Cute Butterfly – Free Pattern is constructed in sections. Here’s how to bring your butterfly to life:
- Create the Body
Start by crocheting the butterfly’s body in rounds. Use a magic circle to begin, and gradually increase stitches to shape the head and torso. - Crochet the Wings
The wings are made separately and attached later. Use your secondary colors to crochet two upper and two lower wings, adding subtle details to enhance their beauty. - Stuff and Shape
Fill the body with stuffing as you go to maintain its shape. Be careful not to overstuff, as this can distort the stitches. - Assemble the Butterfly
Sew the wings onto the body securely, ensuring they are symmetrical. Use your tapestry needle for precision. - Add Facial Features
Attach safety eyes or embroider a cheerful face onto the head. Small details, like rosy cheeks or antennae, can add personality. - Finalize the Project
Weave in all loose ends and give the butterfly a gentle shaping to make it look perfect.
3. Tips for Customizing Your Amigurumi Cute Butterfly
The Amigurumi Cute Butterfly – Free Pattern is highly customizable. Here are some ideas to make it your own:
- Experiment with Colors
Try bold, contrasting colors for a vibrant look or soft pastels for a delicate effect. - Add Patterns
Use different yarn techniques to create stripes, polka dots, or other patterns on the wings. - Incorporate Texture
Choose yarns with unique textures, like velvet or glitter, to add depth and sparkle to your butterfly. - Personalize Details
Add accessories, like tiny bows or flowers, to make your butterfly even more unique. - Vary the Size
Adjust the size of your butterfly by using thicker yarn and a larger hook or finer yarn and a smaller hook. - Make a Set
Create multiple butterflies in different colors to display as a group or gift as a set.
4. Creative Uses for Your Amigurumi Cute Butterfly
Once you’ve completed your Amigurumi Cute Butterfly – Free Pattern, consider these ways to use your creation:
- Decorative Accents
Place your butterfly on a shelf, desk, or window sill to brighten your space. - Nursery Decor
Hang butterflies from the ceiling or use them to adorn a mobile for a baby’s room. - Toys for Kids
Children will love the whimsical charm of these cuddly butterflies. - Gifts
Give handmade butterflies as thoughtful presents for birthdays, baby showers, or holidays. - Keychains or Bag Charms
Attach a small butterfly to a keyring or bag for a unique accessory. - Event Decorations
Use a collection of butterflies to decorate for weddings, parties, or seasonal celebrations.
FAQ
1. Is the Amigurumi Cute Butterfly suitable for beginners?
Yes, this pattern is beginner-friendly with simple shapes and clear instructions.
2. What yarn is best for this project?
Cotton or acrylic yarn works well. Choose a weight that matches your hook size for best results.
3. Can I make the butterfly larger or smaller?
Yes, adjust the hook size and yarn thickness to change the overall size of the butterfly.
4. How long does it take to complete?
Depending on your skill level, the project can take 3-5 hours.
5. Can I sell my finished butterflies?
Yes, you can sell handmade items made from this pattern, but always credit the designer if required.
6. How do I clean my amigurumi butterfly?
Hand wash gently with mild soap and let it air dry to preserve its shape.
Join our VIP broadcast list and gain access to exclusive patterns, all for free. As a VIP member, you’ll receive the best patterns daily, delivered directly to your device. ✨📱 It’s a unique opportunity to stay up-to-date with the latest trends and designs, curated just for you. Don’t miss out on enhancing your projects and discovering new inspirations with the best patterns every day! 🎨🔝
Conclusion
The Amigurumi Cute Butterfly – Free Pattern is a delightful and rewarding project for crochet lovers.
With its charming design and endless customization options, it’s a perfect addition to your crafting repertoire.
Whether you’re making one for yourself or as a gift, the finished butterfly will bring joy and beauty to any setting.
PATTERN HERE
We’d love to hear about your experience with this pattern! Share your thoughts, suggestions, or ideas in the comments below. Happy crocheting!

