Creating an Eight-Point Star Quilt Block – TUTORIAL is a rewarding journey for quilters of all skill levels.
This classic pattern combines elegance and precision, making it a favorite for many quilting projects.
The Eight-Point Star Quilt Block stands out for its timeless design and versatility. You can use it as a focal point or combine it with other blocks for a stunning quilt layout.
With this comprehensive tutorial, you’ll learn the step-by-step process of crafting this beautiful block, ensuring a perfect outcome every time.
Before diving into the tutorial, let’s gather our tools and get inspired. Whether you prefer traditional fabrics or modern prints, the Eight-Point Star Quilt Block offers endless possibilities for creativity.
The Eight-Point Star Quilt Block is admired for its striking symmetry and timeless geometric appeal. Positioned carefully within a quilt layout, this block naturally draws the eye toward its center, creating movement and balance across the entire design. Many quilters appreciate how the sharp angles contrast beautifully with softer background fabrics, allowing the star to stand out clearly. Whether you are using bold solids or delicate prints, thoughtful color placement enhances the illusion of depth and dimension that defines this classic pattern.
When constructing an Eight-Point Star Quilt Block, precision is especially important. Because the design relies on multiple triangular units meeting at a central point, maintaining an accurate ¼-inch seam allowance ensures clean intersections. Careful pressing also plays a key role in achieving crisp lines. Pressing seams open or to one side strategically reduces bulk and helps the block lie flat. Taking extra time to align seams properly before stitching will prevent distortion and keep the star points sharp and symmetrical.
Color contrast is one of the most powerful tools in highlighting the structure of an Eight-Point Star Quilt Block. High contrast between the star points and the background fabric creates a bold, graphic appearance, while subtle tonal differences offer a softer, blended effect. Some quilters enjoy using gradient fabrics within the points to create a dynamic visual flow. Planning the palette in advance allows you to experiment with various combinations before committing to a final layout, ensuring the finished quilt achieves the desired mood and impact.
Another advantage of the Eight-Point Star Quilt Block is its versatility in quilt assembly. The block can be repeated uniformly for a traditional grid layout, or alternated with solid blocks to create breathing space within the design. Sashing strips may be added between blocks to frame each star individually, giving the quilt a more structured appearance. On the other hand, placing blocks edge to edge forms secondary patterns that emerge where points meet, adding unexpected complexity to the overall composition.
As you refine your technique, consider experimenting with scale. Enlarging the Eight-Point Star Quilt Block creates a dramatic focal point suitable for wall hangings or centerpiece quilts, while smaller blocks contribute to intricate patchwork designs. Regardless of size, consistent trimming and squaring of each unit ensures that all blocks fit together seamlessly. By combining careful construction, balanced color selection, and thoughtful layout planning, you can transform this traditional star block into a sophisticated and visually captivating quilt design.
1. Materials Needed for the Eight-Point Star Quilt Block
Before starting, ensure you have all the materials and tools needed to create the Eight-Point Star Quilt Block – TUTORIAL with ease.
- Fabric Selection
Choose three coordinating fabrics: one for the star points, one for the background, and one for the center square. High-contrast fabrics work best to highlight the star’s shape. - Cutting Tools
Use a rotary cutter, quilting ruler, and cutting mat for precise measurements and cuts. - Sewing Machine
A sewing machine with a straight-stitch function is essential for accuracy. - Thread
Pick a thread that complements your fabric colors. Neutral tones are often a safe choice. - Iron and Ironing Board
Pressing is key to achieving crisp seams and a polished look. - Pins or ClipsThese help hold fabric pieces together while sewing.The Eight-Point Star Quilt Block is admired for its striking symmetry and timeless geometric appeal. Positioned carefully within a quilt layout, this block naturally draws the eye toward its center, creating movement and balance across the entire design. Many quilters appreciate how the sharp angles contrast beautifully with softer background fabrics, allowing the star to stand out clearly. Whether you are using bold solids or delicate prints, thoughtful color placement enhances the illusion of depth and dimension that defines this classic pattern.
When constructing an Eight-Point Star Quilt Block, precision is especially important. Because the design relies on multiple triangular units meeting at a central point, maintaining an accurate ¼-inch seam allowance ensures clean intersections. Careful pressing also plays a key role in achieving crisp lines. Pressing seams open or to one side strategically reduces bulk and helps the block lie flat. Taking extra time to align seams properly before stitching will prevent distortion and keep the star points sharp and symmetrical.
Color contrast is one of the most powerful tools in highlighting the structure of an Eight-Point Star Quilt Block. High contrast between the star points and the background fabric creates a bold, graphic appearance, while subtle tonal differences offer a softer, blended effect. Some quilters enjoy using gradient fabrics within the points to create a dynamic visual flow. Planning the palette in advance allows you to experiment with various combinations before committing to a final layout, ensuring the finished quilt achieves the desired mood and impact.
Another advantage of the Eight-Point Star Quilt Block is its versatility in quilt assembly. The block can be repeated uniformly for a traditional grid layout, or alternated with solid blocks to create breathing space within the design. Sashing strips may be added between blocks to frame each star individually, giving the quilt a more structured appearance. On the other hand, placing blocks edge to edge forms secondary patterns that emerge where points meet, adding unexpected complexity to the overall composition.
As you refine your technique, consider experimenting with scale. Enlarging the Eight-Point Star Quilt Block creates a dramatic focal point suitable for wall hangings or centerpiece quilts, while smaller blocks contribute to intricate patchwork designs. Regardless of size, consistent trimming and squaring of each unit ensures that all blocks fit together seamlessly. By combining careful construction, balanced color selection, and thoughtful layout planning, you can transform this traditional star block into a sophisticated and visually captivating quilt design.
2. Cutting and Preparing Your Fabric
Precise cutting and preparation are critical to the success of your Eight-Point Star Quilt Block. Follow these steps carefully.
- Cut the Center Square
Measure and cut a perfect square for the center of the block. This piece will anchor the star design. - Prepare the Star Points
Cut eight identical triangles for the star points. Use a quilting template or measure carefully for consistent shapes. - Background Squares and Triangles
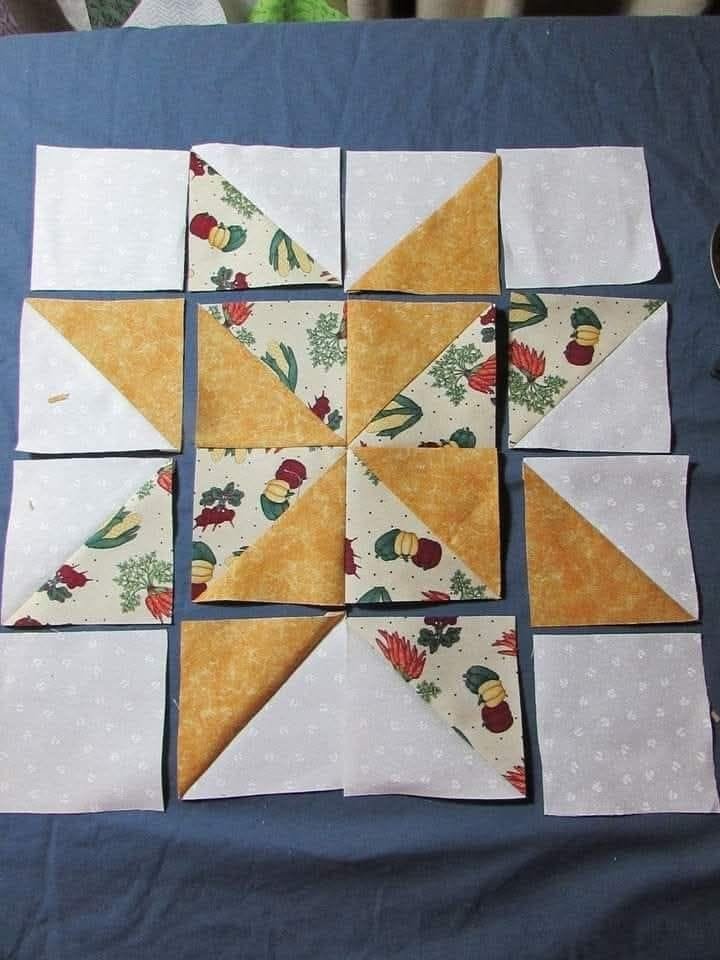
Cut additional squares and triangles to fill in the spaces around the star points. - Lay Out Your Design
Arrange all pieces on a flat surface to visualize the block. Adjust as needed before sewing. - Mark Sewing Lines
Use a fabric pencil to lightly mark sewing lines on the back of each piece for accuracy. - Starch and Press Fabric
Lightly starch and press all pieces to prevent distortion during sewing.
3. Assembling the Eight-Point Star Quilt Block
Assembling the Eight-Point Star Quilt Block requires precision and patience. Follow these steps to ensure a flawless design.
- Sew the Star Points
Start by joining two triangles to form a star point. Repeat until all points are complete. - Attach Star Points to the Center Square
Sew each star point to the edges of the center square. Take your time to match seams. - Add Background Pieces
Sew the background squares and triangles around the star, completing the block. - Press Seams Carefully
Press each seam open or to one side as you sew, ensuring a neat and flat finish. - Square the Block
Use a quilting ruler to trim the edges, ensuring the block is perfectly square. - Check Alignment
Double-check that all points meet correctly and adjust as needed.
4. Creative Variations for the Eight-Point Star Quilt Block
The Eight-Point Star Quilt Block is highly adaptable. Here are some creative ideas to make your project unique.
- Play with Fabrics
Experiment with bold prints, batiks, or metallic fabrics for a modern twist. - Try Monochromatic Themes
Use shades of a single color for a sophisticated, unified look. - Incorporate Scraps
Use fabric scraps for a patchwork-style star, adding depth and character. - Add Embellishments
Enhance your block with embroidery or applique in the center square. - Combine with Other Blocks
Mix the Eight-Point Star with other quilt block patterns for an eclectic quilt. - Create a Miniature Version
Make smaller blocks for a delicate and intricate quilt.
FAQ
1. What is the standard size for the Eight-Point Star Quilt Block?
Most quilt blocks measure 12 inches, but you can adjust the size based on your quilt design.
2. Can I make this block as a beginner?
Yes, but precision in cutting and sewing is crucial. Start with a practice block if you’re new to quilting.
3. What is the best fabric type for this quilt block?
Cotton fabric is ideal due to its durability and ease of handling.
4. Do I need special tools to create this block?
While basic sewing tools are sufficient, a rotary cutter and quilting ruler will improve accuracy.
5. How can I ensure my points align perfectly?
Take your time with pinning and sewing. Using a quarter-inch seam allowance helps achieve perfect points.
6. How do I care for my finished quilt?
Wash in cold water on a gentle cycle and air dry or tumble dry on low heat to preserve the fabric and seams.
Conclusion
The Eight-Point Star Quilt Block – TUTORIAL is a delightful project for quilters looking to create something timeless and beautiful.
With its classic design and endless customization options, this block is perfect for any quilt. We hope this tutorial inspires you to start your own Eight-Point Star project. Share your thoughts, tips, or completed blocks in the comments below. Happy quilting!

