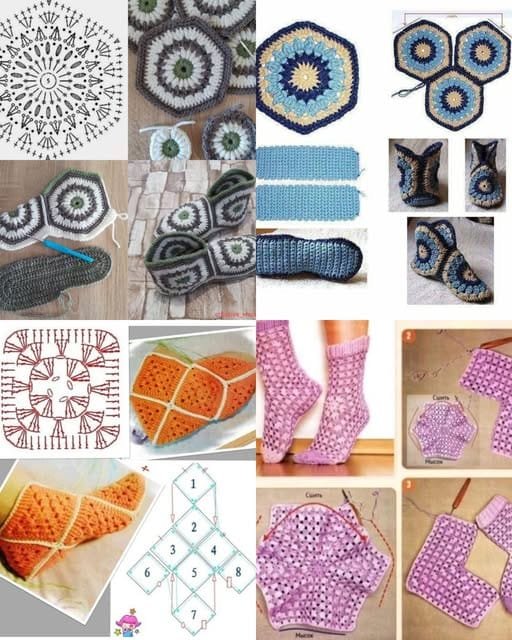
Crocheting cozy, stylish slippers is a wonderful way to showcase your creativity and keep your feet warm.
With this Easy Crochet Hexagon Granny Slippers Free Pattern, you can create a pair of unique, handmade slippers that are both comfortable and visually appealing.
This project is perfect for crocheters of all skill levels, as the steps are simple to follow and allow room for customization.
The beauty of this Easy Crochet Hexagon Granny Slippers Free Pattern lies in its versatility.
You can use your favorite yarn colors and adapt the size to fit any foot. Additionally, hexagon granny shapes add an intricate touch, making these slippers stand out as thoughtful gifts or cozy home accessories.
In this tutorial, we will guide you through every step of the process, from choosing materials to assembling your finished slippers. By the end, you’ll have a gorgeous pair of handmade slippers and a newfound appreciation for crochet’s endless possibilities. Let’s get started!
1. Gathering Materials and Selecting Yarn
The first step in creating your Easy Crochet Hexagon Granny Slippers Free Pattern is ensuring you have the right materials and tools.
- Choosing the Right Yarn
For this project, a medium-weight or worsted-weight yarn is ideal. Choose yarns that are soft and durable, such as acrylic or wool blends. These materials ensure your slippers are cozy and long-lasting. - Selecting Colors
The hexagon granny design allows for fun color combinations. You can opt for a single color for simplicity or mix and match vibrant shades to create eye-catching patterns. - Essential Tools
You’ll need a crochet hook (usually size 4mm or 5mm), a yarn needle for sewing, and scissors. A stitch marker can also be helpful to keep track of your rounds. - Measuring for Size
Measure the foot size of the wearer to ensure the slippers fit comfortably. Adjust the number of hexagons or their size accordingly. - Preparing Your Workspace
Set up a comfortable, well-lit area for crocheting. Having all your materials within reach will make the process more enjoyable. - Checking the Pattern Gauge
Before starting, crochet a small swatch to check your gauge. This ensures your hexagons are the correct size and fit as intended.
2. Crocheting the Hexagon Granny Shapes
The core of this project is the hexagon granny motifs, which form the structure of your slippers.
- Understanding Granny Patterns
Granny motifs are made up of repeating clusters of stitches, often separated by chains. The hexagon version features six sides, making it ideal for forming slipper shapes. - Starting the First Hexagon
Begin with a magic ring or chain 4 and slip stitch to form a circle. This serves as the base for your hexagon. Work in rounds using double crochet clusters and chain stitches. - Adding Rounds for Size
Each round increases the hexagon’s size. Follow the pattern to add rows, ensuring each side of the hexagon expands evenly. - Creating Multiple Hexagons
You’ll need at least six hexagons per slipper—three for the top and three for the bottom. Make more if you’re creating a larger size. - Color Changes
To add variety, switch colors between rounds. Securely weave in the yarn ends to prevent fraying. - Blocking the Hexagons
Once all hexagons are complete, block them by gently dampening and shaping them. This step ensures uniformity and makes assembly easier.
3. Assembling the Slippers
With your hexagons ready, it’s time to put them together to form your slippers.
- Planning the Layout
Lay out the hexagons in the shape of a slipper, aligning edges to form the top and sole. This step helps visualize how the pieces will fit together. - Joining Hexagons
Use a yarn needle and whip stitch or single crochet to join the hexagons along their edges. Make sure the seams are secure but not too bulky. - Forming the Toe and Heel
Fold the assembled hexagons to shape the toe and heel sections. Sew these parts together carefully to create a snug fit. - Adding Elasticity
If desired, add a slip stitch row around the opening to enhance elasticity. This ensures the slippers stay in place while being worn. - Customizing the Fit
Test the slippers and make any adjustments. Add extra stitches if needed to ensure comfort and a good fit. - Securing the Seams
Reinforce all seams with a final row of stitching. This ensures durability, especially in high-stress areas like the toe and heel.
4. Adding Finishing Touches
Once your slippers are assembled, it’s time to add details that make them truly special.
- Decorative Edging
Add a scalloped or picot edging around the opening for a decorative touch. Use a contrasting color to make the edging stand out. - Adding Soles
For added durability, sew a soft sole or use fabric glue to attach non-slip patches. This is especially useful if the slippers will be worn on smooth floors. - Embellishments
Add small embellishments such as pom-poms, buttons, or crochet flowers to personalize the slippers. These details make them unique and fun. - Finishing Loose Ends
Carefully weave in all loose ends of yarn. This step ensures your slippers look neat and professional. - Testing Comfort
Wear the slippers to test for comfort and fit. Make any final adjustments if needed. - Caring for Your Slippers
Hand wash your slippers gently and air dry to maintain their shape and softness.
FAQ
1. Can beginners crochet hexagon granny slippers?
Yes, this project is beginner-friendly, as the pattern primarily involves basic stitches like double crochet and chain stitches.
2. How do I adjust the size of the slippers?
You can adjust the size by increasing or decreasing the number of hexagons or the number of rounds in each hexagon.
3. What type of yarn is best for these slippers?
Medium-weight yarns like acrylic or wool blends are ideal because they’re soft, warm, and durable.
4. Can I make these slippers without a pattern?
While it’s possible, following a pattern ensures consistency and helps achieve the desired shape and size.
5. How do I prevent slipping on smooth floors?
Adding non-slip soles or fabric patches to the bottom of the slippers enhances traction and safety.
6. Can I use leftover yarn for this project?
Absolutely! This pattern is great for using up scraps, especially for colorful hexagons.
Join our VIP broadcast list and gain access to exclusive patterns, all for free. As a VIP member, you’ll receive the best patterns daily, delivered directly to your device. ✨📱 It’s a unique opportunity to stay up-to-date with the latest trends and designs, curated just for you. Don’t miss out on enhancing your projects and discovering new inspirations with the best patterns every day! 🎨🔝
Conclusion
By following this Easy Crochet Hexagon Granny Slippers Free Pattern, you’ve learned how to create a cozy and stylish pair of handmade slippers. From crafting the hexagons to adding finishing touches, every step allows for creativity and customization.
PATTERN HERE
We’d love to hear your thoughts! Did you enjoy making these slippers? Share your feedback, suggestions, or ideas in the comments below. Your input inspires others and helps us create even better tutorials. Happy crocheting!

