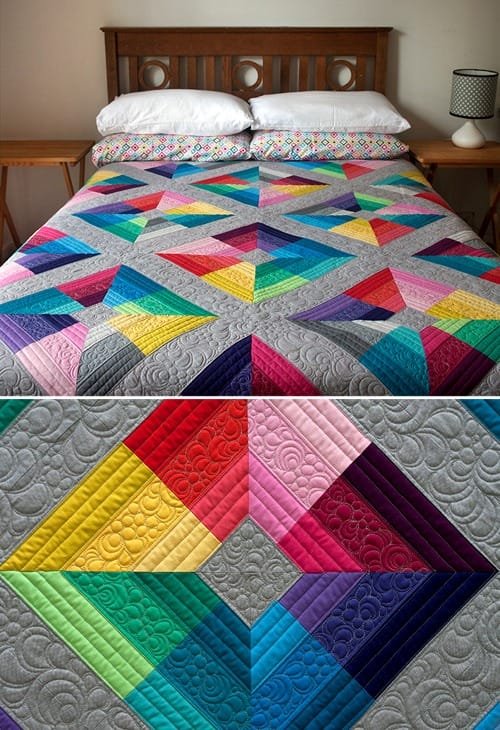
The Kite Flight Quilt is a stunning project that combines vibrant colors, intricate design, and creative freedom.
If you’ve ever wanted to make a quilt that captures the feeling of flight and whimsy, this free pattern is the perfect place to start.
Inspired by the soaring beauty of kites in the sky, this quilt design is filled with geometric shapes, bright colors, and an elegant flow that makes it a joy to create.
In this guide, you will find everything you need to know to bring this beautiful quilt to life, from materials to step-by-step instructions. So, if you’re ready to dive into quilting and want to make your own Kite Flight Quilt, keep reading!
Creating a quilt like the Kite Flight Quilt requires precision, patience, and a good understanding of basic quilting techniques.
Whether you are a beginner or an experienced quilter, this free pattern will guide you through the entire process, making it easier than ever to construct a quilt that will be both a functional and decorative addition to any room.
With its vibrant colors and elegant design, the Kite Flight Quilt is ideal for quilters looking for a challenge while also seeking a project that offers a sense of creative satisfaction.
In this article, you will learn how to make the Kite Flight Quilt from start to finish. We’ll break down the process into manageable steps, covering everything from selecting fabrics to piecing together the quilt top, and even finishing the quilt with the perfect border.
You’ll also find helpful tips to make your quilt stand out, and the best part is that you can get started right away with this free pattern. So let’s begin our journey with the Kite Flight Quilt, and let your creativity soar!
1. Materials You’ll Need for the Kite Flight Quilt
Before you start creating your Kite Flight Quilt, it’s important to gather all the materials you’ll need. Having the right tools and fabrics will ensure your project is a success. Here’s a list of what you’ll need:
1.1 Fabric Selection
For the Kite Flight Quilt, you’ll want to choose fabrics that offer a good contrast and work well together. Opt for vibrant colors, especially for the kite shapes, while keeping a balanced mix of solids and prints for variety. You’ll need fabric in several colors for the kites, the background, and the border. The pattern is designed to make the most of these colors, so be sure to pick fabrics that you truly love.
1.2 Quilt Batting
Quilt batting provides the thickness and warmth of your quilt. Choose a batting material that suits the climate and function of your quilt. For a cozy, medium-weight quilt, cotton or a cotton-blend batting works well. If you’re making a larger quilt, ensure the batting is large enough to cover your entire project, and consider a higher loft for extra warmth.
1.3 Quilt Backing Fabric
For the back of your quilt, choose a fabric that complements the front. The backing fabric is typically a solid color or a large-scale print. For the Kite Flight Quilt, you may want to use a fabric that matches one of the main colors in the design, or you can opt for a neutral color to let the front of the quilt shine.
1.4 Thread
You’ll need a quality quilting thread for piecing and quilting the layers together. Cotton thread works best for most quilting projects. You can match the thread color to your quilt top or go with a neutral thread that blends in. Ensure you have enough thread to complete the entire quilt top, piecing, and quilting.
1.5 Quilting Tools
For precision and ease of assembly, make sure to have the following quilting tools:
- A rotary cutter and mat for cutting your fabric pieces.
- A quilting ruler to ensure straight, accurate cuts.
- Straight pins to hold your pieces in place.
- A sewing machine with a walking foot for quilting.
1.6 Pattern and Instructions
The Kite Flight Quilt – Free Pattern will guide you through all the necessary steps to construct your quilt. Download the pattern or print it out for reference as you work through the project. This pattern includes templates and detailed instructions on how to cut and sew each piece together.
2. Cutting the Fabric for the Kite Flight Quilt
Cutting your fabric accurately is crucial in creating the Kite Flight Quilt. The pattern calls for different fabric shapes, so precision is key to ensuring your pieces fit together properly. Follow these steps carefully to ensure a smooth cutting process:
2.1 Prepare Your Fabrics
Before you begin cutting, wash and press your fabrics. This helps to remove any shrinkage and ensures your fabric is flat and smooth, which makes cutting easier. Press each fabric piece with a hot iron to avoid wrinkles.
2.2 Cut the Main Kite Pieces
Use the pattern templates to cut out the kite shapes from your fabric. Be sure to use a rotary cutter and ruler to make straight and accurate cuts. You will need multiple kite shapes in different colors, so be sure to follow the pattern’s guide for the exact number of pieces you need for each color.
2.3 Cut the Background Pieces
Next, cut the background fabric. The Kite Flight Quilt uses a background that allows the kites to float freely, so cutting your background pieces accurately is essential for the final look. Follow the pattern’s instructions on how large each background piece should be.
2.4 Cutting Border Strips
Once you’ve finished cutting the kite and background pieces, cut the strips for the quilt’s border. The border frames the quilt and gives it a finished look, so choosing the right fabric for the border is important. You can use the same fabric for the border as the background or choose a contrasting color for a bold effect.
2.5 Double Check Your Cuts
Once you’ve cut all of the pieces, double check everything to make sure you haven’t missed anything. Having all your pieces ready before you start sewing will save time and help avoid any confusion during the quilting process.
2.6 Organize Your Pieces
Before starting to sew, it’s a good idea to organize your pieces by size and color. This will make it easier to grab the right pieces when you need them and ensure the quilting process goes smoothly.
3. Piecing the Kite Flight Quilt Together
Once you’ve cut all your fabric pieces, it’s time to start piecing them together. This is where the magic of the Kite Flight Quilt comes to life. Follow these steps to ensure your quilt top is assembled correctly:
3.1 Sewing the Kite Shapes
Start by sewing the kite pieces together. Use a quarter-inch seam allowance for all of your seams, as this is standard for quilting. Carefully join the kite pieces, making sure the colors align as shown in the pattern. Take your time to ensure accuracy.
3.2 Attaching the Background
Once your kites are pieced together, it’s time to attach the background fabric. Lay the background pieces out and begin sewing them to the kite sections. Make sure the seams are aligned, and press each seam as you go to avoid bulky seams and ensure a clean finish.
3.3 Assembling the Quilt Top
After you’ve sewn together the kite and background sections, join the larger sections to form the full quilt top. Lay out all your pieces and pin them in place before sewing them together. Press the seams flat to create a smooth quilt top.
3.4 Sewing the Quilt Rows
Once the quilt top is assembled, you can start sewing the rows together. This step requires careful attention to detail to make sure the pieces align perfectly. Be sure to press your seams as you go to maintain a neat and tidy look.
3.5 Adding the Quilt Border
After completing the quilt top, sew on the border strips. The border adds a finishing touch to the quilt and helps frame the design. Measure the length of the quilt carefully to make sure the border fits properly.
3.6 Final Pressing
Once the quilt top is complete, give it one final pressing. Pressing the entire quilt top ensures that all seams are smooth and flat, making it easier to quilt the layers together.
4. Quilting and Finishing the Kite Flight Quilt
Now that your quilt top is complete, it’s time to quilt and finish the quilt. This process will add texture and dimension to your quilt, making it even more beautiful.
4.1 Basting the Quilt Layers
Before you start quilting, you need to baste the quilt layers together. Lay your quilt backing on a flat surface, then add the quilt batting and quilt top on top. Pin or baste the layers together to keep them in place during quilting.
4.2 Machine Quilting the Quilt
You can quilt your Kite Flight Quilt by hand or with a sewing machine. If you’re using a machine, install a walking foot and begin quilting along the seams of the kite shapes. You can also quilt in a simple grid pattern or choose a free-motion quilting technique to add texture.
4.3 Binding the Quilt
Once the quilting is finished, it’s time to add the quilt binding. Cut strips of fabric and sew them around the edges of the quilt to create a clean, finished look. Be sure to join the strips at the corners carefully for a smooth transition.
4.4 Final Pressing and Inspection
Once the binding is attached, give the entire quilt one final press. This will ensure that all seams and edges are neat and professional-looking. Inspect your quilt to make sure there are no loose threads or missed spots.
4.5 Displaying Your Quilt
Your Kite Flight Quilt is now complete! Hang it on a wall or display it on your bed to enjoy the beauty of your hard work. This quilt will make a stunning statement in any room, and it’s sure to be a conversation starter.
4.6 Caring for Your Quilt
To keep your quilt looking great for years to come, be sure to follow proper care instructions. Wash it on a gentle cycle and air dry to preserve the colors and integrity of the fabric.
FAQ – Frequently Asked Questions
1. What is a “Kite Flight Quilt” pattern?
A Kite Flight Quilt pattern is a design that typically features kite-shaped pieces arranged in a playful and dynamic pattern. The design is inspired by the motion and shape of kites in flight, often using vibrant colors to create a lively, whimsical effect.
2. How difficult is the Kite Flight Quilt to make?
While the Kite Flight Quilt pattern can be challenging for beginners, it is manageable for quilters with some experience. The key to success is following the steps carefully, paying attention to the cutting and piecing instructions, and taking your time with the assembly process.
3. Can I customize the colors in the Kite Flight Quilt?
Absolutely! You can customize the colors of your Kite Flight Quilt to match your personal style or home décor. The pattern is flexible and works well with a wide range of color schemes.
4. What type of batting should I use for this quilt?
Cotton batting is a popular choice for the Kite Flight Quilt as it provides a medium weight and softness. However, you can also use polyester batting for a lighter feel or wool batting for extra warmth.
5. How long does it take to make a Kite Flight Quilt?
The time it takes to make a Kite Flight Quilt varies depending on your experience level and how much time you dedicate to the project. It can take anywhere from several days to a few weeks to complete, especially if you work on it in stages.
Join our VIP broadcast list and gain access to exclusive patterns, all for free. As a VIP member, you’ll receive the best patterns daily, delivered directly to your device. ✨📱 It’s a unique opportunity to stay up-to-date with the latest trends and designs, curated just for you. Don’t miss out on enhancing your projects and discovering new inspirations with the best patterns every day! 🎨🔝
Conclusion
In this guide, we’ve walked you through the steps to create your own Kite Flight Quilt from start to finish. We covered everything from gathering the materials to cutting fabric, piecing the quilt top, and adding the finishing touches. By following these steps, you can create a beautiful quilt that will bring joy to any room. Remember to enjoy the process, experiment with colors, and take your time to perfect your quilt.
We’d love to hear your thoughts and experiences with this Kite Flight Quilt. Have you made one yourself? What colors did you choose? Share your feedback and suggestions in the comments below! Happy quilting!

