Creating a kid’s crochet beanie – free pattern is a fun and practical project that adds a touch of handmade warmth to a child’s wardrobe.
These beanies are perfect for keeping little ones cozy during colder months while showcasing your crochet skills. Whether you’re crafting for your own child, a gift, or even donating to a worthy cause, this project is quick, enjoyable, and customizable.
This tutorial is designed to suit crocheters of all skill levels. From beginners to seasoned crafters, everyone can create beautiful and functional beanies using this kid’s crochet beanie – free pattern.
The pattern allows for plenty of flexibility in terms of colors and design, making it ideal for personalizing to fit any child’s personality.
Gather your materials and get ready to crochet something special. Let’s explore the steps needed to make a stunning kid’s crochet beanie – free pattern that’s perfect for any occasion.
1. Materials and Tools for the Kid’s Crochet Beanie
To start your project, you’ll need a few essential materials and tools. These items are easy to find at any craft store or online. Using the right materials ensures your kid’s crochet beanie – free pattern is both comfortable and durable.
- Choose soft, machine-washable yarn, especially if the beanie is for everyday wear. Acrylic or blended yarns work best for kids due to their softness and easy maintenance.
- Select an appropriate crochet hook size for your yarn. Check the yarn label for recommendations, but typically a 5mm or 5.5mm hook works well.
- Stitch markers can help keep track of rounds, especially for beginners.
- A pair of sharp scissors is essential for cutting yarn neatly.
- A tapestry needle will be needed for weaving in the ends and adding any final touches.
Selecting high-quality materials ensures your beanie is long-lasting and cozy for the child who wears it.
Soft yarn reduces irritation for sensitive skin, while durable materials make the beanie resistant to wear and tear. Experimenting with color choices allows for creative designs that reflect the child’s preferences.
If you’re making multiple beanies, consider purchasing yarn in bulk to save costs. Choose colors that coordinate well for stripes or other fun patterns. Don’t forget to check for yarn sales during seasonal promotions to maximize value.
Once you’ve gathered your tools, it’s time to move on to the fun part: crocheting the beanie.
2. Step-by-Step Instructions for Crafting the Beanie
Follow these detailed steps to bring the kid’s crochet beanie – free pattern to life. This process involves a combination of simple techniques that even beginners can master.
Start with a magic ring or chain two and work your stitches into the second chain. This forms the beanie’s crown and sets the foundation for the entire project. Add increasing rounds to shape the top of the beanie. This creates a snug, rounded fit perfect for a child’s head.
Switch to working even rounds to extend the beanie’s height. Measure as you go to ensure a perfect fit for the child’s head circumference. Use stitch markers to track your starting point for each round. This prevents mistakes and ensures even rows throughout the pattern.
For added flair, incorporate stripes or a second color. Simply switch yarn colors at the beginning of a new round for a seamless transition. Continue until the beanie reaches the desired length. Most kid-sized beanies are between 6-8 inches tall.
Finish with a decorative border. Options include a simple single crochet edge, a scalloped trim, or a ribbed look using back loop stitches. Finally, weave in all loose ends with a tapestry needle to complete your kid’s crochet beanie – free pattern.
3. Customization Ideas for the Kid’s Crochet Beanie
Personalizing your kid’s crochet beanie – free pattern makes it even more special. Here are some fun ideas to make your beanie stand out.
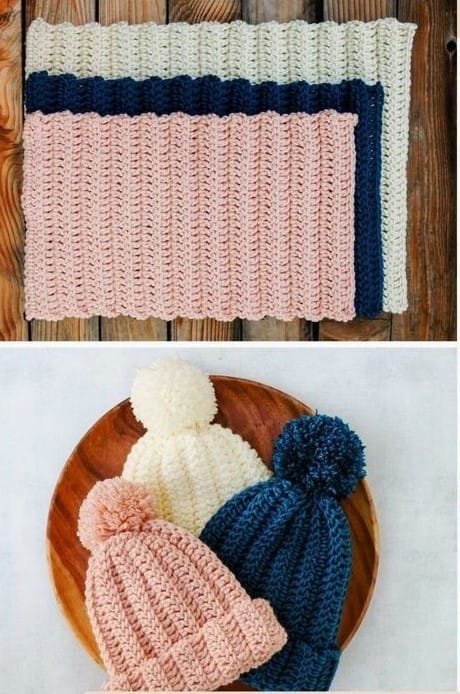
Add a pom-pom to the top of the beanie for a classic winter accessory. Use matching or contrasting yarn for a playful touch. Experiment with textured stitches like bobbles or popcorns to add dimension to your beanie design.
Incorporate appliques like flowers, stars, or animals. These small details can be sewn onto the finished beanie for a unique look. Use self-striping yarn to create a colorful effect without switching skeins. This saves time and creates an intricate appearance.
Crochet ear flaps to keep little ears warm on extra chilly days. Attach ties or braids to the ear flaps for a secure fit and a stylish finish. If the beanie is for a special occasion, use metallic or glittery yarn to give it a festive feel.
Customizing your beanie makes it a one-of-a-kind piece that children will love to wear.
4. Benefits of Making Crochet Beanies for Kids
Creating a kid’s crochet beanie – free pattern offers more than just a functional accessory. It’s a rewarding experience that benefits both the maker and the recipient.
Handmade beanies are perfect gifts that show thoughtfulness and care. Kids love the personal touch of a beanie made just for them. Crocheting beanies is a relaxing hobby that allows you to unwind while creating something practical.
Beanies are a great project for using leftover yarn from other crochet ventures. This reduces waste and maximizes your supplies. Making beanies for charity is a fulfilling way to use your crochet skills to help others in need. Many organizations welcome handmade donations for children.
Engaging in crochet strengthens hand-eye coordination and boosts creativity. Sharing the craft with others, such as teaching kids to crochet, creates lasting memories.
By making a kid’s crochet beanie – free pattern, you’re contributing to a timeless tradition of handmade goods.
FAQ: Kid’s Crochet Beanie – Free Pattern
Q: What size should I make the beanie for kids?
A: Most kid-sized beanies range from 18-20 inches in circumference. Adjust based on the child’s age and head size.
Q: How do I ensure the beanie fits properly?
A: Measure the child’s head and match the circumference. Crochet slightly smaller for a snug fit, as crochet items stretch.
Q: What is the best yarn for kid’s beanies?
A: Use soft, washable yarns like acrylic or cotton blends. Avoid scratchy materials that may irritate a child’s skin.
Q: Can I add embellishments to the beanie?
A: Yes, consider adding pom-poms, appliques, or textured stitches for a unique look.
Q: How long does it take to crochet a kid’s beanie?
A: Depending on your skill level, a simple beanie can take 1-3 hours to complete.
Q: Can beginners make this pattern?
A: Absolutely! This kid’s crochet beanie – free pattern is straightforward and perfect for beginners.
Join our VIP broadcast list and gain access to exclusive patterns, all for free. As a VIP member, you’ll receive the best patterns daily, delivered directly to your device. ✨📱 It’s a unique opportunity to stay up-to-date with the latest trends and designs, curated just for you. Don’t miss out on enhancing your projects and discovering new inspirations with the best patterns every day! 🎨🔝
Conclusion
The kid’s crochet beanie – free pattern is a delightful project that combines creativity, functionality, and personal expression. Whether you’re crafting for your child, gifting a friend, or donating to charity, these beanies bring joy and warmth. By following this guide, you can create beautiful and practical accessories with ease.
We’d love to hear your feedback! Share your thoughts, suggestions, or questions in the comments below. Let us know how your beanies turned out and what you’d like to see in future tutorials. Happy crocheting!

