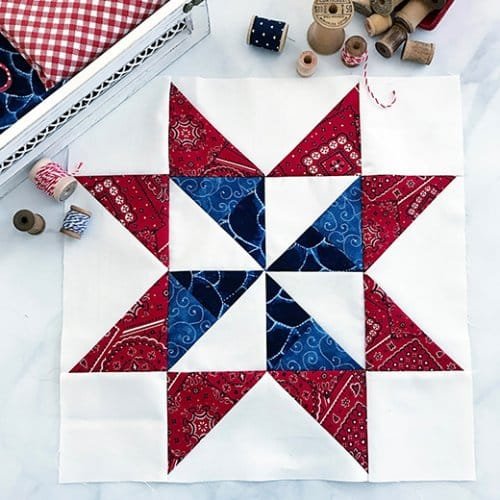
The Pinwheel Star Block – Tutorial is a must-have guide for quilters looking to create an eye-catching quilt block that combines classic design with contemporary appeal.
This block is a versatile addition to any quilt project, featuring dynamic pinwheel shapes combined with the elegance of a star motif.
Whether you’re a beginner or an experienced quilter, the Pinwheel Star Block – Tutorial offers step-by-step instructions to help you master this beautiful design.
Quilt blocks like the Pinwheel Star Block are a cornerstone of quilting traditions, offering endless opportunities for creativity and customization.
This tutorial will guide you through every step of the process, from choosing your materials to assembling the final block. With a little patience and practice, you’ll find that this block is both fun to make and incredibly rewarding.
In this article, you’ll learn about the tools and materials needed, detailed assembly steps, tips for customization, and troubleshooting common issues. Let’s dive into the world of the Pinwheel Star Block – Tutorial and get started!
1. Materials and Tools for the Pinwheel Star Block
Creating the Pinwheel Star Block starts with gathering the right materials and tools. Preparation is key to achieving clean, precise results.
- Fabric Selection
Choose high-quality cotton fabrics in contrasting colors or patterns to make the pinwheel and star shapes stand out. Solid colors work well for a bold look, while prints can add a whimsical touch. - Cutting Tools
A rotary cutter and a self-healing cutting mat are essential for precise cuts. Pair these with a quilting ruler to ensure accuracy. - Sewing Machine
A reliable sewing machine with a ¼-inch seam allowance setting is crucial for piecing the block. - Thread
Use a high-quality cotton thread that matches or contrasts with your fabric, depending on your desired aesthetic. - Iron and Pressing Tools
Pressing seams as you go ensures your block lays flat and looks professional. A steam iron is particularly helpful. - Pins and Clips
These are useful for holding pieces in place while sewing, especially for beginners.
2. Step-by-Step Guide to Assembling the Pinwheel Star Block
Follow these steps in the Pinwheel Star Block – Tutorial to create a stunning quilt block.
- Cut the Fabric
Begin by cutting your fabric into the required squares and triangles. Most pinwheel star blocks require at least two contrasting fabrics, with precise measurements to ensure alignment. - Create Half-Square Triangles (HSTs)
Half-square triangles are the foundation of the pinwheel. Sew two contrasting squares together diagonally, cut along the seam, and press them open. - Assemble the Pinwheel
Arrange the HSTs in a pinwheel pattern. Sew the pieces together row by row, ensuring the points align perfectly. - Add the Star Points
Once the pinwheel is complete, sew additional triangles or squares around it to form the star shape. This step requires careful alignment to maintain symmetry. - Join the Block Sections
Combine all the sections, pressing seams as you go. Double-check measurements to ensure the block is square. - Final Press and Trim
Press the completed block to remove any wrinkles and trim the edges if necessary to achieve the desired size.
3. Customizing the Pinwheel Star Block
One of the joys of quilting is making each project uniquely yours. Here are some ideas for customizing your Pinwheel Star Block:
- Experiment with Color Palettes
Play with different color combinations to create unique effects. Monochromatic schemes offer elegance, while bold contrasts add drama. - Use Scraps for a Patchwork Look
Incorporate leftover fabric scraps to give your block a scrappy, charming appeal. - Add Embellishments
Consider adding hand embroidery or decorative stitching around the star points for added texture and detail. - Modify the Block Size
Scale the pattern up or down to fit your specific quilt project, from mini quilts to large bedspreads. - Combine with Other Blocks
Pair the Pinwheel Star Block with other traditional blocks like Log Cabin or Flying Geese for a diverse quilt design. - Play with Fabric Patterns
Mix florals, stripes, and polka dots to create a vibrant, modern look or stick to solids for a classic appearance.
4. Common Mistakes and How to Avoid Them
While working on the Pinwheel Star Block, it’s normal to encounter a few challenges. Here’s how to avoid common mistakes:
- Misaligned Points
Ensure precise cutting and consistent seam allowances to avoid misaligned star or pinwheel points. - Inaccurate Measurements
Double-check all measurements before cutting to prevent pieces that don’t fit together correctly. - Wavy Seams
Press seams flat after each step to keep your block smooth and prevent puckering. - Color Bleeding
Pre-wash fabrics to prevent colors from bleeding when the quilt is washed. - Skewed Blocks
Ensure your sewing machine’s settings are correct and avoid pulling fabric as you sew. - Incomplete Pressing
Take time to press each seam thoroughly for a polished and professional finish.
FAQ
Q1: What size is the finished Pinwheel Star Block?
The size depends on the pattern you follow, but standard blocks are often 12×12 inches.
Q2: Can I make the block without a sewing machine?
Yes, hand stitching is possible, but it requires more time and patience.
Q3: What’s the best fabric for beginners?
Cotton is ideal for beginners because it’s easy to work with and holds its shape well.
Q4: How do I ensure my points are sharp?
Use precise cutting, consistent seam allowances, and press seams carefully to achieve sharp points.
Q5: Can I use different shapes for the star points?
Yes, you can experiment with trapezoids or rectangles for a unique take on the classic design.
Q6: How do I incorporate the Pinwheel Star Block into a larger quilt?
Simply make multiple blocks and join them together with sashing or borders to create a cohesive quilt top.
Join our VIP broadcast list and gain access to exclusive patterns, all for free. As a VIP member, you’ll receive the best patterns daily, delivered directly to your device. ✨📱 It’s a unique opportunity to stay up-to-date with the latest trends and designs, curated just for you. Don’t miss out on enhancing your projects and discovering new inspirations with the best patterns every day! 🎨🔝
Conclusion
The Pinwheel Star Block – Tutorial is an excellent project for quilters of all skill levels. Its timeless design and versatile nature make it a valuable addition to any quilting repertoire. By following this guide, you can create stunning blocks that showcase your creativity and skill.
We’d love to hear about your experience with this tutorial! Share your thoughts, feedback, and any suggestions in the comments below. Your input helps us improve and bring you even more inspiring content. Happy quilting!

