The Winter’s Grandeur Mini Quilt – Free Pattern is a beautiful way to bring the essence of winter indoors through the art of quilting. This mini quilt is a lovely addition to seasonal decor, featuring elegant winter designs that add a touch of grandeur to any space.
Perfect for beginners and advanced quilters alike, this free pattern provides a step-by-step guide to crafting a quilt that captures the beauty of winter in every stitch.
Designed to be small and manageable, this Winter’s Grandeur Mini Quilt project can be completed in a few sessions, making it ideal for those looking to create a decorative piece without committing to a large-scale quilt.
This quilt is also a wonderful gift for loved ones during the holiday season, showcasing your unique, handcrafted creation that speaks to the spirit of winter.
In this article, we’ll guide you through every step of creating the Winter’s Grandeur Mini Quilt, from gathering materials to piecing together each section of the pattern. So grab your favorite fabrics and let’s dive into the art of crafting this winter-inspired masterpiece.
1. Materials Needed for Winter’s Grandeur Mini Quilt
To start your Winter’s Grandeur Mini Quilt – Free Pattern project, you’ll need a few basic materials and tools. Here’s a list of essentials to make sure your quilting experience is smooth and enjoyable.
- Fabric Selection: Choosing winter-themed fabrics is a great way to bring seasonal charm to your mini quilt. Look for designs featuring snowflakes, frosty blues, whites, and grays, or even subtle metallic accents. You’ll need a small quantity of fabric due to the quilt’s compact size, making it an ideal project for using up fabric scraps.
- Batting and Backing: Batting is the inner layer that gives your quilt some thickness and warmth. For a mini quilt, a lightweight batting is usually best, as it keeps the quilt from becoming too bulky. You’ll also need fabric for the backing, which can be a solid color or a coordinating pattern.
- Rotary Cutter and Cutting Mat: These tools are essential for clean and precise cuts. A rotary cutter allows you to slice through fabric smoothly, and a cutting mat protects your work surface. Accurate cuts are key to ensuring all pieces fit together seamlessly.
- Sewing Machine and Thread: Any standard sewing machine will work for this project. Use a thread color that complements your fabric selection, ensuring that your stitches blend in nicely with the design.
- Iron and Pressing Surface: Pressing seams as you go is crucial for achieving a professional-looking quilt. An iron and a safe, flat surface to press your seams will help each section of the quilt come together neatly.
- Quilting Pins and Ruler: Quilting pins help hold your fabric pieces in place as you work, making it easier to keep everything aligned. A clear quilting ruler is also helpful for measuring and aligning your pieces accurately.
2. Step-by-Step Guide to Sewing the Mini Quilt Top
With materials in hand, it’s time to start sewing the top of your Winter’s Grandeur Mini Quilt. Follow these steps carefully to create a beautiful quilt top that captures the essence of winter.
- Cut the Fabric Pieces: Using your rotary cutter and cutting mat, begin by cutting out the fabric pieces according to the pattern measurements. Typically, this will include squares and rectangles that will be sewn together to form the quilt’s design. Accurate cuts are essential to ensure your pieces align perfectly.
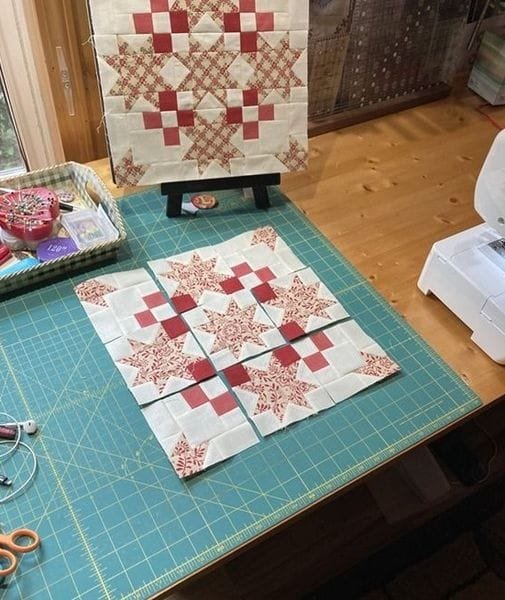
- Arrange the Quilt Design: Lay out your fabric pieces on a flat surface to get a preview of the final design. This step helps you visualize the pattern and adjust any colors or placements as needed. It’s a good idea to take a photo of the layout for reference.
- Sew the Fabric Pieces Together: Begin sewing the pieces together row by row. Use a 1/4-inch seam allowance for all seams, which is standard in quilting. This ensures that the pieces fit together uniformly, creating a polished look.
- Press Each Seam: After sewing each row, press the seams to one side with an iron. This keeps the fabric flat and makes it easier to join the rows without bulky seams. Be careful not to distort the fabric as you press.
- Assemble the Rows: Once all the rows are completed, sew them together to create the quilt top. Match up seams carefully to keep the design aligned. Press each row as you go to keep the quilt top smooth and ready for layering.
- Add Border or Sashing (Optional): If you’d like to add extra detail, consider adding a border or sashing around the quilt top. This can be a contrasting color or a coordinating winter-themed fabric that frames the main design and adds dimension to your mini quilt.
3. Layering and Quilting the Mini Quilt
Now that you’ve completed the quilt top, it’s time to layer and quilt the Winter’s Grandeur Mini Quilt. This step is essential for giving the quilt its cozy texture and finished look.
- Layer the Quilt Sandwich: Start by placing the backing fabric right side down, followed by the batting layer, and finally the quilt top face up. Ensure that all layers are smooth and aligned. The batting and backing should be slightly larger than the quilt top.
- Pin or Baste the Layers Together: To keep the layers in place, use quilting pins or basting spray. This will prevent shifting as you quilt, making it easier to create even stitches across the quilt surface.
- Decide on a Quilting Pattern: Choose a quilting pattern that complements your design. Simple straight lines or a grid pattern work well for beginners, while free-motion quilting can add a unique texture to the quilt. For a winter look, try quilting snowflake shapes or gentle waves to mimic falling snow.
- Quilt the Layers Together: Begin quilting from the center of the quilt and work your way outward. This helps prevent bunching and keeps the layers evenly distributed. Take your time to create smooth, even stitches that enhance the overall design.
- Remove Pins and Trim Excess Fabric: Once the quilting is complete, carefully remove all pins. Trim any excess batting and backing fabric to align with the quilt top edges, creating a clean edge for binding.
- Press the Quilt: Give the quilt a final press to smooth out any wrinkles or puckering from the quilting process. This step prepares the quilt for binding, ensuring that it lies flat and looks professional.
4. Binding and Finishing the Mini Quilt
The final step in making the Winter’s Grandeur Mini Quilt is adding the binding. This step gives the quilt a neat, finished edge and keeps the layers securely in place.
- Cut the Binding Strips: Cut strips of fabric for the binding, about 2.5 inches wide. You can choose a coordinating color or a contrasting one to frame the quilt. The strips should be long enough to go around the entire perimeter of the quilt.
- Attach the Binding to the Quilt: Begin by sewing the binding to the front of the quilt. Align the raw edges of the binding strip with the quilt’s edge and use a 1/4-inch seam allowance. Fold the binding over the edges as you work.
- Create Mitered Corners: As you reach each corner, fold the binding to create a neat mitered corner. This will give the quilt a polished look and keep the edges from fraying.
- Sew the Binding to the Back: Fold the binding over to the back of the quilt and hand-stitch it in place for a clean finish. Alternatively, you can machine-stitch the binding, but hand-stitching gives a more seamless appearance.
- Add a Label (Optional): If you’re giving this quilt as a gift, consider adding a personalized label to the back. You can embroider a message, add the date, or simply sign your name to commemorate your work.
- Final Pressing: Once the binding is complete, give the quilt a final press to smooth out any wrinkles. Your Winter’s Grandeur Mini Quilt is now ready to be displayed, gifted, or enjoyed as a seasonal decoration!
FAQ
Q1: How long does it take to make the Winter’s Grandeur Mini Quilt?
Creating this mini quilt can take anywhere from a few hours to a few days, depending on your experience level and the complexity of the quilting design.
Q2: Can beginners make the Winter’s Grandeur Mini Quilt?
Yes, this pattern is beginner-friendly, especially if you choose a simple quilting pattern. Taking it step-by-step makes it manageable for new quilters.
Q3: What size is a mini quilt?
A mini quilt typically measures around 12-24 inches on each side, but you can adjust the size based on your preferences and display space.
Q4: Can I hand-quilt the Winter’s Grandeur Mini Quilt?
Absolutely! Hand-quilting adds a lovely, personal touch to any quilt. Just be sure to use even stitches and take your time.
Q5: What fabrics work best for a winter quilt?
Cotton fabrics with winter themes, such as snowflakes or pine trees, are ideal. Fabrics in cool tones like blues and whites enhance the winter aesthetic.
Q6: How do I care for my mini quilt?
To clean your mini quilt, hand wash with mild soap and air dry. Avoid machine washing if possible to preserve its shape and details.
Join our VIP broadcast list and gain access to exclusive patterns, all for free. As a VIP member, you’ll receive the best patterns daily, delivered directly to your device. ✨📱 It’s a unique opportunity to stay up-to-date with the latest trends and designs, curated just for you. Don’t miss out on enhancing your projects and discovering new inspirations with the best patterns every day! 🎨🔝
Conclusion
The Winter’s Grandeur Mini Quilt – Free Pattern is a delightful project for quilters of all levels. By following this tutorial, you’ve learned how to select materials, piece together a winter-themed design, layer and quilt the mini quilt, and finish it with a neat binding.
Whether you’re creating it for yourself or as a heartfelt gift, this mini quilt brings the magic of winter into any space. Let us know your thoughts and share your experiences! We’d love to hear your feedback and any ideas for future projects. Happy quilting!

