The holiday season brings joy, warmth, and the spirit of celebration. A perfect way to infuse your home with festive cheer is by crafting your own Mini Macramé Christmas Wreaths.
These charming wreaths not only add a personalized touch to your decorations but also make wonderful gifts. Whether you’re a seasoned crafter or a beginner looking to create something unique, crafting a macramé wreath is a perfect way to express your creativity and spread the holiday spirit.
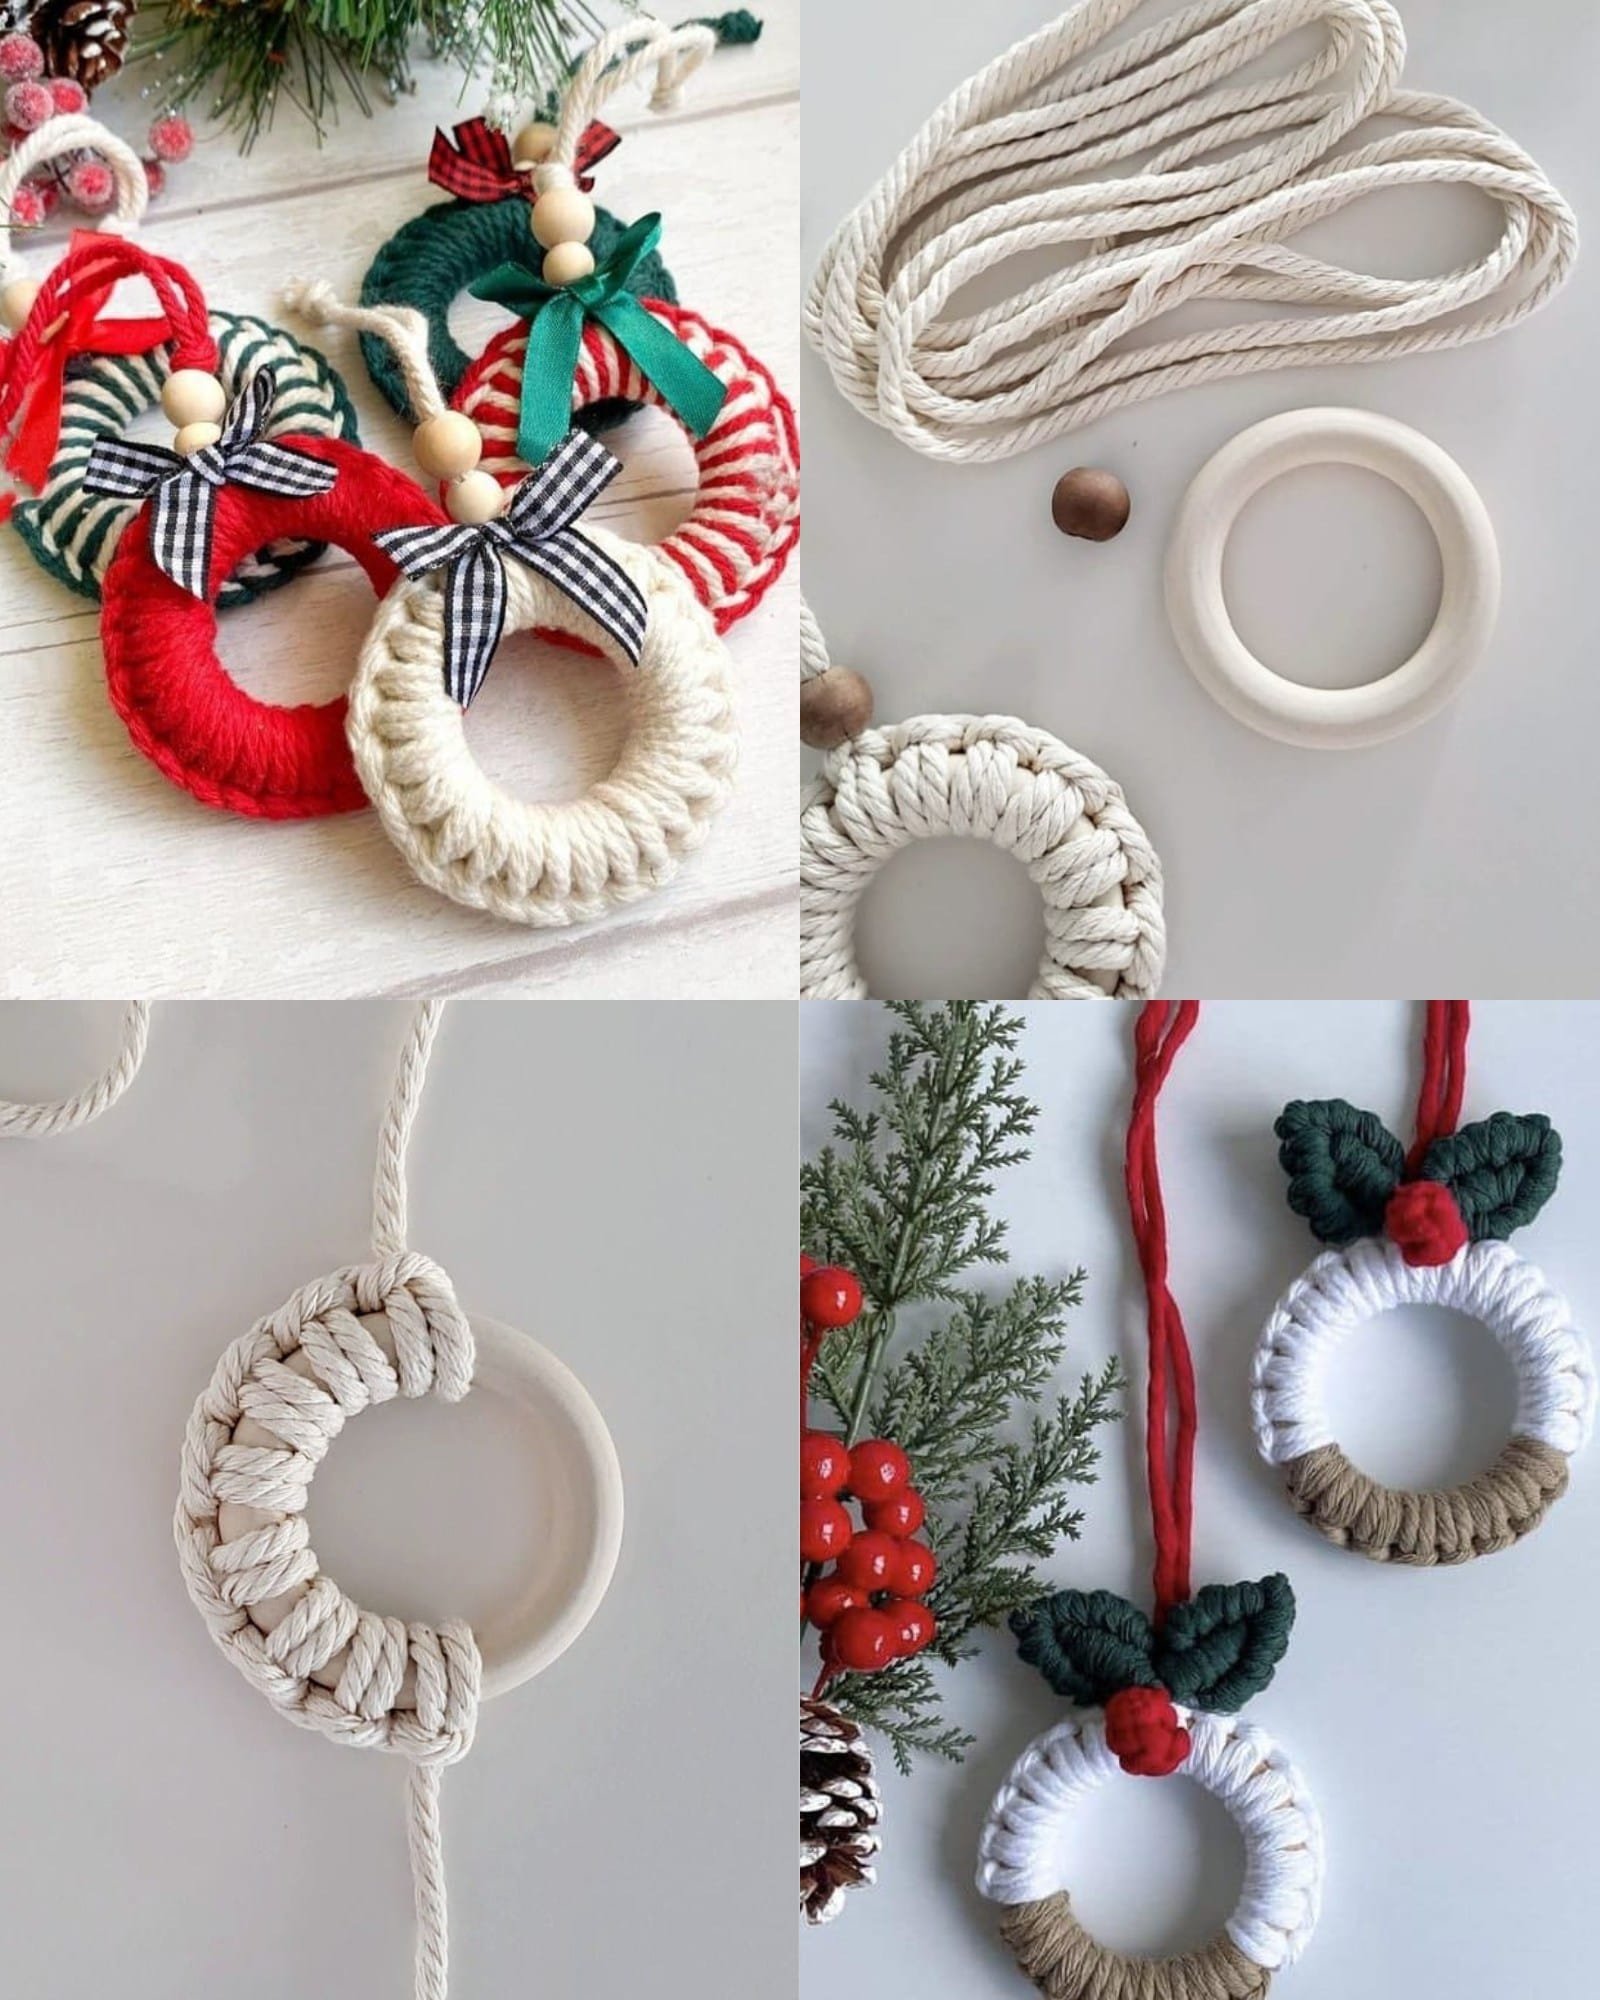
Mini Macramé Christmas Wreaths are a blend of intricate knotting techniques and festive decor. This guide will walk you through every step of crafting your own, from gathering the materials to adding the final festive touches.
As you create these little works of art, you’ll feel the joy of crafting while making something beautiful that will adorn your home throughout the holiday season.
The Mini Macramé Christmas Wreaths are not only easy to make, but they can be customized to reflect your personal style. Whether you prefer a minimalist look or want to incorporate colorful accents, these wreaths are versatile and fun.
The best part is that you don’t need to be an expert to create a stunning wreath; the macramé technique, with its simple knots and patterns, is easy to learn and enjoyable to master.
1. Gathering the Materials for Your Mini Macramé Christmas Wreath
Before diving into the crafting process, it’s important to gather all the necessary materials for your Mini Macramé Christmas Wreath. While the supplies required are minimal, having everything on hand will make the process smoother and more enjoyable.
First, you’ll need macramé cord. Opt for a soft, sturdy cord that’s easy to knot but still durable enough to hold its shape. The traditional natural cotton macramé cord is a great choice for this project. The thickness of the cord will determine how large and dense your knots will be, so choose accordingly depending on the desired look of your wreath. A thicker cord will give your wreath a fuller, more substantial appearance, while a thinner cord will result in a lighter, more delicate wreath.
You’ll also need a metal ring or a wooden hoop as the base for your wreath. These rings come in various sizes, and for a mini wreath, a 4-inch to 6-inch ring should suffice. This ring will serve as the foundation of your wreath, around which you will tie your macramé knots.
For decoration, consider adding ribbons, beads, or festive embellishments like tiny pinecones, holly leaves, or artificial berries. These elements will bring a touch of Christmas magic to your wreath. Don’t forget a pair of scissors to trim the excess cord and a hot glue gun to attach decorative elements securely.
Lastly, have a measuring tape on hand to ensure accurate measurements for your cord lengths, and a comb to help untangle any knots and to fluff up the macramé for a fuller, more polished look.
2. Learning the Basic Macramé Knots
Now that you have your materials ready, it’s time to dive into the crafting process. The foundation of your Mini Macramé Christmas Wreath lies in the macramé knots. You don’t need to be an expert to create beautiful knots, but learning a few basic ones will help you achieve the perfect look for your wreath.
The square knot is one of the most common knots used in macramé. It’s created by using four strands of cord, two as the working cords and two as the filler cords. To create this knot, cross the left working cord over the filler cords, then cross the right working cord over the left one. Pull everything tight to form a square shape. Repeat this process to create a row of square knots along the ring.
Another popular knot is the lark’s head knot, which is great for attaching your cord to the ring. To tie a lark’s head knot, fold the cord in half and loop the folded end around the ring. Pull the two loose ends through the loop, securing the cord in place.
If you want to create some texture, you can incorporate the half-hitch knot, which is a simple knot that creates a diagonal line along your wreath. To tie this knot, take one cord and loop it over the base cord, then pull it through the loop. Tighten the knot by pulling the working cord down toward the ring.
Once you’re comfortable with these basic knots, you can start experimenting with different patterns and combinations. These knots will give your Mini Macramé Christmas Wreath its signature texture and boho charm, while providing a sturdy foundation for the additional decorations.
3. Assembling Your Mini Macramé Christmas Wreath
With your knots mastered, it’s time to start assembling your Mini Macramé Christmas Wreath. Begin by cutting several lengths of macramé cord, each around 24 inches long, depending on how many strands you want to use for your wreath. These cords will be knotted around your ring, so make sure to have enough to cover the ring completely.
Start by attaching your cords to the ring using the lark’s head knot. Place your cords evenly around the ring, creating a nice and even distribution. Once all cords are attached, it’s time to start knotting them together.
To create a cohesive design, use the square knot to tie your cords together, working in rows around the ring. You can also alternate between the square knot and half-hitch knots to create different textures and patterns. The key to a beautiful wreath is keeping the knots tight and even, so be sure to adjust the tension as you work.
As you work your way around the wreath, remember that you can vary the lengths of the cords for added dimension. If you’d like to add a fringed effect to your wreath, simply leave the ends of your cords unknotted and trim them into a uniform length. This will give the wreath a rustic and bohemian touch.
Once you’ve completed the knotting, step back and take a look at your wreath. You can always add more knots if you’d like a fuller look or trim the cords for a more delicate design.
4. Adding Festive Decorations to Your Mini Macramé Christmas Wreath
Now that your macramé wreath is taking shape, it’s time to add some festive decorations that will bring it to life. The beauty of a Mini Macramé Christmas Wreath is that you can make it as simple or as elaborate as you like. Whether you prefer a minimalist look or a more traditional wreath with colorful embellishments, the possibilities are endless.
Start by adding a decorative ribbon to the top of the wreath for hanging. Choose a ribbon in festive colors like red, gold, or green to complement the macramé design. Simply tie a bow at the top of the wreath and secure it with hot glue if necessary.
Next, add a few small ornaments or beads to give your wreath some sparkle. You can glue tiny wooden ornaments, pinecones, or artificial berries around the ring. These little touches will evoke the cozy, festive atmosphere of Christmas. For a more natural look, consider using dried flowers, leaves, or a sprig of holly.
Another great addition is miniature lights. Wrapping a string of battery-operated fairy lights around the wreath adds a magical glow, perfect for the holiday season. Make sure to tuck the battery pack discreetly behind the wreath.
If you enjoy a bit of whimsy, you can also hang a small wooden sign or a mini Christmas stocking from your wreath. These tiny accents will give your wreath an extra dose of personality, making it a true reflection of your style.
Finally, step back and admire your handiwork! With the final decorative touches in place, your Mini Macramé Christmas Wreath is ready to hang and brighten up any space.
FAQ
Q1: How do I make the macramé wreath fit the size of my space?
A1: The beauty of macramé is its versatility. To make the wreath fit your space, simply adjust the size of your ring. For a mini wreath, choose a smaller ring (4-6 inches), and for larger spaces, use a bigger ring.
Q2: Can I use any kind of cord for the wreath?
A2: While you can experiment with different types of cord, cotton macramé cord is ideal for creating sturdy, yet soft knots. It’s the best choice for both beginner and advanced macramé projects.
Q3: What are the best decorative elements for a Christmas wreath?
A3: Festive ribbons, small ornaments, pinecones, holly leaves, and miniature lights are popular choices for adding a seasonal touch to your wreath. Feel free to add personal items to make it unique!
Q4: How do I maintain my macramé wreath?
A4: To maintain your wreath, avoid placing it in damp areas. If the cord becomes dusty, gently wipe it with a damp cloth. Be sure to store it in a cool, dry place when not in use.
Q5: How long does it take to make a mini macramé wreath?
A5: Creating a Mini Macramé Christmas Wreath typically takes about 2-4 hours, depending on your experience and the complexity of the design.
Join our VIP broadcast list and gain access to exclusive patterns, all for free. As a VIP member, you’ll receive the best patterns daily, delivered directly to your device. ✨📱 It’s a unique opportunity to stay up-to-date with the latest trends and designs, curated just for you. Don’t miss out on enhancing your projects and discovering new inspirations with the best patterns every day! 🎨🔝
Conclusion
In this article, we’ve explored how to create your own Mini Macramé Christmas Wreaths, from gathering materials to adding those final decorative touches. Crafting these wreaths brings the spirit of Christmas into your home while allowing you to express your creativity through knotting and decoration. Whether you’re new to macramé or an experienced crafter, this project is a fun and rewarding way to celebrate the season.
We’d love to hear your thoughts! Please feel free to share your experiences, suggestions, and any other creative ideas for Mini Macramé Christmas Wreaths in the comments below. Happy crafting, and may your home be filled with joy and festivity!

