The Winter Cabin Quilt – Tutorial is a wonderful project to bring a warm, rustic charm into your home, especially during the colder months. This quilt design, inspired by the cozy feeling of a log cabin retreat, captures the essence of winter with its warm tones, geometric patterns, and intricate craftsmanship.
Whether you’re an experienced quilter or a beginner looking for a new challenge, this tutorial will guide you step-by-step in creating a quilt that perfectly complements your winter décor.
Quilting has long been a beloved craft, combining both practicality and art. The Winter Cabin Quilt takes this tradition a step further by incorporating elements of winter’s serene beauty into the design.
The block layout often resembles a log cabin, which creates a sturdy, structured look while allowing you to play with colors, fabrics, and patterns. By the end of this tutorial, you will have a stunning quilt to keep you warm through the season or to give as a thoughtful homemade gift.
In this tutorial, we’ll explore everything you need to know to successfully create a Winter Cabin Quilt. From gathering your materials to piecing together each block and finishing the quilt, we’ll cover all the essential steps. Grab your fabric, scissors, and sewing machine, and let’s dive into the steps needed to make this beautiful quilt!
1. Materials Needed for the Winter Cabin Quilt
Before diving into your Winter Cabin Quilt – Tutorial, it’s essential to gather all the materials needed for the project. Having everything ready will help you avoid interruptions during the quilting process. Here’s a list of the key items you’ll need to start:
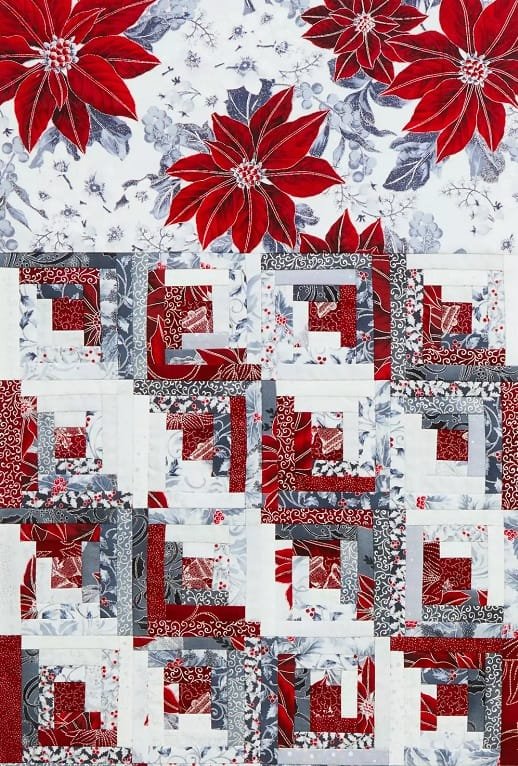
Fabric: The fabric choices for your quilt are essential for creating the rustic, warm feel of the Winter Cabin Quilt. Select fabrics in rich, cozy colors that evoke the feeling of winter. Common colors for this quilt include shades of brown, beige, gray, dark green, and red, but feel free to use your creativity. Opt for high-quality cotton fabrics to ensure durability and a smooth finish.
Quilt Batting: The batting is the middle layer that adds thickness and warmth to the quilt. For a winter quilt, consider using a medium-weight or heavy batting to provide extra warmth during the colder months. Cotton batting or polyester blend batting are both great options.
Thread: Use a strong quilting thread, usually a cotton thread that matches the fabric colors. Choose neutral or matching thread colors to ensure a seamless finish between the fabric layers.
Sewing Machine: While hand sewing is an option, using a sewing machine will speed up the quilting process. Make sure your sewing machine has a straight stitch or walking foot to handle thick layers of fabric.
Rotary Cutter and Mat: A rotary cutter, cutting mat, and rulers will help you cut fabric strips and pieces with precision. This is especially important for creating the perfect sizes for each log cabin block.
Pins or Fabric Clips: These will help hold your fabric pieces in place as you sew. Fabric clips are a great alternative to pins and work well with thicker layers of fabric.
Iron and Ironing Board: Pressing your fabric after each step is crucial to keeping your quilt blocks flat and even. It will also make it easier to sew your pieces together.
Having all of these materials ready before you begin will make the quilting process smoother and more enjoyable.
2. Creating the Log Cabin Blocks for the Quilt
The Winter Cabin Quilt pattern is primarily made up of log cabin blocks, a classic quilt block design known for its ability to create a visually appealing and structured pattern. The first step is to cut your fabric into strips of various widths, typically ranging from 1.5 to 2.5 inches, depending on the size you want for each log cabin block.
Start by creating the center of your log cabin block, which is typically a small square of fabric. This square represents the “hearth” or “center” of the cabin. Choose a color that contrasts with the surrounding fabric to make it stand out.
From here, begin adding the first strip of fabric around the center square, ensuring that it is straight and aligned with the edges of the square. Sew along one edge of the square, press the seam open, and then add the next strip of fabric in the same manner. Continue adding strips to the block, alternating between light and dark fabrics to create the log cabin effect.
As you add each new strip of fabric, press the seams flat before adding the next strip. This step will help keep the blocks square and ensure that your quilt lays flat when finished. The size of each block will increase as you add more strips, so be sure to measure and trim your fabric as needed to maintain an even, consistent block size.
Once your log cabin block has reached the desired size (usually around 10-12 inches), you can begin working on the next block. Repeat this process for each block in your quilt, making sure to keep your fabric cuts uniform for consistency.
3. Assembling the Quilt Top
After all your log cabin blocks are complete, it’s time to assemble them into the quilt top. The key to a beautiful Winter Cabin Quilt is arranging the blocks in a visually appealing way. There are various layouts you can choose from, but the most common arrangement for a log cabin quilt is either a straight or diagonal pattern.
To begin, lay out your blocks in the desired pattern on a large flat surface. Experiment with different orientations of the blocks until you’re happy with how they look. In some variations of the Winter Cabin Quilt, you may want to alternate dark and light blocks or mix the colors in a more randomized fashion.
Once you’re satisfied with the layout, start sewing the blocks together. Begin by sewing the blocks into rows. Pin or clip the blocks in place to avoid shifting while sewing. Make sure the seams of the blocks align perfectly to keep the overall design neat and tidy.
After sewing the rows together, join the rows to complete the quilt top. Press the seams flat as you go to avoid bulky areas. Once all the rows are attached, give the quilt top a final pressing to make sure everything is smooth and even.
Now that your quilt top is assembled, it’s time to move on to the next step of adding the backing and finishing the quilt.
4. Quilting and Binding the Winter Cabin Quilt
The final step in completing your Winter Cabin Quilt – Tutorial involves quilting the layers together and adding the binding. This is where the quilt truly comes to life and the pattern takes shape.
First, lay out the quilt top, batting, and quilt backing on a large surface. The backing fabric should be larger than the quilt top, so you have room to trim and align it properly. Baste the layers together using safety pins, fabric clips, or a temporary spray adhesive to keep the layers from shifting as you sew.
Now, it’s time to quilt! Using a quilting foot on your sewing machine, sew through all three layers (quilt top, batting, and backing). You can choose a simple straight line quilting pattern, a diagonal grid, or even a free-motion quilting pattern for more intricate designs. The quilting adds texture and holds the layers of fabric together securely.
Once the quilt top is quilted, it’s time to add the binding. Cut strips of fabric for the binding, then join them together to form one long continuous strip. Attach the binding to the edges of the quilt using a sewing machine, folding the edges over to create a clean, finished look.
Finally, press the quilt and trim any loose threads. Your Winter Cabin Quilt is now complete and ready to be enjoyed!
FAQ
Q1: How long does it take to make a Winter Cabin Quilt?
A1: The time required to make a Winter Cabin Quilt depends on your quilting experience and the size of the quilt. On average, it can take anywhere from 15 to 30 hours to complete the entire project, including cutting fabric, piecing the blocks, and quilting.
Q2: Can I use a different fabric for the backing?
A2: Yes, you can use any fabric you like for the backing of your quilt. Many quilters choose a contrasting color or a simple solid fabric, but it’s completely up to your personal style and preferences.
Q3: What is the best type of batting to use for a Winter Cabin Quilt?
A3: For a winter quilt, it’s best to use a medium to heavy batting. Cotton batting is breathable and soft, while polyester batting can provide extra warmth and loft. Choose based on how thick or warm you want the quilt to feel.
Q4: Do I need a walking foot for quilting?
A4: While not absolutely necessary, a walking foot can make quilting easier, especially when sewing through multiple layers of fabric. It helps move the fabric through the machine evenly, preventing puckering.
Q5: Can I make a smaller version of the Winter Cabin Quilt?
A5: Absolutely! You can adjust the number of blocks and their sizes to create a smaller quilt, such as a lap quilt, baby quilt, or wall hanging. Just make sure to scale the fabric cuts and quilt blocks accordingly.
Q6: What is the best technique for piecing the quilt blocks together?
A6: The best technique for piecing quilt blocks together is to sew with consistent seam allowances (typically ¼ inch). Press seams open or to one side to ensure clean joins between blocks.
Join our VIP broadcast list and gain access to exclusive patterns, all for free. As a VIP member, you’ll receive the best patterns daily, delivered directly to your device. ✨📱 It’s a unique opportunity to stay up-to-date with the latest trends and designs, curated just for you. Don’t miss out on enhancing your projects and discovering new inspirations with the best patterns every day! 🎨🔝
Conclusion
The Winter Cabin Quilt – Tutorial is a beautiful and rewarding project that will provide warmth and comfort throughout the winter season. By following the steps outlined in this guide, you can create a stunning quilt that reflects the cozy charm of a winter cabin. From selecting materials to piecing together log cabin blocks and finishing the quilt with quilting and binding, this tutorial covers all the essential steps.
We hope you enjoyed this tutorial and that it inspires you to start your next quilting project. Please share your thoughts and suggestions in the comments below— we’d love to hear about your quilting experience!

