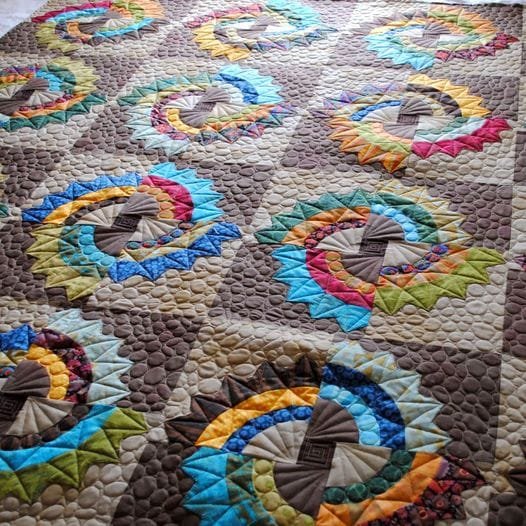
Creating a beautiful quilt can be a rewarding and fulfilling experience, especially when the design is as charming as the Twirling Fans Quilt. This tutorial will guide you step-by-step through the process of making your own Twirling Fans Quilt.
Not only will you learn about the materials needed and the sewing techniques, but you’ll also discover tips to personalize your quilt, making it a unique piece that reflects your style.
In this guide, we’ll break down the process into manageable steps, ensuring you have a clear understanding of each part of the quilting journey. The Twirling Fans Quilt is not only visually stunning, but it also showcases your creativity and skill.
Whether you’re an experienced quilter or a beginner, this tutorial is designed to help you create a quilt that you’ll be proud to display or gift to someone special.
Before we dive into the details of this quilt pattern, let’s briefly discuss the charm and significance of quilting as a craft. Quilting has been a beloved tradition for centuries, passed down through generations.
The act of sewing fabric together to create something functional and beautiful fosters a deep sense of connection and accomplishment. Now, let’s embark on the journey of creating your very own Twirling Fans Quilt.
1. Materials Needed for the Twirling Fans Quilt
To start your Twirling Fans Quilt project, gathering the right materials is crucial. Here’s a list of what you’ll need:
- Fabric: Choose a variety of cotton fabrics in colors and patterns that inspire you. The Twirling Fans design looks particularly lovely with contrasting colors.
- Rotary Cutter and Mat: A rotary cutter will help you cut your fabric accurately, while a cutting mat protects your surfaces.
- Ruler: A quilting ruler will assist in measuring and cutting fabric pieces with precision.
- Sewing Machine: A reliable sewing machine is essential for piecing together your quilt blocks.
- Thread: Select a thread that complements your fabric colors; 100% cotton thread is a great choice.
- Batting: This is the filling that goes between the quilt top and backing, providing warmth and thickness.
Having these materials on hand will set you up for success as you begin your quilting adventure. Remember to wash and iron your fabrics before cutting to pre-shrink them and ensure a professional finish.
2. Cutting the Fabric for the Quilt Blocks
Once you have your materials ready, it’s time to cut your fabric into the necessary pieces for your quilt blocks. The Twirling Fans Quilt consists of multiple fan-shaped pieces, so accuracy is key.
Begin by cutting your fabric into squares that will form the basis of the fan blades. A typical size is 5 inches by 5 inches, but you can adjust based on your desired finished quilt size. After cutting the squares, cut triangles from contrasting fabrics to form the tips of the fans.
Next, arrange your fabric pieces in a way that appeals to you. Experiment with different combinations until you find a layout you love. Keep in mind that the colors and patterns you choose will affect the overall look of your quilt, so take your time to get it right.
After you’re satisfied with your arrangement, it’s time to sew the pieces together. Start by joining the squares and triangles into fan shapes, following the layout you’ve created. Press each seam open to ensure the pieces lay flat, making it easier to assemble the final quilt.
3. Assembling the Twirling Fans Quilt
Now that you’ve cut and sewn the fan shapes, it’s time to assemble the quilt. This stage is where your Twirling Fans Quilt truly starts to come together.
Begin by arranging the fan blocks on a large, flat surface. Lay them out in rows, ensuring that the colors and patterns flow harmoniously. This step is crucial for achieving a balanced look in your finished quilt. Once you’re happy with the arrangement, start sewing the blocks together in rows.
Sew each row individually, then join the rows to complete the quilt top. Be sure to press the seams as you go to keep everything aligned and flat. If you find any discrepancies in your seams or block sizes, now is the time to make adjustments before adding the backing and batting.
After assembling the quilt top, trim any excess fabric along the edges to ensure everything is even. This will make it easier to add the backing and prepare for quilting.
4. Quilting and Finishing Touches
With your quilt top complete, it’s time for the most rewarding part of the process: quilting! This involves sewing through the quilt top, batting, and backing to create a cohesive piece.
There are several quilting techniques you can use, such as straight-line quilting, free-motion quilting, or even hand quilting. Choose a method that you feel comfortable with and that complements your design. For the Twirling Fans Quilt, straight-line quilting often works beautifully, enhancing the fans’ movement.
Once you’ve finished quilting, trim any excess batting and backing fabric, and bind the edges of the quilt to give it a polished look. The binding can be made from your chosen fabric, adding another layer of color and style to your quilt.
Finally, give your quilt a good press and check for any loose threads or imperfections. Once you’re satisfied with your work, it’s time to enjoy your Twirling Fans Quilt! Whether you choose to keep it for yourself or gift it to someone special, this quilt will surely be cherished.
FAQ
Q1: What is the Twirling Fans Quilt pattern?
The Twirling Fans Quilt pattern features a series of fan-shaped blocks arranged in a visually appealing layout. It’s characterized by its flowing design and colorful fabric choices.
Q2: How do I choose fabric for the Twirling Fans Quilt?
Select a variety of cotton fabrics in contrasting colors and patterns. It’s best to choose a combination that reflects your personal style and creates a vibrant, dynamic look.
Q3: Can I use a different quilting technique?
Absolutely! While straight-line quilting is popular for this design, you can use any quilting technique you prefer, such as free-motion quilting or hand quilting.
Q4: How long does it take to make a Twirling Fans Quilt?
The time it takes can vary based on your experience and the quilt size, but expect to spend several hours to a few days on the entire project.
Q5: What type of batting is best for a quilt?
Cotton batting is a great choice as it provides warmth and a nice drape. However, you can also consider polyester or a cotton-poly blend based on your desired finish.
Q6: Can beginners make the Twirling Fans Quilt?
Yes, beginners can certainly tackle this project! The step-by-step approach and clear instructions make it accessible for those new to quilting.
Join our VIP broadcast list and gain access to exclusive patterns, all for free. As a VIP member, you’ll receive the best patterns daily, delivered directly to your device. ✨📱 It’s a unique opportunity to stay up-to-date with the latest trends and designs, curated just for you. Don’t miss out on enhancing your projects and discovering new inspirations with the best patterns every day! 🎨🔝
Conclusion
In this Twirling Fans Quilt – Tutorial, we’ve explored everything from gathering materials to the final stitching. You learned how to cut your fabric, assemble quilt blocks, and quilt your finished top. With patience and creativity, you can create a stunning quilt that showcases your skills and style.
I invite you to share your thoughts and experiences in the comments below. Did you find this tutorial helpful? What suggestions do you have for others looking to make their own Twirling Fans Quilt? Your feedback is invaluable, and I’m excited to hear about your quilting journey!

