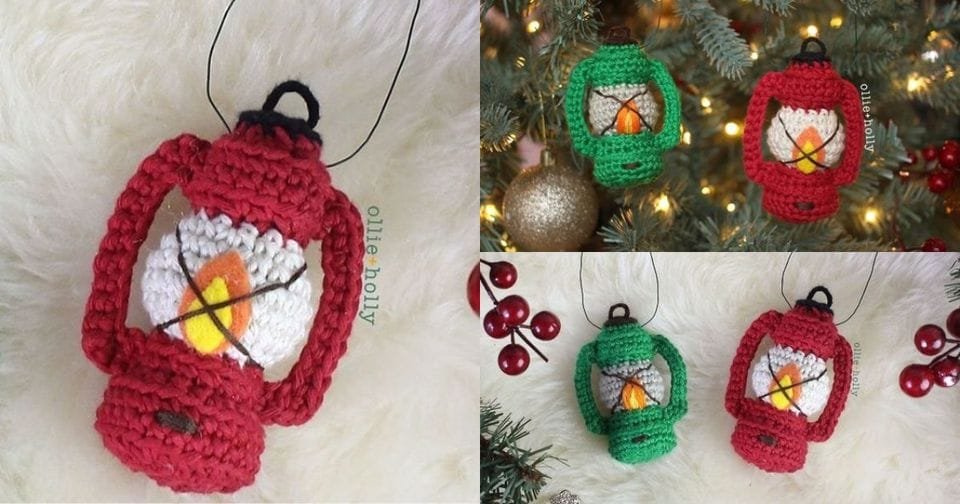
The Vintage Camping Lantern Crochet Ornament – Free Pattern is an adorable, rustic addition to any holiday decor. This pattern captures the nostalgic charm of vintage camping lanterns, combining the outdoorsy feel of camping with the cozy warmth of crochet.
With this free pattern, you can create a unique ornament that will not only look great on your holiday tree but also make a thoughtful, handmade gift.
In this tutorial, we’ll walk through every step needed to make the Vintage Camping Lantern Crochet Ornament. The project is simple enough for beginners, but engaging enough to keep seasoned crocheters entertained.
It’s perfect for using up small amounts of yarn and can be customized with colors to match any decor theme.
By following this Vintage Camping Lantern Crochet Ornament – Free Pattern, you’ll learn new techniques, create something unique, and enjoy the satisfaction of making a beautiful handmade item. Let’s dive in and get started!
1. Gathering Materials and Yarn Selection
Before starting your Vintage Camping Lantern Crochet Ornament, gather all necessary materials. Choosing the right yarn and tools will set the foundation for a well-crafted ornament.
1.1 Yarn Choices
Selecting the correct yarn is essential. For a Vintage Camping Lantern Crochet Ornament, a worsted-weight yarn works well as it provides enough structure to hold the shape. Consider using natural fibers like cotton or wool for a rustic, vintage feel.
1.2 Color Selection
Traditional camping lanterns often come in metallic or muted shades. For a realistic look, opt for colors like grey, black, or red. However, you can customize the ornament with any color that fits your personal style or decor theme.
1.3 Choosing the Right Hook
A smaller crochet hook, such as a 3.5mm or 4mm, will ensure tighter stitches. This helps the ornament maintain its shape and gives it a sturdier appearance, preventing any loose or floppy areas.
1.4 Additional Materials
In addition to yarn and a hook, you’ll need some fiberfill stuffing to give the lantern its form. Small amounts of black yarn or thread can be used for detailing, such as adding the lantern’s handle.
1.5 Stitch Markers and Needle
Stitch markers will help you keep track of your rounds and stitches, especially if you’re new to crocheting in the round. A tapestry needle is essential for weaving in ends and adding final details.
1.6 Preparing Your Workspace
Set up a comfortable space with good lighting, a small container for supplies, and a space to keep your yarn tangle-free. Having a designated workspace can help you stay organized and make the crocheting process enjoyable.
2. Creating the Lantern’s Base and Shape
The base of the Vintage Camping Lantern Crochet Ornament is where we’ll start, shaping the main body of the lantern to give it a recognizable structure.
2.1 Starting with the Base
Begin by creating a magic ring, a popular technique in crochet that forms a tight center. This will be the bottom of the lantern and give it a solid foundation. Crocheting in the round will help form the cylindrical shape typical of lanterns.
2.2 Increasing for Shape
To shape the base, add increases in each round. This expands the circumference gradually, forming a rounded structure. The size of your base will determine the overall size of your lantern.
2.3 Moving to the Main Body
Once the base is completed, you’ll continue with the main body without any more increases, which will help the lantern take on a cylindrical shape. Keep your stitches tight to avoid any gaps where the stuffing might show.
2.4 Adding the Top
As you reach the top of the lantern, start decreasing stitches to close it off. This part may require some trial and error, so be patient and adjust as needed. The goal is to create a tapered top to mimic a real camping lantern’s appearance.
2.5 Adding Stuffing
Before fully closing the lantern, add fiberfill stuffing to give it volume. Be careful not to overstuff, as this can distort the shape. Aim for a firm but pliable structure that holds its form well.
2.6 Closing the Lantern
Once the stuffing is in place, complete the last few rounds with decreases, pulling the top closed. Use a tapestry needle to secure the last stitches and weave in the end for a clean finish.
3. Adding Details and Customization
Now that the base of your Vintage Camping Lantern Crochet Ornament is complete, let’s add the details that make it unique and authentic.
3.1 Creating the Lantern’s Handle
The handle is an essential part of the lantern and can be made using a single chain stitch. This gives the ornament an authentic look and allows it to be easily hung on a tree. Attach each end of the chain to opposite sides of the top of the lantern.
3.2 Adding the Glass Section
Many vintage camping lanterns have a glass section in the center. To replicate this, you can create a band of a lighter or contrasting color around the middle. This adds dimension and mimics the look of glass in a real lantern.
3.3 Stitching Additional Accents
For an extra touch, you can add small details like decorative stitches to indicate knobs or fuel valves. These little accents give the ornament a realistic and charming appearance.
3.4 Embellishing with Beads
Adding a bead at the top or bottom of the lantern can represent hardware elements. This small detail can elevate the overall look, making the ornament feel more polished and intricate.
3.5 Experimenting with Color Variations
For a personalized touch, try experimenting with different colors for the main body and accents. Whether you want a vintage look with muted colors or a modern look with bright hues, the options are limitless.
3.6 Finishing with a Loop
To make it easy to hang on your tree, add a small yarn loop at the top. This final touch makes the ornament ready for display or gift-giving.
4. Displaying and Gifting Your Lantern Ornament
The Vintage Camping Lantern Crochet Ornament is versatile and can be used in various ways during the holiday season. Here’s how to make the most of your handmade ornament.
4.1 Using as a Holiday Ornament
The lantern ornament is perfect for hanging on a Christmas tree. Its rustic charm and unique design make it stand out among other decorations, adding a cozy, handmade touch to your decor.
4.2 Incorporating in Seasonal Decor
Apart from the tree, this ornament can be displayed around the home. Try placing it on a garland, a wreath, or in a seasonal centerpiece for added holiday flair.
4.3 Creating a Set for Gifting
Consider making multiple lantern ornaments in different colors or sizes to give as a set. This makes a thoughtful, handmade gift that friends and family will cherish.
4.4 Adding to Gift Wrapping
You can also attach the ornament to holiday gifts as a unique addition. It not only decorates the package but becomes an additional present that the recipient can keep.
4.5 Displaying Year-Round
Although perfect for the holidays, the lantern ornament can be enjoyed year-round. Its vintage camping theme makes it suitable for rustic home decor, even after the holidays.
4.6 Sharing with Others
If you enjoyed making this Vintage Camping Lantern Crochet Ornament – Free Pattern, consider sharing your creations online or in crochet groups. Inspire others by showing your unique color choices and customizations!
FAQ
Q: Is this pattern suitable for beginners?
A: Yes, this Vintage Camping Lantern Crochet Ornament pattern is beginner-friendly. It uses basic stitches, and the instructions are straightforward, making it accessible to all skill levels.
Q: What type of yarn is best for this project?
A: Worsted-weight yarn works well for this ornament. Cotton or wool yarns are recommended for a sturdy, vintage look, though you can use any yarn that gives a firm shape.
Q: How long does it take to make one ornament?
A: The time varies by skill level, but most crocheters can complete one ornament in about 1-2 hours, making it a quick and satisfying project.
Q: Can I use different colors for the lantern?
A: Absolutely! You can customize the lantern with any colors you prefer, whether you want traditional red and black or a more modern color scheme.
Q: Do I need to add stuffing to the ornament?
A: Yes, stuffing helps the ornament maintain its shape. Use fiberfill or scrap yarn for an eco-friendly option.
Q: Can I wash the ornament?
A: Handwashing is recommended, especially if you use delicate yarns. Avoid machine washing, as it may distort the shape of the ornament.
Join our VIP broadcast list and gain access to exclusive patterns, all for free. As a VIP member, you’ll receive the best patterns daily, delivered directly to your device. ✨📱 It’s a unique opportunity to stay up-to-date with the latest trends and designs, curated just for you. Don’t miss out on enhancing your projects and discovering new inspirations with the best patterns every day! 🎨🔝
Conclusion
This Vintage Camping Lantern Crochet Ornament – Free Pattern provides a delightful way to add handmade charm to your holiday decor. By following this guide, you’ve crafted a unique and personal ornament that embodies the spirit of the season.
We hope you enjoyed making this rustic and whimsical piece. Let us know your thoughts and any suggestions for future projects in the comments below!

