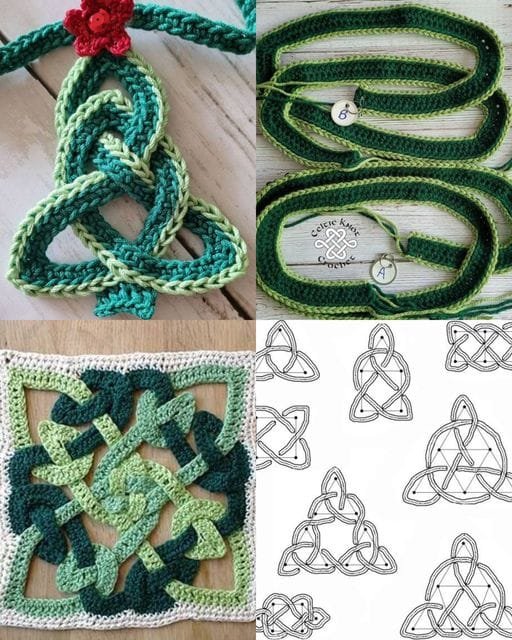
Creating a DIY Crochet Celtic Knot Decoration is a beautiful way to enhance your home decor and showcase your crochet skills.
The intricate design of Celtic knots is not only visually appealing but also holds rich symbolism, representing eternity and interconnectedness.
Whether you want to use this decoration for special occasions or everyday home embellishments, this tutorial will guide you through the entire process step by step.
Crocheting Celtic knots can be a delightful challenge for crocheters of all skill levels. The patterns involved in this project may seem complex at first glance, but with a little patience and practice, you’ll find that they are quite manageable.
This tutorial breaks down the steps into simple instructions, allowing you to enjoy the creative process as you work on your knot decorations.
In this article, we will cover everything from the materials needed to detailed instructions for creating your own stunning DIY Crochet Celtic Knot Decoration. By the end of this tutorial, you’ll have not just the skills to create these decorations but also ideas for how to incorporate them into your home decor.
1. Materials Needed for Your Crochet Celtic Knot
Before diving into the project, it’s important to gather all the necessary materials for your DIY Crochet Celtic Knot Decoration. Having everything ready will make your crafting experience much smoother and enjoyable.
First, you will need yarn. For a Celtic knot, consider using worsted-weight cotton or acrylic yarn. Cotton yarn provides a crisp finish that holds its shape well, while acrylic yarn offers a softer texture. Choose colors that complement your decor; traditional choices are green or gold for a classic Celtic look, but feel free to experiment with your favorite colors.
Next, select the appropriate crochet hook. A size H (5.0 mm) or I (5.5 mm) hook is typically ideal for worsted-weight yarn. The hook size can affect the final look and drape of your project, so it’s worth checking the yarn label for recommendations.
In addition to yarn and a hook, you might want to have stitch markers handy. These can help you keep track of your stitches and rows, especially in more complex patterns. You will also need a yarn needle for weaving in ends once your project is complete, as well as scissors to cut your yarn.
Lastly, consider any embellishments you may want to add, such as beads or decorative buttons. These can enhance the beauty of your Celtic knot decoration and add a personal touch. Once you have everything collected, you’re ready to move on to the next step!
2. Basic Crochet Techniques for Celtic Knots
Creating a DIY Crochet Celtic Knot Decoration involves several basic crochet techniques. While the final design may look intricate, it’s constructed using foundational stitches that you likely already know. Familiarizing yourself with these techniques will help you tackle this project with confidence.
The first technique you’ll use is the chain stitch. This is the starting point for most crochet projects. To create a chain, make a slip knot on your hook, yarn over, and pull the yarn through the loop on your hook. Repeat this until you have the desired number of chains.
Next is the single crochet stitch. This stitch is essential for creating the base of your knot. To perform a single crochet, insert your hook into the next chain, yarn over, pull through, yarn over again, and pull through both loops on your hook. Practicing this stitch will help you build the foundation for your Celtic knot.
You will also need to master the double crochet stitch. This stitch adds height and texture to your work, which is crucial for creating the loops of the knot. To perform a double crochet, yarn over, insert your hook into the stitch, yarn over again, pull through, yarn over, pull through the first two loops, and yarn over again to pull through the remaining two loops.
As you progress, you will encounter increases and decreases, which are used to shape your project. Increases allow you to widen a section, while decreases narrow it. Understanding these techniques will be vital in shaping your Celtic knot.
Once you’re comfortable with these basic stitches and techniques, you’re well on your way to creating your DIY Crochet Celtic Knot Decoration. Don’t hesitate to practice each stitch before starting your project; every bit of practice adds to your skill.
3. Step-by-Step Instructions for Crafting Your Knot
Now that you have all your materials and have brushed up on your crochet techniques, it’s time to dive into the step-by-step process of making your DIY Crochet Celtic Knot Decoration. This section will guide you through the crafting of a simple yet beautiful Celtic knot.
- Create a Foundation Chain: Start by making a slip knot on your hook. Chain 40 stitches to create the foundation of your knot. This will give you enough length to work with while forming your design.
- Form the Knot Base: In the fourth chain from the hook, make a double crochet stitch. Continue making double crochet stitches into the following chains, increasing as necessary to create a wider base. This will create the first section of your knot.
- Create the Loops: Once you have completed the base, you will begin creating the loops that form the knot’s intricate design. To do this, chain a few stitches (about 8-10), then slip stitch back into the base to secure the loop. Repeat this process to create additional loops, spacing them evenly along the base.
- Join the Loops: After creating your loops, it’s time to join them together. Carefully fold your loops towards the center, ensuring they overlap in a way that resembles a Celtic knot. Use slip stitches to secure them in place, making sure to maintain the shape.
- Add Embellishments: With the basic shape of your knot complete, consider adding embellishments. You can crochet small flowers or leaves to attach to the knot or incorporate beads for added detail. This is where you can truly personalize your decoration.
- Finish Your Project: Once you are satisfied with your design, weave in any loose ends using your yarn needle. Make sure to trim excess yarn to give your decoration a clean look.
With these steps, you’ve crafted a beautiful DIY Crochet Celtic Knot Decoration that showcases your skills and creativity. Feel free to modify the pattern as you gain confidence to create more complex designs!
4. Creative Ways to Use Your Crochet Celtic Knot
Now that you’ve completed your DIY Crochet Celtic Knot Decoration, it’s time to explore the various creative ways you can use these beautiful pieces in your home or as gifts. The versatility of crochet knots allows for a wide range of applications.
One of the most popular uses for crochet Celtic knots is as wall decorations. Hang them in a group for a stunning visual effect or place them individually throughout your home to create a cohesive theme. They can also be incorporated into wreaths, adding a unique touch to your seasonal decorations.
Another creative idea is to use your knots as gift embellishments. Tie them onto presents to add a special handmade touch. This makes your gifts feel more personal and thoughtful. You could also use them as bookmarks or attach them to handmade cards.
If you’re feeling adventurous, consider sewing your knots onto fabric items, such as tote bags or pillow covers. This will elevate your projects and make for unique, eye-catching designs that showcase your crochet skills.
Additionally, crochet Celtic knots can be utilized in crafting jewelry. Create smaller versions to use as pendants for necklaces or earrings. Adding beads or other decorative elements can transform these knots into stunning wearable art.
Lastly, don’t forget to share your creations with the online crochet community. Posting photos of your finished knots can inspire others and provide you with new ideas for future projects. Join crafting groups or forums where you can exchange tips, patterns, and inspiration with fellow crafters.
FAQ
Q: What type of yarn is best for making Celtic knots?
A: Cotton or acrylic yarns work well for Celtic knots. Cotton provides a crisp finish, while acrylic offers a softer texture.
Q: Can I use a different hook size for my project?
A: Yes, the hook size can vary based on the yarn weight you choose. Always refer to the yarn label for recommended hook sizes.
Q: Are Celtic knots difficult to make?
A: While they may seem complex, Celtic knots are constructed using basic crochet stitches. With practice, anyone can create them.
Q: Can I personalize my Celtic knot decorations?
A: Absolutely! You can experiment with colors, add embellishments, or incorporate them into other projects to make them uniquely yours.
Q: What are some uses for crochet Celtic knots?
A: They can be used as wall decor, gift embellishments, jewelry, or sewn onto fabric items for a unique touch.
Q: Is there a specific pattern to follow for Celtic knots?
A: While many patterns are available, you can also create your own design. Start with the basic techniques and modify them to suit your style.
Join our VIP broadcast list and gain access to exclusive patterns, all for free. As a VIP member, you’ll receive the best patterns daily, delivered directly to your device. ✨📱 It’s a unique opportunity to stay up-to-date with the latest trends and designs, curated just for you. Don’t miss out on enhancing your projects and discovering new inspirations with the best patterns every day! 🎨🔝
Conclusion
In this tutorial, we explored the fascinating world of DIY Crochet Celtic Knot Decoration, covering everything from materials and basic techniques to detailed step-by-step instructions. You now have the knowledge and skills to create beautiful Celtic knots that can enhance your home decor or serve as thoughtful gifts.
We encourage you to experiment with different patterns and embellishments to make your creations truly unique. As you continue your crochet journey, remember that each project is an opportunity to learn and express your creativity.
We would love to hear your thoughts on this tutorial! Please leave your honest feedback and any suggestions for future topics in the comments below. Happy crocheting!

