If you’re looking for a quilt block that combines elegance with creativity, the Beautiful Tunes Block Pattern is the perfect design for you. This pattern is not only visually stunning but also versatile, making it a great addition to any quilt project.
Whether you’re a seasoned quilter or just starting your quilting journey, the Beautiful Tunes Block Pattern offers a unique way to add a musical and harmonious touch to your designs.
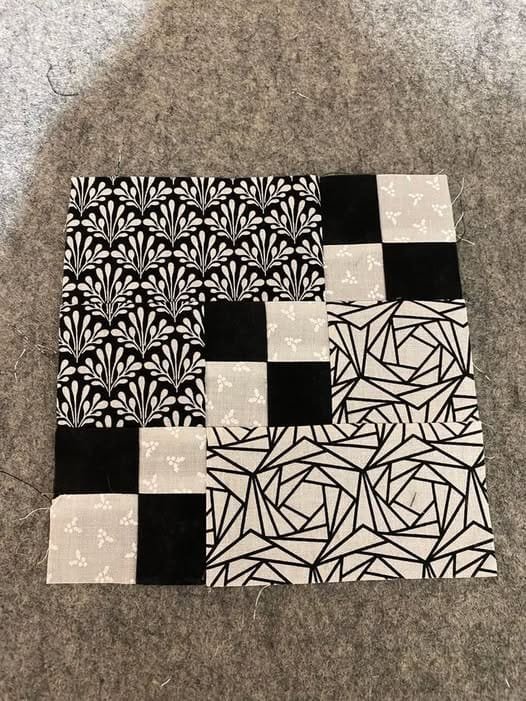
Quilters love the Beautiful Tunes Block Pattern for its intricate details and the way it allows for bold color contrasts. This block is a beautiful way to showcase a variety of fabrics while maintaining a cohesive and stylish look.
From traditional tones to more modern palettes, this pattern offers endless possibilities to express your creativity. By using different fabrics and colors, you can truly make the Beautiful Tunes Block Pattern your own, adding a unique flair to your quilts.
In this article, we will walk through the process of creating your own Beautiful Tunes Block, provide tips and tricks for quilting success, and inspire you with ideas for incorporating this lovely pattern into your quilt projects. Let’s dive into this fun and fulfilling quilting adventure!
1. Materials and Tools You Will Need
Before getting started with your Beautiful Tunes Block Pattern, it’s important to gather the materials and tools that will help you create the perfect quilt block. Having the right supplies on hand will make the process smooth and enjoyable, so let’s take a look at what you’ll need.
Fabrics
The Beautiful Tunes Block Pattern works best when using a combination of at least two contrasting fabrics. For example, you can choose a solid color and a patterned fabric to create a striking visual effect. Consider using cotton fabrics as they are easy to work with and have a nice texture for quilting.
Cutting Tools
A rotary cutter, cutting mat, and ruler are essential tools for cutting your fabric pieces accurately. Precise cutting is crucial in ensuring that your quilt block comes together perfectly, with sharp lines and clean edges.
Sewing Machine
You’ll need a sewing machine that is in good working condition. While the Beautiful Tunes Block Pattern can be sewn by hand, using a sewing machine will save you time and help you achieve more consistent stitches.
Thread
Choose thread that complements your fabric colors, and ensure it is strong enough to hold your quilt together over time. Cotton or polyester thread works well for quilting projects.
Iron
An iron will help you press your seams as you go, ensuring that your block lays flat and your seams are crisp and neat. Pressing is an important step in achieving a polished finish for your quilt.
Pins and Clips
Having pins or fabric clips handy will help you keep your fabric pieces aligned while sewing. This ensures that your seams line up perfectly and that the overall pattern remains consistent.
2. Step-by-Step Guide to Creating the Beautiful Tunes Block
Now that you’ve gathered your materials, it’s time to start sewing your Beautiful Tunes Block Pattern. This step-by-step guide will walk you through the process from cutting to assembling the block. Whether you’re a beginner or experienced quilter, these instructions are easy to follow.
Step 1: Cutting Your Fabric Pieces
Begin by cutting your fabrics into the necessary shapes and sizes for the block. For the Beautiful Tunes Block Pattern, you’ll typically need squares and triangles in different sizes. Make sure to use your ruler and rotary cutter for precise measurements.
Step 2: Arranging Your Pieces
Lay out your fabric pieces on a flat surface, following the design of the Beautiful Tunes Block Pattern. This will help you visualize how the finished block will look and ensure that you are happy with your color and fabric choices before sewing.
Step 3: Sewing the Block
Start sewing your fabric pieces together, beginning with the smaller units such as the triangles. Use a quarter-inch seam allowance for each seam, as this is the standard for most quilting projects. Be sure to backstitch at the beginning and end of each seam for added durability.
Step 4: Pressing the Seams
After sewing each unit, press your seams open or to one side using your iron. Pressing is a key step in creating flat, professional-looking quilt blocks. Avoid ironing back and forth, as this can stretch the fabric and distort your block.
Step 5: Assembling the Block
Once all the individual units are sewn, you can begin assembling them into the full Beautiful Tunes Block Pattern. Pin the pieces together and check that your seams match up perfectly. Then, sew the units together to form the complete block.
Step 6: Final Pressing
Give your finished block one last press to ensure it’s flat and all seams are crisp. This step will help your block lay smoothly when it’s time to join it with other blocks or add it to a quilt top.
3. Creative Ways to Use the Beautiful Tunes Block Pattern
The Beautiful Tunes Block Pattern is highly versatile and can be used in a variety of quilting projects. Here are a few creative ideas for how to incorporate this block into your next quilt or crafting endeavor.
1. Full-Size Quilt
One of the most popular ways to use the Beautiful Tunes Block Pattern is to make an entire quilt out of repeating blocks. This creates a harmonious and rhythmic design that is both visually striking and cohesive. You can alternate colors or fabrics for each block to create a dynamic and personalized quilt.
2. Baby Quilts
For a smaller project, the Beautiful Tunes Block can be used to create a baby quilt. This is a thoughtful and unique gift for new parents, especially when made with soft, pastel fabrics that suit a nursery.
3. Table Runners
Add a touch of handmade elegance to your dining room with a table runner made from Beautiful Tunes Blocks. By placing the blocks in a row, you’ll create a stunning centerpiece for your table that is sure to impress guests.
4. Wall Hangings
If you want to showcase your quilting skills, consider using the Beautiful Tunes Block Pattern to create a quilted wall hanging. Choose colors that complement your home decor and hang it in a prominent spot for everyone to admire.
5. Pillow Covers
For a quick and easy project, turn the Beautiful Tunes Block into decorative pillow covers. This is a great way to experiment with different color combinations and add a handmade touch to your home.
6. Quilted Tote Bags
Use the Beautiful Tunes Block Pattern to create a stylish quilted tote bag. This functional yet beautiful project is perfect for carrying your crafting supplies or as a gift for a fellow quilter.
4. Tips for Perfecting Your Beautiful Tunes Block
Whether you’re new to quilting or an experienced quilter, there are always ways to improve your technique and ensure that your Beautiful Tunes Block Pattern comes out looking its best. Here are some tips for achieving a flawless block.
1. Practice Precision Cutting
Precision is key when cutting your fabric pieces. Take your time to measure accurately and cut straight lines. This will make sewing your pieces together much easier and result in a cleaner, more professional-looking block.
2. Use Chain Piecing
Chain piecing is a time-saving technique where you sew multiple units together without stopping to cut the thread in between. This not only speeds up the process but also helps you keep your fabric pieces organized.
3. Test Your Seam Allowance
Before you start sewing your Beautiful Tunes Block, make sure your sewing machine is set to a consistent quarter-inch seam allowance. You can test this on a scrap piece of fabric to ensure your seams are accurate.
4. Press, Don’t Iron
When pressing your seams, avoid moving the iron back and forth as you would when ironing clothes. Instead, press down gently to set the seam in place. This will help prevent any distortion or stretching of the fabric.
5. Match Your Seams
When sewing the units together, take the time to pin your seams so they match up perfectly. This attention to detail will make your Beautiful Tunes Block Pattern look professional and well-crafted.
6. Don’t Rush the Process
While it can be tempting to rush through the sewing process, taking your time will ensure that each step is done correctly. Quilting is a craft that rewards patience and precision, so enjoy the journey as much as the finished product!
FAQ
What skill level is required to make the Beautiful Tunes Block Pattern?
The Beautiful Tunes Block Pattern is suitable for all skill levels, from beginners to advanced quilters. It involves basic cutting, sewing, and pressing techniques, making it accessible to everyone.
Can I use different fabrics for this pattern?
Yes! One of the joys of quilting is experimenting with different fabric choices. You can use solids, prints, or even a mix of both to create a unique look for your Beautiful Tunes Block.
How long does it take to complete one block?
Depending on your skill level and pace, it typically takes about 1 to 2 hours to complete a single Beautiful Tunes Block. However, taking your time to ensure precision will result in a more polished block.
What size is the finished Beautiful Tunes Block?
The finished size of the Beautiful Tunes Block will depend on the dimensions you cut your fabric pieces to, but most commonly, it measures around 12 inches square.
Can I hand sew this pattern?
While the Beautiful Tunes Block Pattern can be hand-sewn, using a sewing machine will save you time and produce more consistent results. However, hand sewing is a great option if you enjoy a slower, more meditative process.
How can I ensure my seams align perfectly?
To ensure your seams align perfectly, use pins or clips to hold your fabric pieces together before sewing. Taking the time to pin each seam carefully will help you achieve a neat and professional-looking block.
Conclusion
The Beautiful Tunes Block Pattern offers quilters a chance to explore their creativity and produce a block that is both elegant and versatile. Whether you’re making a full-size quilt or a smaller project like a table runner or pillow cover, this pattern allows for endless possibilities in fabric and color combinations.
I hope this guide has helped you understand the steps involved in creating your own Beautiful Tunes Block. Please feel free to share your thoughts, suggestions, or questions in the comments below. I can’t wait to see how your blocks turn out! Happy quilting!

