If you’re looking for a fun and creative way to bring a touch of nature into your home décor or handmade gifts, crochet pinecones are the perfect project! In this Crochet Pinecones – Video Tutorial and Ideas to Get Inspired, we’ll show you how to crochet realistic and decorative pinecones that can be used in various ways.
Whether you’re a beginner or an experienced crocheter, this tutorial will guide you step-by-step to create beautiful pinecones, and we’ll also provide ideas to spark your creativity.
Crochet pinecones are versatile and can be used in different seasonal decorations, particularly around fall and winter. They make great additions to wreaths, garlands, or even as standalone ornaments.
If you want to add a personal touch to your home or give a unique, handmade gift, learning how to crochet pinecones is an excellent place to start. In this tutorial, you will not only find a video tutorial to guide you but also ideas to get inspired.
Throughout this Crochet Pinecones – Video Tutorial and Ideas to Get Inspired, we will break down the project into easy-to-follow steps, share the tools you need, and explore different creative ways you can use your finished crochet pinecones. Let’s dive into this fun and festive crochet project!
1. Materials and Tools for Crochet Pinecones
Before you start making your crochet pinecones, it’s essential to gather all the necessary materials and tools. Here is a list of items you will need:
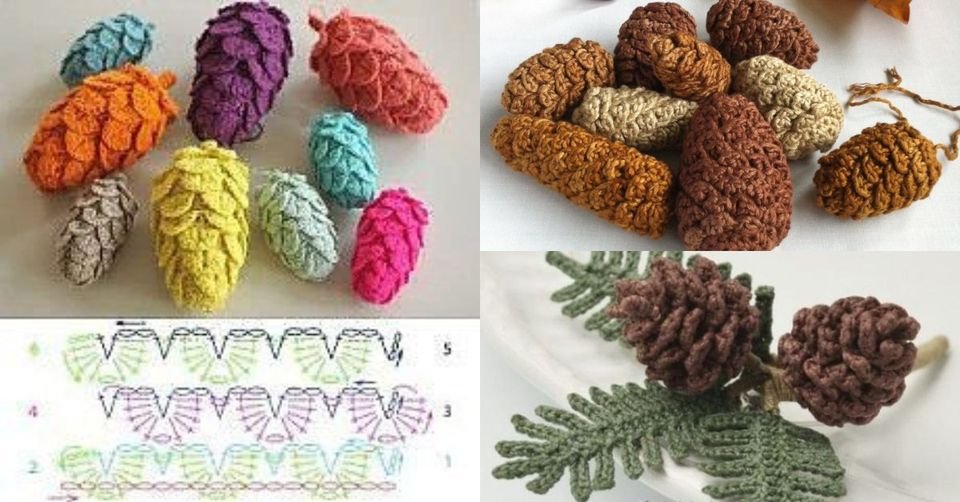
- Yarn: Choose a yarn that suits the look you want for your pinecones. For a more rustic and natural look, consider using brown or beige yarn. Thicker yarns create larger pinecones, while thinner yarns can give you a more delicate look.
- Crochet Hook: The size of the crochet hook depends on the yarn you choose. Check the yarn label for the recommended hook size. Typically, a 4mm (G/6) crochet hook works well for most yarn types used for pinecones.
- Stuffing (Optional): If you want your pinecones to have a fuller, three-dimensional appearance, you can stuff them with polyfill or cotton stuffing. This is particularly useful for making pinecones that will hang as ornaments.
- Tapestry Needle: A tapestry needle is used to weave in the loose ends of the yarn and attach any small details like the pinecone scales or hanging loops.
- Scissors: A sharp pair of scissors will help you cut the yarn cleanly without fraying the ends.
- Stitch Markers: Stitch markers help you keep track of your rounds, especially when working in continuous rounds to shape the pinecone.
Gathering these materials ahead of time will make the process smoother and more enjoyable. Once you have everything ready, you can follow along with the video tutorial to start crocheting your pinecones.
2. How to Crochet Pinecones – Step-by-Step Tutorial
Now that you have your materials ready, it’s time to dive into the actual crocheting process. This section of the Crochet Pinecones – Video Tutorial and Ideas to Get Inspired will walk you through the steps to create your pinecone.
- Start with a Magic Ring: To begin your pinecone, create a magic ring (or adjustable ring), which allows you to crochet in the round. This is the base of your pinecone.
- Crocheting in Rounds: Work single crochet stitches into the magic ring, slowly increasing the stitch count with each round to give the pinecone its natural shape. Pay attention to the video tutorial for guidance on where to place your stitches.
- Shaping the Pinecone: As you progress, you’ll need to create the characteristic scales of the pinecone. This is done by alternating between regular stitches and special stitches, such as popcorn or cluster stitches, which give the pinecone texture and volume.
- Adding the Scales: Once the body of the pinecone is shaped, the scales are crocheted in a separate round. These are typically worked in rows on the surface of the pinecone, giving it a more natural appearance.
- Closing the Pinecone: After you’ve finished crocheting the desired number of rounds, it’s time to close off the top of the pinecone. This can be done by threading the tail of the yarn through the remaining stitches and pulling it tight.
- Stuffing (Optional): If you want your pinecone to be more solid, stuff it lightly with polyfill before fully closing the top. Be careful not to overstuff, as this could distort the shape of the pinecone.
- Final Touches: Weave in the loose ends of your yarn with a tapestry needle. You can also add a loop to hang the pinecone as an ornament if desired.
Once you’ve followed these steps, your crochet pinecone is complete! Feel free to experiment with different yarns and sizes to create a variety of pinecones that suit your project.
3. Creative Ideas to Use Crochet Pinecones
Now that you’ve learned how to crochet pinecones, it’s time to explore some creative ways to use them. Whether you’re decorating your home for the holidays or creating gifts, these ideas will help you get inspired.
- Pinecone Wreath: Crochet several pinecones and attach them to a wreath base. Combine the pinecones with greenery, berries, or ribbons for a stunning holiday decoration. The natural look of the pinecones will add a rustic charm to your wreath.
- Garlands and Bunting: Create a garland by stringing multiple crochet pinecones along a piece of yarn or twine. Hang this garland on your mantel, across a window, or along a staircase railing for a festive touch.
- Table Decorations: Use crochet pinecones as part of your table centerpiece. Scatter them among candles, flowers, and leaves for a nature-inspired autumn or winter theme. They also work well as placeholders for holiday dinners.
- Christmas Tree Ornaments: Crochet smaller pinecones and attach a loop to the top to hang them on your Christmas tree. You can even add beads or glitter to the pinecones for an extra festive look.
- Gift Toppers: Personalize your holiday gifts by tying a crochet pinecone to the top of a wrapped present. This handmade touch will make your gift stand out and show the recipient that you put thought and effort into their present.
- Nature-Themed Toys: If you enjoy making toys, crochet pinecones can be part of a woodland creature set. Pair them with other nature-inspired crochet projects like mushrooms, leaves, or small animals for a cute playset.
These ideas offer just a glimpse of how versatile and creative crochet pinecones can be. Feel free to mix and match these ideas or come up with your own ways to incorporate them into your projects.
4. Tips for Perfecting Your Crochet Pinecones
Crocheting pinecones can be a fun and satisfying project, but like all crochet projects, there are a few tips that can help you achieve the best results. Here are some helpful tips from the Crochet Pinecones – Video Tutorial and Ideas to Get Inspired:
- Practice Your Magic Ring: The magic ring is a crucial foundation for crocheting in the round. If you’re new to this technique, practice it a few times before starting your pinecone to ensure it’s tight and secure.
- Choose the Right Yarn: Yarn choice matters when it comes to achieving the right look for your pinecones. A thicker yarn will give you a chunkier pinecone, while thinner yarns will create a more delicate design. Natural colors work best, but don’t be afraid to experiment with different shades.
- Stitch Markers Are Your Friend: Keep track of your rounds with stitch markers, especially when working in continuous rounds. This will prevent you from losing count and ensure your pinecone stays symmetrical.
- Watch the Video Carefully: Following along with the video tutorial is essential, especially if you’re new to crochet. Pause the video at key moments to ensure you’re following each step correctly.
- Tension Control: Pay attention to your tension while crocheting. Consistent tension will result in a uniform and smooth pinecone. If your stitches are too tight, the pinecone may be difficult to shape; if too loose, it may lack structure.
- Experiment with Sizes: Once you’ve mastered the basic pinecone, try changing up the size by using different yarn weights and hook sizes. This will give you a variety of pinecones to use in your projects.
By following these tips, your crochet pinecones will turn out beautifully, and you’ll be ready to tackle more advanced projects in no time.
FAQ
What type of yarn works best for crochet pinecones?
A worsted-weight cotton or wool yarn works well for crochet pinecones. It provides the right amount of structure while still being soft and easy to work with.
Can I stuff the crochet pinecones?
Yes, you can stuff your crochet pinecones with polyfill or cotton stuffing to give them a more three-dimensional shape. This is optional but recommended if you want a fuller, more realistic pinecone.
How long does it take to crochet a pinecone?
Depending on your skill level, it can take anywhere from 30 minutes to an hour to complete a crochet pinecone. Once you’re comfortable with the pattern, you can make them faster.
Are crochet pinecones suitable for beginners?
Yes, crochet pinecones are a beginner-friendly project as long as you are familiar with basic stitches like single crochet and working in the round. The video tutorial will guide you through the process step-by-step.
Can I customize the size of my crochet pinecones?
Absolutely! By using different hook sizes and yarn weights, you can easily adjust the size of your crochet pinecones. Thicker yarn and larger hooks will result in bigger pinecones, while thinner yarn and smaller hooks will create smaller ones.
How can I use crochet pinecones in holiday decorations?
Crochet pinecones are versatile and can be used in a variety of ways, including as ornaments for your Christmas tree, additions to wreaths and garlands, or as part of a holiday table centerpiece.
Join our VIP broadcast list and gain access to exclusive patterns, all for free. As a VIP member, you’ll receive the best patterns daily, delivered directly to your device. ✨📱 It’s a unique opportunity to stay up-to-date with the latest trends and designs, curated just for you. Don’t miss out on enhancing your projects and discovering new inspirations with the best patterns every day! 🎨🔝
Conclusion
In this Crochet Pinecones – Video Tutorial and Ideas to Get Inspired, we explored how to make beautiful crochet pinecones, from gathering the materials to completing the project step-by-step. We also shared several creative ways to use your finished pinecones in home décor and holiday decorations. We hope this tutorial has inspired you to try this project and get creative with your crochet skills.
If you have any questions, comments, or suggestions, please share them below. We’d love to hear your feedback and see how you use crochet pinecones in your own projects! Happy crocheting!

