Learning how to crochet roses is a delightful and rewarding experience for both beginners and seasoned crocheters alike. Roses are a versatile motif that can be used in various projects, from embellishing garments to creating beautiful home decor items.
This free crochet pattern will guide you through the steps to create stunning crochet roses that can brighten up any space or project.
Crocheting roses not only allows you to practice your skills but also enables you to explore different yarns and colors. The beauty of roses lies in their variety, and you can customize your creations to fit your personal style.
Whether you want a classic red rose for a romantic gift or a vibrant pink rose to adorn a spring scarf, the possibilities are endless.
In this article, we’ll break down the process of crocheting roses into easy-to-follow steps. You’ll find detailed instructions, tips for making your roses look their best, and creative ideas for incorporating them into your projects.
So, grab your crochet hook and let’s dive into the wonderful world of how to crochet roses!
1. Materials You’ll Need for Crocheting Roses
Before you start crocheting your beautiful roses, it’s essential to gather the right materials. Having everything prepared will make your crocheting experience smoother and more enjoyable.
- Yarn: Choose a medium-weight yarn (worsted weight) in the colors you desire. For a classic rose, consider red, pink, or white yarn. You can also experiment with variegated yarn for a unique look.
- Crochet Hook: A size H (5 mm) crochet hook is generally recommended for medium-weight yarn. However, always check the yarn label for specific hook size suggestions.
- Scissors: A sharp pair of scissors will be necessary for cutting your yarn at the end of your project.
- Yarn Needle: A yarn needle, also known as a tapestry needle, will help you weave in the ends of your yarn for a clean finish.
- Stitch Marker: While not required, a stitch marker can help you keep track of the beginning of your rounds, especially if you’re working on larger projects.
- Optional Embellishments: If desired, you can add embellishments like beads or glitter to give your roses an extra touch of charm.
Once you have gathered all your materials, you’re ready to start creating your stunning crochet roses!
2. Basic Crochet Techniques for Roses
Understanding some basic crochet techniques is crucial for how to crochet roses successfully. Below are essential techniques that will help you as you work through the pattern.
- Chain Stitch (ch): The chain stitch is the foundation of most crochet projects. To make a chain, simply yarn over and pull through the loop on your hook. This creates a series of loops that will be the base for your rose.
- Slip Stitch (sl st): A slip stitch is used to join rounds or to move your yarn to a different part of your project without adding height. To make a slip stitch, insert your hook into the desired stitch, yarn over, and pull through both loops on your hook.
- Double Crochet (dc): This stitch adds height and texture to your work. To make a double crochet, yarn over, insert your hook into the stitch, yarn over again, pull through, yarn over, pull through two loops, yarn over, and pull through the remaining two loops on your hook.
- Single Crochet (sc): A single crochet stitch is a tighter stitch that creates a solid fabric. To make a single crochet, insert your hook into the stitch, yarn over, pull through, yarn over again, and pull through both loops.
- Increasing and Decreasing: You will often need to increase (add stitches) or decrease (remove stitches) to shape your rose properly. To increase, simply make two stitches in one stitch. To decrease, you will crochet two stitches together.
- Working in the Round: Many rose patterns are worked in the round. This means you will crochet in a circular motion without turning your work, allowing for a seamless look.
With these techniques under your belt, you’re ready to start crocheting your first rose!
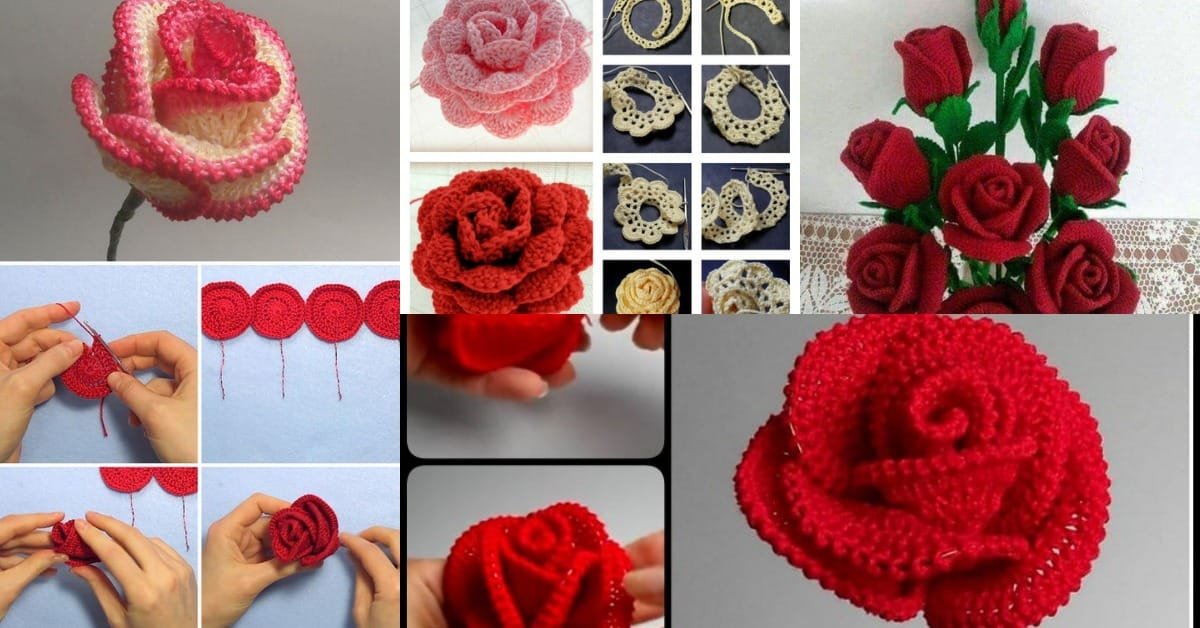
3. Step-by-Step Guide to Crocheting Roses
Now that you are familiar with the necessary materials and basic techniques, it’s time to get into the how to crochet roses process. Follow these step-by-step instructions to create your beautiful roses.
- Start with a Magic Ring: Create a magic ring (also known as a magic circle) by wrapping the yarn around your fingers, then pulling a loop through the center. This allows you to pull the yarn tight, creating a closed center for your rose.
- Round 1: Chain 2 (this does not count as a stitch). Make 10 double crochets into the magic ring. Pull the magic ring tight to close the center, then slip stitch into the top of the first double crochet to join.
- Round 2: Chain 2 and make 2 double crochets in the same stitch. Continue making 2 double crochets in each stitch around. You should have 20 double crochets at the end of this round. Slip stitch to join.
- Round 3: Chain 2, then make 1 double crochet in the first stitch, followed by 2 double crochets in the next stitch. Repeat this pattern around (1 double crochet, 2 double crochets) until you reach the end. Slip stitch to join, resulting in 30 stitches.
- Round 4: Chain 2, then make 1 double crochet in the first two stitches, followed by 2 double crochets in the next stitch. Repeat this pattern around (1 double crochet, 1 double crochet, 2 double crochets) until you reach the end. Slip stitch to join for a total of 40 stitches.
- Shaping the Rose: To shape your rose, begin to gently pull the petals outward. You can pinch the base of the petals to create a natural rose look. Weave in any loose ends with your yarn needle for a polished finish.
Congratulations! You have just completed your first crochet rose. Now you can make multiple roses in various colors to create bouquets, hair accessories, or decorative pieces for your home.
4. Creative Ways to Use Your Crocheted Roses
Now that you know how to crochet roses, it’s time to explore some creative ways to use them in your projects. Here are some ideas to inspire your next crochet adventure.
- Bouquets: Create a stunning bouquet by crocheting several roses in different colors and sizes. Wrap them with a decorative ribbon for a lovely gift or centerpiece.
- Hair Accessories: Attach small crocheted roses to hair clips or headbands for a charming hair accessory. This is a fun way to add a floral touch to your outfit.
- Embellishments for Clothing: Sew or glue roses onto sweaters, jackets, or bags to add a unique flair. They can serve as a pop of color or a thoughtful touch to any garment.
- Home Decor: Use crocheted roses to create beautiful wall hangings or table centerpieces. They can brighten up your living space and add a cozy touch.
- Gift Wrapping: Attach a small rose to gift packages or cards for an elegant finishing touch. This small detail can make your gifts feel extra special.
- Holiday Decorations: Incorporate your roses into holiday decor by using them in wreaths or garlands. They can be themed for any holiday, from Christmas to Valentine’s Day.
These creative ideas will help you showcase your crochet roses in a variety of ways, allowing you to enjoy your beautiful creations.
FAQ: Frequently Asked Questions About How to Crochet Roses
- Can I use different yarn types for crocheting roses?
Yes, you can experiment with different yarn types, such as cotton or silk blends, to achieve various textures and finishes for your roses. - What if I don’t know how to make a magic ring?
If you’re uncomfortable making a magic ring, you can start with a chain of four stitches, then join them into a ring instead. You will work your double crochets into that ring. - How can I make my roses more realistic?
To make more realistic roses, consider adding shading to your petals using a darker shade of yarn at the base and a lighter shade toward the tips. - Are crocheted roses suitable for beginners?
Yes! This pattern is beginner-friendly, making it an excellent project for those just starting with crochet. - How do I secure my roses if I want to attach them to something?
You can use a yarn needle to sew the roses onto your project or use hot glue for a quicker attachment method. - How do I store my crocheted roses?
Store your crocheted roses in a cool, dry place. You can use a box or a bag to protect them from dust and damage. -
Join our VIP broadcast list and gain access to exclusive patterns, all for free. As a VIP member, you’ll receive the best patterns daily, delivered directly to your device. ✨📱 It’s a unique opportunity to stay up-to-date with the latest trends and designs, curated just for you. Don’t miss out on enhancing your projects and discovering new inspirations with the best patterns every day! 🎨🔝
Conclusion
In this article on how to crochet roses, we have covered everything from gathering materials and learning basic crochet techniques to step-by-step instructions for creating beautiful roses. Additionally, we’ve explored creative ways to incorporate these lovely flowers into your projects, allowing you to showcase your crochet skills.
We hope you found this free crochet pattern helpful and inspiring. Please share your thoughts and suggestions in the comments below. We’d love to hear about your experiences with crocheting roses and any unique projects you’ve completed. Happy crocheting!

