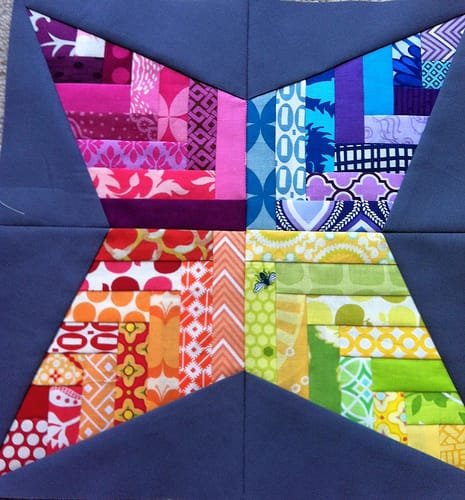
The Basketweave Braid Star Block – Free Pattern by Nydia Kehnle is an exquisite quilting design that showcases the beauty of geometric patterns while allowing quilters of all skill levels to express their creativity.
This unique block features an intricate woven appearance that brings warmth and texture to any quilt. Whether you’re a seasoned quilter or a beginner, this pattern will guide you through the process of creating a stunning star block that is sure to impress.
In quilting, the beauty often lies in the details, and the Basketweave Braid Star Block is no exception. Nydia Kehnle’s innovative design combines traditional star block elements with a contemporary twist, resulting in a versatile pattern that can be adapted for various projects.
From bed quilts to table runners, this star block can elevate any quilting endeavor, making it an essential addition to your pattern library.
This tutorial will delve into the materials needed, detailed instructions for constructing the block, and tips for finishing your project. By the end of this article, you’ll have the knowledge and confidence to create your own Basketweave Braid Star Block and incorporate it into your future quilting projects.
1. Materials Needed for the Basketweave Braid Star Block
Before you start your quilting journey, it’s crucial to gather all the necessary materials for the Basketweave Braid Star Block – Free Pattern by Nydia Kehnle. Having everything ready will streamline your process and ensure a more enjoyable sewing experience.
First, you’ll need fabric. Choose a selection of high-quality quilting cotton in your desired colors. The pattern typically calls for a combination of contrasting fabrics to highlight the woven effect, so consider selecting light and dark shades. You’ll need fabric for the star points, the background, and any additional pieces that make up the basketweave design.
Second, ensure you have a rotary cutter, cutting mat, and quilting ruler. These tools are essential for making precise cuts, which is vital for achieving accurate seams and clean edges in your star block. If you prefer, a fabric scissors can also work, but rotary cutting often yields better results.
Third, you will need thread. A high-quality cotton or polyester thread in a color that complements your fabric choice is ideal. Make sure your thread is strong enough to withstand the stresses of piecing and quilting without breaking.
Next, have a sewing machine ready for use. While most sewing machines can handle quilting tasks, ensure your machine is in good working condition and that you have the necessary attachments, such as a quarter-inch foot, for accurate piecing.
Fifth, prepare your ironing station. An iron and a pressing mat are important for achieving crisp seams and finishing your block neatly. Pressing your seams open or to one side will help reduce bulk and create a professional-looking finish.
Lastly, don’t forget to have a seam ripper on hand. Mistakes can happen, and having a reliable seam ripper will make it easier to correct any errors without damaging your fabric.
2. Cutting Your Fabric Pieces
Now that you have gathered your materials, the next step in creating the Basketweave Braid Star Block is cutting your fabric pieces. Accurate cutting is crucial in quilting, as it affects the overall look and fit of your blocks.
First, refer to the Basketweave Braid Star Block – Free Pattern by Nydia Kehnle for the specific measurements needed for each piece. Typically, you’ll be cutting squares and triangles from your chosen fabrics. Be sure to read the pattern carefully to understand how many pieces you will need.
Second, use your rotary cutter and cutting mat to cut your fabric. Lay your fabric flat on the cutting mat and use your quilting ruler to measure and mark your cuts. When cutting triangles, ensure you cut accurately along the diagonal to achieve the correct shape.
Third, label your cut pieces if necessary. Keeping your pieces organized will save you time during the sewing process. You can use small labels or sticky notes to identify which pieces belong to which part of the star block.
Next, take a moment to review your cutting layout. This is a good time to rearrange your fabrics to see how they will look together in the finished block. Experimenting with different color combinations can help you find the perfect arrangement that suits your style.
Fifth, double-check your measurements. It’s always wise to confirm that your pieces are cut to the correct dimensions before you start sewing. This attention to detail will pay off in the accuracy of your finished block.
Finally, prepare for the sewing stage by stacking your cut pieces in order of assembly. This will make the process flow more smoothly and reduce the risk of losing any pieces during your project.
3. Assembling the Basketweave Braid Star Block
With your fabric pieces cut, it’s time to start assembling your Basketweave Braid Star Block. This part of the Basketweave Braid Star Block – Free Pattern by Nydia Kehnle is where your creativity truly shines as you bring your block to life.
First, begin by piecing together the star points. Take the triangles and sew them together according to the pattern instructions. Be sure to use a quarter-inch seam allowance for accuracy. Press the seams open or to one side as you go to ensure the points lay flat.
Second, once your star points are complete, you can start attaching them to the background squares. Align the star points with the background pieces and sew them together, again using a quarter-inch seam allowance. Pay attention to the orientation of the pieces to ensure that your star block is symmetrical.
Third, after the star points are sewn onto the background, it’s time to assemble the rows. The Basketweave Braid Star Block is constructed in sections, so follow the pattern to join the star segments into rows. Press the seams as you go to keep your block looking crisp and neat.
Next, add any additional strips that create the basketweave effect. These strips will enhance the design and add a unique texture to your block. Follow the instructions carefully to ensure that the strips are placed correctly for the woven look.
Fifth, as you assemble the entire block, take your time to pin the pieces together. Pinning can help keep everything aligned while you sew, reducing the chances of fabric shifting or slipping out of place.
Finally, once the entire block is assembled, give it a final press. Use your iron to smooth out any wrinkles and ensure that all seams are flat. This will help your Basketweave Braid Star Block look its best when it’s time to incorporate it into your quilt.
4. Finishing Your Basketweave Braid Star Block
Now that your Basketweave Braid Star Block is assembled, it’s time to focus on finishing touches that will give it a polished look. This stage of the Basketweave Braid Star Block – Free Pattern by Nydia Kehnle is crucial for ensuring that your block stands out beautifully in your quilt.
First, trim your block to the final dimensions specified in the pattern. Use your rotary cutter and quilting ruler to ensure that your edges are straight and even. Trimming is important to maintain the accuracy of your quilt design, especially when combining multiple blocks.
Second, consider adding a border to your star block if desired. A simple border can frame your block and enhance its overall design. Choose a fabric that complements your existing colors for a cohesive look.
Next, prepare for quilting. If you plan to add this block to a larger quilt, you’ll want to create a quilt sandwich with your backing fabric, batting, and the star block on top. Pin or baste the layers together to prevent any shifting during the quilting process.
Fifth, select your quilting design. You can opt for simple straight-line quilting or get creative with free-motion quilting to highlight the basketweave effect. The choice of quilting can significantly impact the texture and appearance of your finished block.
Finally, after quilting, bind your block if it will be used as a standalone piece, or incorporate it into your quilt as planned. If binding, cut strips of fabric to create a clean edge around your block, ensuring that the corners are mitered for a professional finish.
FAQ
Q: What skill level is required for the Basketweave Braid Star Block?
A: The Basketweave Braid Star Block – Free Pattern by Nydia Kehnle is suitable for quilters of all skill levels. The instructions are clear and straightforward, making it accessible for beginners while still offering creative challenges for experienced quilters.
Q: Can I use different fabrics for the star block?
A: Yes! While the pattern suggests specific colors, you can customize your Basketweave Braid Star Block using any fabric that suits your style. Consider using solid colors, prints, or even themed fabrics for unique results.
Q: How do I ensure accurate cutting and sewing?
A: Use a rotary cutter, ruler, and mat for precise cutting. When sewing, always maintain a consistent quarter-inch seam allowance and press your seams to reduce bulk and keep your pieces aligned.
Q: What should I do if I make a mistake while sewing?
A: Mistakes happen! Use a seam ripper to carefully remove any incorrect stitches. Take your time to ensure you don’t damage the fabric, and re-sew the pieces as needed.
Q: How do I care for my finished star block?
A: To care for your Basketweave Braid Star Block, machine wash it on a gentle cycle with cold water, and tumble dry on low heat. Avoid using harsh detergents to maintain the fabric’s color and integrity.
Q: Can I use this pattern for projects other than quilts?
A: Absolutely! The Basketweave Braid Star Block can be used in various projects, including wall hangings, table runners, or even as a decorative pillow cover. The versatility of the design allows for many creative applications.
Join our VIP broadcast list and gain access to exclusive patterns, all for free. As a VIP member, you’ll receive the best patterns daily, delivered directly to your device. ✨📱 It’s a unique opportunity to stay up-to-date with the latest trends and designs, curated just for you. Don’t miss out on enhancing your projects and discovering new inspirations with the best patterns every day! 🎨🔝
Conclusion
The Basketweave Braid Star Block – Free Pattern by Nydia Kehnle offers an exciting opportunity to create a beautiful and intricate quilting piece. From gathering your materials to cutting, assembling, and finishing your block, this tutorial has guided you through the essential steps to complete this project successfully. By incorporating this stunning star block into your quilting repertoire, you can enhance your creations and showcase your skills.
We hope this article has inspired you to take on the Basketweave Braid Star Block and explore the endless possibilities it offers. Please leave your honest feedback and suggestions in the comments below, and share your experiences with this delightful quilting pattern! Happy quilting!

