If you’re looking for a festive and cozy project for the holiday season, the Treats from a Holiday Tree Quilt Tutorial by Debora Exum is the perfect choice.
This quilt tutorial brings together the magic of Christmas with the warmth of handmade crafts, resulting in a beautiful, tree-themed quilt that will brighten up any room.
Whether you’re an experienced quilter or just starting, this tutorial offers a step-by-step guide to help you create your very own holiday masterpiece.
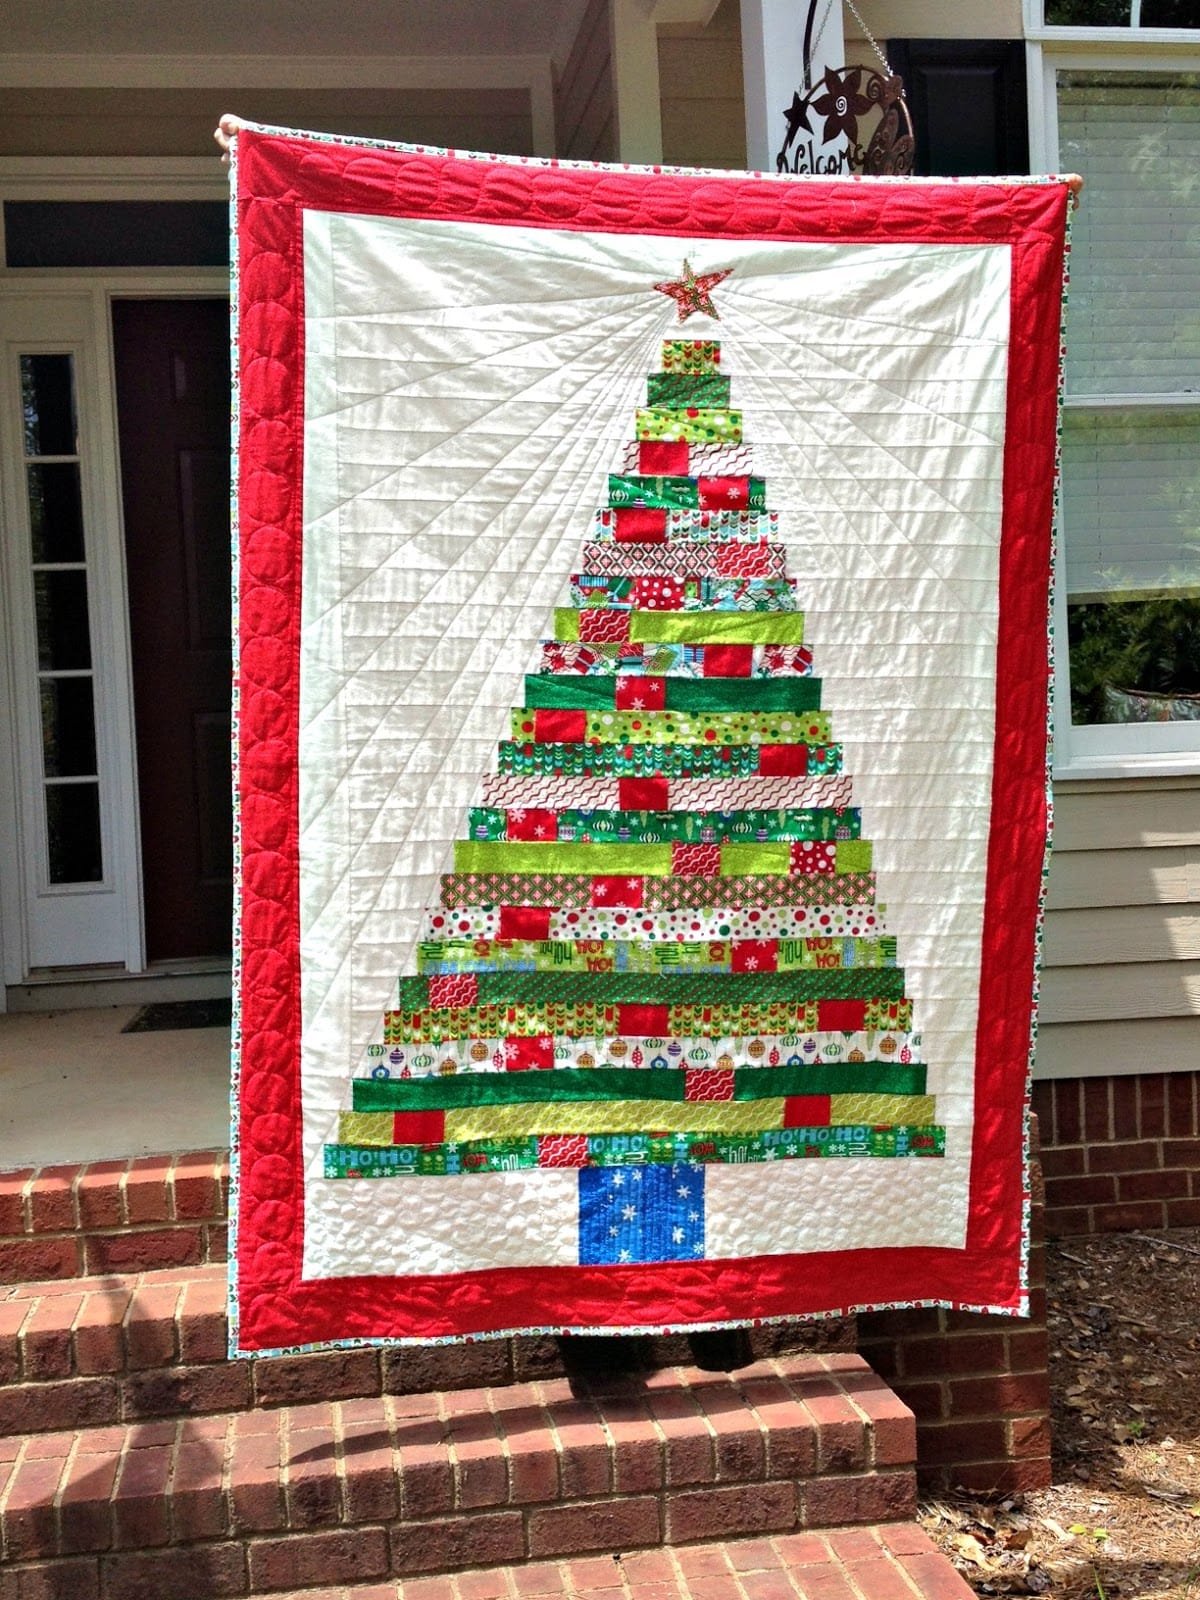
The Treats from a Holiday Tree Quilt Tutorial by Debora Exum is designed with holiday spirit in mind, making it a fun and festive project for quilters of all levels.
The design is made up of different blocks that represent treats and decorations often found on Christmas trees, creating a charming and seasonal theme.
In this article, we’ll walk you through the key steps of the tutorial, breaking down the process to ensure that your quilt turns out beautifully.
From selecting fabrics to stitching the blocks together, the Treats from a Holiday Tree Quilt Tutorial by Debora Exum is the ideal way to create a holiday quilt that you can cherish for years to come.
1. Materials You’ll Need for the Treats from a Holiday Tree Quilt
Before starting your Treats from a Holiday Tree Quilt Tutorial by Debora Exum, it’s important to gather all the necessary materials. Having everything you need on hand will make the process much smoother and more enjoyable. Here’s a list of materials you’ll need to get started:
- Fabric: Select fabrics in a variety of holiday-themed colors and patterns. Greens, reds, whites, and golds are perfect for creating the Christmas tree and the decorations represented in the quilt blocks.
- Batting: This is the middle layer of the quilt, giving it thickness and warmth. Choose a high-quality batting that matches the size of your quilt.
- Backing Fabric: The fabric for the back of the quilt can either match or contrast with your front design. Opt for a solid color or a subtle pattern that complements your quilt top.
- Quilting Ruler and Cutting Mat: These tools are essential for cutting your fabric pieces accurately.
- Rotary Cutter: This tool will make it easier to cut straight lines quickly and efficiently.
- Thread: Choose a thread that complements the colors of your fabric. A neutral color often works well, but feel free to experiment with colored thread to add extra detail.
- Quilting Pins: These are used to hold the fabric pieces in place as you sew them together.
By gathering these materials before starting your Treats from a Holiday Tree Quilt Tutorial by Debora Exum, you’ll set yourself up for a smooth and enjoyable quilting experience.
2. Cutting and Preparing the Fabric
Once you’ve gathered your materials, it’s time to start cutting and preparing the fabric for your Treats from a Holiday Tree Quilt. This step is crucial, as the precision of your cuts will determine how well your quilt pieces fit together.
- Cut the Fabric into Blocks: Using your quilting ruler and rotary cutter, cut the fabric into squares and rectangles that will form the different sections of the quilt. Each block in the Treats from a Holiday Tree Quilt Tutorial by Debora Exum represents a treat or decoration, so make sure to follow the measurements provided in the tutorial.
- Arrange the Blocks: Lay out the fabric pieces on a flat surface to get a sense of how they will look when sewn together. This step allows you to rearrange the blocks if needed before you start sewing.
- Press the Fabric: Before sewing, it’s a good idea to press the fabric pieces with an iron to remove any wrinkles. This will help the fabric lay flat as you sew, ensuring clean, straight lines.
- Label the Pieces: To avoid confusion, label each fabric block according to the design instructions from the Treats from a Holiday Tree Quilt Tutorial by Debora Exum. This will make it easier to assemble the quilt later on.
- Trim Excess Fabric: After arranging the blocks, trim any excess fabric that might have been left over from the cutting process. Accuracy is key here to ensure that all your quilt pieces align perfectly.
- Consider Adding Sashing: Sashing is a strip of fabric sewn between blocks, and it can help separate the blocks while adding visual interest to your quilt. If you’d like to add sashing, make sure to cut the fabric strips before beginning assembly.
Following these steps will set you up for success as you move into the next stage of the Treats from a Holiday Tree Quilt Tutorial by Debora Exum.
3. Assembling the Quilt Top
Once your fabric pieces are cut and arranged, it’s time to assemble the quilt top. In this section of the Treats from a Holiday Tree Quilt Tutorial by Debora Exum, you’ll learn how to sew the blocks together to form the main part of the quilt.
- Sew the Blocks Together: Start by sewing the individual blocks together. Use a quarter-inch seam allowance, which is standard in quilting, to ensure consistency across all blocks. Be sure to press the seams flat with an iron after each row is sewn.
- Assemble the Rows: After sewing the individual blocks, sew the blocks together in rows. Follow the pattern from the Treats from a Holiday Tree Quilt Tutorial by Debora Exum to ensure the blocks are in the correct order.
- Add Sashing (Optional): If you decided to include sashing, sew the strips between the rows of blocks. This will create a framed effect around each block, making the individual designs stand out.
- Sew the Rows Together: Once all the rows are complete, sew them together to form the quilt top. Make sure the seams from each row align correctly.
- Check for Accuracy: After sewing the rows together, double-check that all the blocks are aligned and that there are no gaps or crooked seams. If needed, make adjustments before moving forward.
- Press the Quilt Top: Once the quilt top is assembled, press the entire top with an iron to remove any wrinkles and ensure the seams lay flat.
By following these steps, you’ll create a beautiful quilt top that’s ready for quilting.
4. Quilting and Finishing the Quilt
Now that your quilt top is complete, it’s time to move on to the quilting process. This stage of the Treats from a Holiday Tree Quilt Tutorial by Debora Exum will walk you through how to layer the quilt and finish it off with a binding.
- Create a Quilt Sandwich: A quilt sandwich is made up of three layers: the quilt top, the batting, and the backing fabric. Lay the backing fabric flat on a surface, then place the batting on top, and finally, add the quilt top. Make sure all three layers are smooth and aligned.
- Baste the Quilt: Basting holds the three layers of the quilt together while you quilt them. You can baste with safety pins or by using a temporary spray adhesive. Start from the center and work your way out to ensure the layers don’t shift during quilting.
- Quilt the Layers Together: Quilting is the process of stitching through all three layers of the quilt. You can use straight-line quilting, free-motion quilting, or even hand quilting. Follow the design suggestions from the Treats from a Holiday Tree Quilt Tutorial by Debora Exum or get creative with your quilting patterns.
- Trim the Edges: After quilting, trim the edges of the quilt to remove any excess batting or backing fabric. Make sure the edges are straight and clean, as this will make binding the quilt easier.
- Add the Binding: Binding is the fabric strip that finishes the edges of the quilt. Sew the binding around the perimeter of the quilt, folding it over the edges and hand-stitching it in place for a neat finish.
- Inspect the Quilt: Before considering the quilt complete, inspect it for any loose threads or missed stitches. Make any necessary touch-ups, then give the quilt one final press to remove wrinkles.
Completing these steps will give you a finished quilt that’s not only beautiful but also durable enough to be cherished for years.
FAQ
Q: What size should the Treats from a Holiday Tree Quilt be?
A: The Treats from a Holiday Tree Quilt Tutorial by Debora Exum offers flexibility in terms of size. You can adjust the size based on the number of blocks you include, but typically, it will be a throw-size quilt around 50” x 60”.
Q: Can beginners follow the Treats from a Holiday Tree Quilt Tutorial by Debora Exum?
A: Yes! This tutorial is designed to be beginner-friendly, with clear, step-by-step instructions. Even if you’re new to quilting, you’ll be able to follow along and create a beautiful holiday quilt.
Q: What is the best fabric for a holiday quilt?
A: Cotton quilting fabric is the best choice for this project. It’s easy to work with and comes in a wide range of holiday-themed prints. Look for fabrics with Christmas trees, candy canes, or snowflakes to enhance the holiday theme.
Q: How long does it take to complete the Treats from a Holiday Tree Quilt?
A: The time it takes to complete the quilt depends on your skill level and how much time you dedicate to the project. On average, it may take about 10-15 hours to complete the quilt from start to finish.
Q: Can I customize the quilt with different colors or designs?
A: Absolutely! The Treats from a Holiday Tree Quilt Tutorial by Debora Exum is highly customizable. You can choose different colors or even incorporate other holiday-themed designs into the blocks.
Q: Do I need a sewing machine for this quilt?
A: While a sewing machine will speed up the process, you can also hand-sew the quilt if you prefer. Hand-sewing takes more time but adds a personal touch to the project.
Join our VIP broadcast list and gain access to exclusive patterns, all for free. As a VIP member, you’ll receive the best patterns daily, delivered directly to your device. ✨📱 It’s a unique opportunity to stay up-to-date with the latest trends and designs, curated just for you. Don’t miss out on enhancing your projects and discovering new inspirations with the best patterns every day! 🎨🔝
Conclusion
The Treats from a Holiday Tree Quilt Tutorial by Debora Exum is a fun and festive project that allows you to create a quilt full of holiday spirit. By following the steps outlined in this article, you’ll be able to craft a cozy and beautiful quilt that will become a cherished part of your holiday decor. Whether you’re making it for yourself or as a gift, the finished product will be a reminder of the joy of handmade creations.
We hope you found this guide helpful! Let us know your thoughts in the comments below, and feel free to share any suggestions or ideas you have for future projects.

