In this article, we will explore the Kimono Girl quilt, a beautiful and charming design that celebrates the elegance of Japanese culture.
This quilt measures 62 x 78″ and is perfect for anyone looking to add a touch of sophistication to their home decor or make a thoughtful gift. With the free pattern at Tilda’s World, you can easily create your own version of this stunning quilt.
Whether you’re an experienced quilter or a beginner eager to learn, this tutorial will guide you through each step of the process.
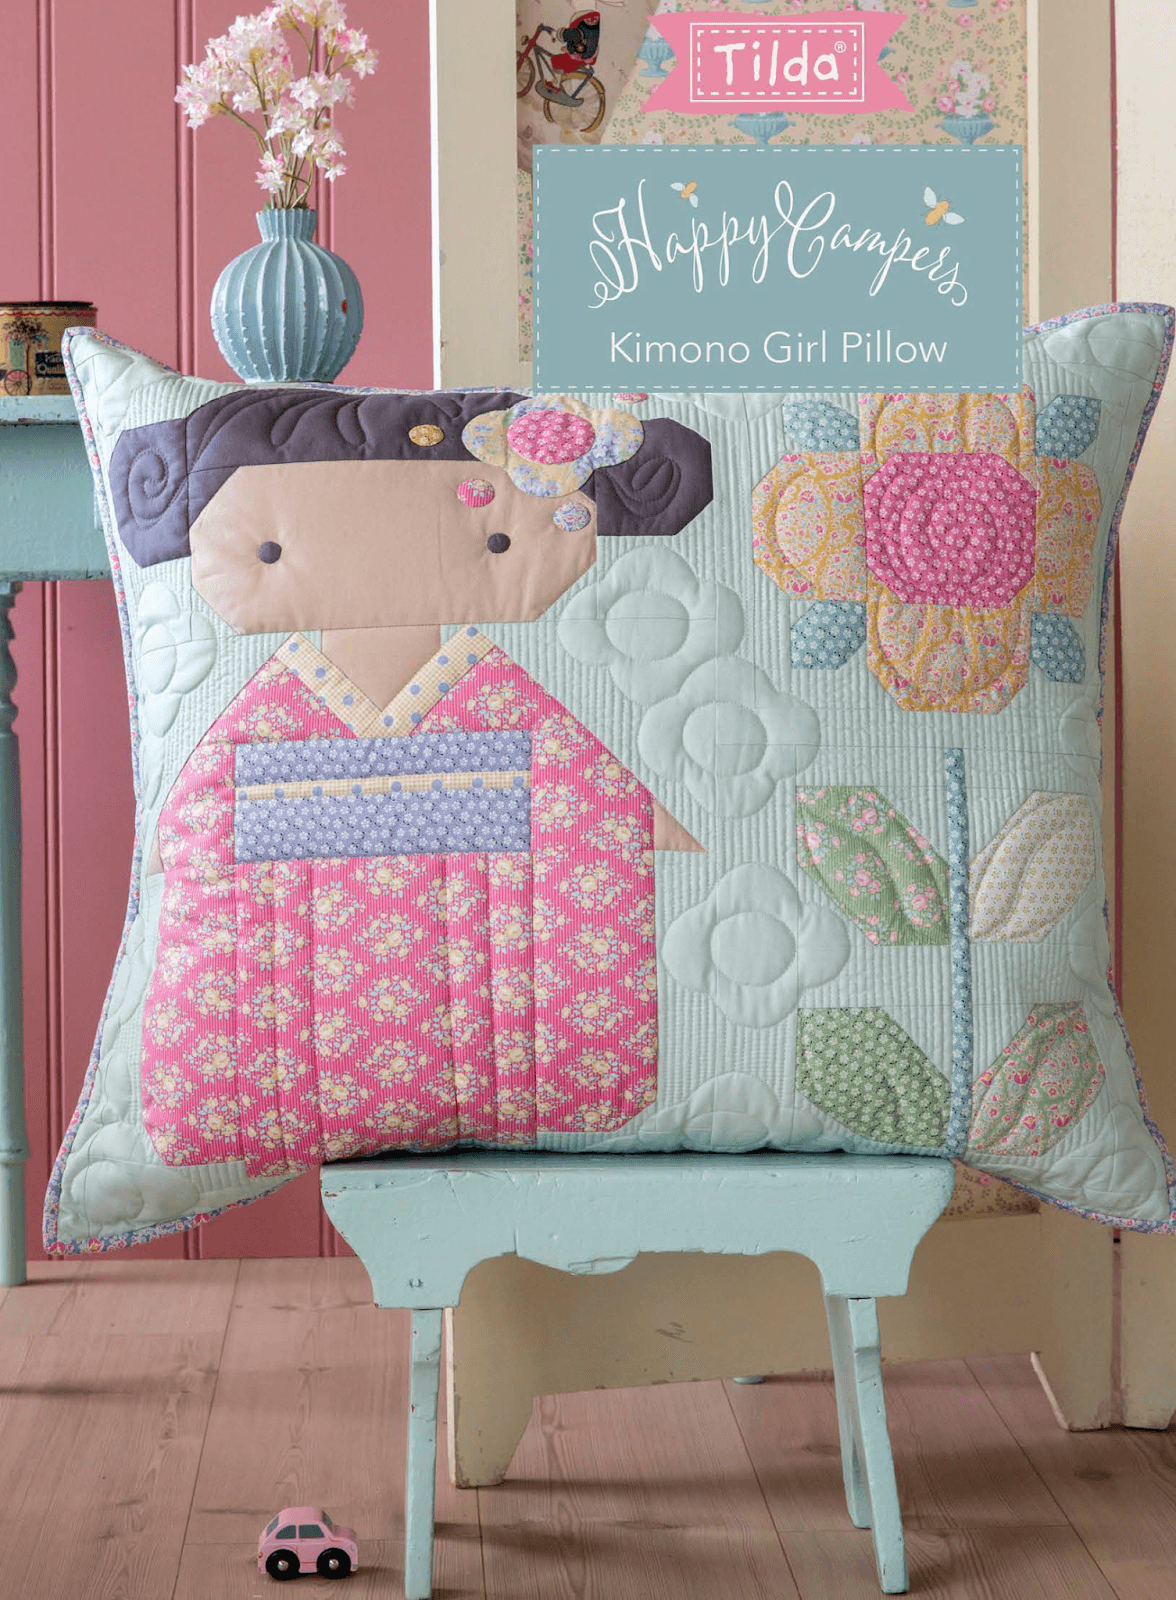
The Kimono Girl quilt features adorable blocks that depict a girl in a traditional kimono, beautifully surrounded by intricate patchwork patterns. The colors and fabrics you choose can greatly enhance the design, making it unique to your personal style.
This quilt is not just a project; it’s a journey through creativity, offering the chance to express yourself through fabric and design.
Throughout this tutorial, we will cover everything you need to know, from gathering materials to assembling your quilt blocks.
We’ll also provide tips on how to quilt and bind your finished piece, ensuring that you have all the information necessary to complete your Kimono Girl quilt. Let’s dive into the exciting world of quilting!
1. Gathering Your Materials
Before we begin sewing, it’s essential to gather all the materials needed to create your Kimono Girl quilt. Having everything organized will make the process smoother and more enjoyable.
- Fabrics: Choose a variety of fabrics that reflect your style. For the Kimono Girl quilt, you will need different prints for the kimono, background, and additional patchwork elements. Tilda’s fabrics are known for their soft colors and whimsical designs, perfect for this project.
- Thread: Select high-quality cotton thread that matches your fabric choices. A neutral color often works well, but don’t hesitate to choose a thread that adds a pop of color to your project.
- Cutting Tools: You’ll need a rotary cutter, a cutting mat, and a ruler for precise fabric cutting. Make sure your blades are sharp for clean cuts, which are crucial in quilting.
- Sewing Machine: A reliable sewing machine is vital for piecing your quilt blocks together. Familiarize yourself with your machine’s settings and functions before you start sewing.
- Iron and Ironing Board: An iron is essential for pressing seams and fabric pieces flat, ensuring that your quilt block maintains its shape during assembly.
- Batting and Backing Fabric: Don’t forget to pick up some batting and backing fabric for the final quilt. Cotton batting is often recommended for its breathability and comfort.
2. Cutting Your Fabric Pieces
With your materials ready, the next step in our Kimono Girl quilt tutorial is cutting your fabric pieces. This step is crucial for ensuring that all your blocks fit together perfectly.
- Step 1: Measure and Mark: Using your ruler, measure out the dimensions for each piece according to the free pattern at Tilda’s World. Take your time during this step; accuracy will make a big difference in the finished quilt.
- Step 2: Cut the Kimono Blocks: Begin with the fabric for the kimono blocks. Cut the required shapes, paying attention to the orientation of patterns, as this can affect the overall look of your quilt.
- Step 3: Prepare Background Pieces: Next, cut the fabric for the background of your quilt blocks. This will serve as the canvas for your kimono girl designs.
- Step 4: Cut Patchwork Pieces: For the additional patchwork elements, cut various shapes and sizes. These pieces will add depth and interest to your quilt.
- Step 5: Organize Your Pieces: As you cut each piece, organize them by block or color. This will save you time when you start assembling the quilt.
- Step 6: Press Your Fabric: Before sewing, press each piece with your iron. This will help eliminate any wrinkles and ensure that your seams align properly when you begin to stitch.
3. Assembling the Kimono Girl Quilt Blocks
Now that your fabric pieces are cut and organized, it’s time to assemble your Kimono Girl quilt blocks. Follow these steps for a smooth assembly process.
- Step 1: Start with the Kimono Block: Take the cut pieces for the kimono block and lay them out in their designated positions. This will help you visualize the design before sewing.
- Step 2: Sew the Kimono Pieces Together: Begin by sewing the pieces for the kimono together, starting with the sleeves and body. Use a quarter-inch seam allowance for best results.
- Step 3: Attach the Background Fabric: Once the kimono is assembled, attach the background fabric to the kimono block. This will frame your design and provide contrast.
- Step 4: Add Patchwork Elements: Incorporate the patchwork pieces you’ve cut. These can be added around the edges of the kimono block or as part of a border, depending on your design preferences.
- Step 5: Press the Seams: After each sewing step, press the seams flat. This will help ensure that your quilt blocks remain square and neat.
- Step 6: Complete the Remaining Blocks: Repeat the assembly process for the remaining blocks in the quilt. Aim for consistency in your sewing and pressing techniques to achieve a cohesive look.
4. Quilting and Binding Your Kimono Girl Quilt
With your quilt blocks assembled, it’s time to quilt and bind your Kimono Girl quilt. This final stage adds texture and finish to your project.
- Step 1: Layer the Quilt: Lay out your backing fabric on a flat surface, right side down. Place the batting on top, followed by the quilt top. Smooth out any wrinkles as you layer.
- Step 2: Baste the Layers Together: Use safety pins or basting spray to hold the layers together temporarily. This step is crucial to prevent shifting during quilting.
- Step 3: Quilt Your Design: Using your sewing machine, quilt through all layers. You can opt for straight lines, free-motion quilting, or any pattern that complements your Kimono Girl quilt.
- Step 4: Trim Excess Batting and Backing: Once quilted, trim any excess batting and backing fabric from the edges of your quilt. This will help create clean edges for binding.
- Step 5: Prepare the Binding: Cut strips of fabric for the binding. These strips should be 2.5 inches wide. Join the strips together until you have enough length to go around the entire quilt.
- Step 6: Bind Your Quilt: Attach the binding to the edges of your quilt, sewing it down with a quarter-inch seam. Fold the binding over to the back and hand stitch it down for a finished look.
FAQ
Q: What skill level is required for the Kimono Girl quilt tutorial?
A: The Kimono Girl quilt – Free Tutorial is suitable for quilters of all skill levels, including beginners. Basic sewing knowledge is helpful but not necessary.
Q: Where can I find the free pattern for the Kimono Girl quilt?
A: The free pattern at Tilda’s World can be downloaded from their website. It provides detailed instructions and templates for the quilt blocks.
Q: What fabrics work best for the Kimono Girl quilt?
A: Cotton fabrics are ideal for quilting due to their durability and ease of handling. Tilda’s fabrics are highly recommended for their beautiful prints and soft feel.
Q: How do I care for my finished quilt?
A: To maintain your quilt, wash it in cold water on a gentle cycle. Tumble dry on low heat or line dry to prevent shrinking and preserve the fabric.
Q: Can I customize the colors in the Kimono Girl quilt?
A: Absolutely! Feel free to use your favorite colors and fabrics to create a unique version of the Kimono Girl quilt that reflects your personal style.
Q: How long will it take to complete the Kimono Girl quilt?
A: The time it takes to complete the quilt will vary based on your skill level and the amount of time you can dedicate to sewing. On average, expect to spend several days to a few weeks on the project.
Join our VIP broadcast list and gain access to exclusive patterns, all for free. As a VIP member, you’ll receive the best patterns daily, delivered directly to your device. ✨📱 It’s a unique opportunity to stay up-to-date with the latest trends and designs, curated just for you. Don’t miss out on enhancing your projects and discovering new inspirations with the best patterns every day! 🎨🔝
Conclusion
In this Kimono Girl quilt – Free Tutorial, we’ve covered everything from gathering materials to assembling, quilting, and binding your beautiful quilt. You have learned how to create a stunning 62 x 78″ quilt that showcases the charm of a kimono girl while allowing for personal creativity in fabric choices. We hope this tutorial has inspired you to embark on your quilting journey.
We encourage you to share your thoughts and suggestions in the comments below. Your feedback is invaluable, and we’d love to hear about your experiences as you create your own Kimono Girl quilt! Happy quilting!

