If you’re looking to add a delightful touch to your crochet projects, the Crochet 3D butterfly tutorial is the perfect choice for you! Crocheting 3D butterflies can transform simple items into vibrant, eye-catching pieces, whether you’re making accessories, home decor, or gifts.
These little creatures are not only fun to create but also offer endless possibilities for customization in color and size, allowing you to express your creativity.
In this tutorial, we’ll walk you through the steps to create your very own 3D butterfly. We’ll cover the materials you’ll need, provide detailed instructions for each part of the butterfly, and explore creative ways to use your finished butterflies.
Whether you are a seasoned crocheter or just starting, this guide is designed to be user-friendly and straightforward, making it easy for you to follow along.
So, grab your yarn and hooks, and let’s dive into the beautiful world of crochet as we learn how to crochet a 3D butterfly!
1. Materials Needed
Before we start our Crochet 3D butterfly tutorial, it’s essential to gather all the materials you’ll need. Having everything ready will streamline the process and allow you to focus on the fun of crocheting.
- Yarn: Choose a lightweight yarn (preferably sport or DK weight) for a delicate look. You can opt for cotton, acrylic, or a blend. The choice of color is entirely up to you; vibrant colors will make your butterfly stand out beautifully.
- Crochet Hook: A size G (4 mm) or H (5 mm) crochet hook is recommended, depending on your yarn choice and personal tension preferences. The hook size affects the tightness of your stitches, so find a size that feels comfortable for you.
- Scissors: A sharp pair of scissors is essential for cutting your yarn once you’ve finished your project or changed colors.
- Yarn Needle: This tool, also known as a tapestry needle, is necessary for weaving in loose ends once your butterfly is complete. A needle with a large eye is ideal for thicker yarns.
- Stitch Markers: These can be very helpful for keeping track of your rounds, especially if you’re new to crocheting or working on larger projects.
- Stuffing (optional): If you want your butterfly to have a more dimensional look, consider using a small amount of stuffing, such as fiberfill or yarn scraps, to give it a plush appearance.
2. Step-by-Step Instructions
Now that you have your materials ready, let’s get started with the step-by-step instructions for creating your 3D butterfly. This process is broken down into manageable sections, making it easy for you to follow along.
- Creating the Body: Start with a magic ring (or adjustable loop). Chain two, then make six single crochet stitches into the ring. Pull the yarn tail to tighten the ring. Slip stitch to the first single crochet to close the round. You should have six stitches total. For the next round, increase by making two single crochet stitches in each stitch around, bringing your total to twelve stitches.
- Shaping the Body: Continue to work in rounds. For rounds three to five, single crochet in each stitch without increasing. This will create a cylindrical shape for the body. At the end of round five, you should have twelve stitches. If you want a longer body, continue for a few more rounds.
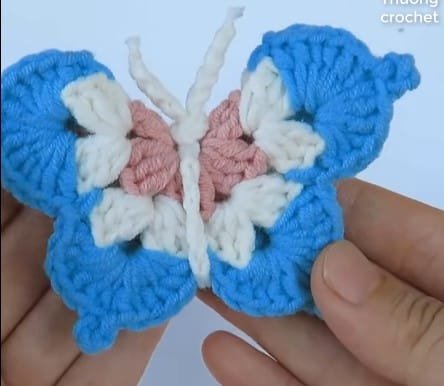
- Creating the Wings: For the wings, start with a new color of yarn. Chain five, then double crochet in the fourth chain from the hook. This creates a nice base for your wings. Double crochet in the remaining two chains. Turn your work, chain three, and in the first stitch, make a double crochet. This will create a fan-like shape.
- Building the Second Wing: Repeat the previous steps to create a second wing. Once you have both wings completed, you’ll need to connect them to the body. You can use slip stitches or sew them on with your yarn needle.
- Adding Texture: To make the butterfly even more visually appealing, you can add some decorative elements like picots or a contrasting color along the edges of the wings. To create a picot, chain three and slip stitch back into the same stitch. This small detail adds a lovely touch.
- Final Assembly: Once both wings are attached, you can shape them slightly by pinching at the base and fanning out the tops. If you opted for stuffing, gently insert some into the body before closing it up completely. Weave in all ends, and your 3D butterfly is ready to take flight!
3. Creative Uses for Your Crochet Butterflies
Now that you’ve completed the Crochet 3D butterfly tutorial, you may be wondering how to use these lovely creations in your projects. Here are some creative ideas to inspire you:
- Appliques: Use your 3D butterflies as appliques on hats, scarves, or bags. They can add a whimsical touch to your accessories, making them stand out in any crowd.
- Home Decor: Attach your butterflies to wreaths, wall hangings, or decorative pillows to bring a touch of nature indoors. They can brighten up any room with their colorful presence.
- Gift Embellishments: Consider using them as gift toppers or embellishments on greeting cards. They add a personal touch that shows you care, making your gifts even more special.
- Hair Accessories: With a little creativity, you can attach a butterfly to a hair clip or headband. This is a fun way to make unique hair accessories that can be worn by both children and adults.
- Mobile or Garland: Create a mobile or garland using multiple butterflies. String them together to hang in a nursery, bedroom, or playroom, creating a playful and enchanting atmosphere.
- Keychains: Attach a butterfly to a keychain or bag charm for a cute accessory that’s perfect for showing off your crochet skills wherever you go.
4. Tips for Success
To ensure a successful outcome with your Crochet 3D butterfly tutorial, consider these helpful tips:
- Practice Makes Perfect: If you’re new to this technique, practice creating a few butterflies before using them in a project. This will help you refine your skills and gain confidence.
- Experiment with Colors: Don’t be afraid to mix and match colors for your butterflies. Using multiple colors can create stunning visual effects, making your butterflies truly unique.
- Check Your Tension: Maintaining consistent tension is crucial for achieving uniform stitches. If you find your stitches are uneven, take a moment to relax your grip on the yarn and hook.
- Keep a Yarn Journal: Documenting your projects can be a fun way to track your progress and help you remember your favorite color combinations and techniques for future reference.
- Engage with the Community: Joining crochet forums or social media groups can provide inspiration, support, and feedback from fellow crafters. Sharing your work can also motivate you to try new projects.
- Have Fun!: The most important part of crocheting is to enjoy the process. Don’t be too hard on yourself if things don’t turn out perfectly. Every stitch is a learning experience!
FAQ
Q: What is a 3D butterfly in crochet?
A: A 3D butterfly in crochet is a decorative piece created using crochet techniques to give it a dimensional appearance, making it look lifelike and textured.
Q: Can I use different yarn types for the butterfly?
A: Yes! You can experiment with different yarn types and textures, but lightweight yarn is typically recommended for the best results.
Q: How long does it take to crochet a 3D butterfly?
A: The time it takes to complete a 3D butterfly can vary depending on your experience level, but it generally takes around 30 minutes to an hour.
Q: Can I make my butterfly larger or smaller?
A: Absolutely! You can adjust the size of your butterfly by using different hook sizes and yarn weights or by changing the number of stitches and rounds.
Q: What can I do if my stitches are too tight?
A: If your stitches are too tight, try using a larger hook size or practicing with a looser tension to create a more comfortable crochet experience.
Q: Are there any patterns available for crocheting butterflies?
A: Yes, many crochet patterns are available online and in books that feature butterfly designs. Feel free to experiment with different styles!
Join our VIP broadcast list and gain access to exclusive patterns, all for free. As a VIP member, you’ll receive the best patterns daily, delivered directly to your device. ✨📱 It’s a unique opportunity to stay up-to-date with the latest trends and designs, curated just for you. Don’t miss out on enhancing your projects and discovering new inspirations with the best patterns every day! 🎨🔝
Conclusion
In this Crochet 3D butterfly tutorial, we explored how to create beautiful 3D butterflies step by step. We covered the necessary materials, detailed instructions for making the body and wings, and creative ways to incorporate your butterflies into various projects.
Remember, crocheting is about expressing your creativity and having fun, so don’t hesitate to experiment with colors and designs. We would love to hear your thoughts and suggestions in the comments below. Happy crocheting!

