Welcome to our Morning Glory Quilt Block – Tutorial! If you’re looking to add a vibrant and cheerful touch to your quilt, the Morning Glory quilt block is a fantastic choice.
Known for its beautiful floral design, this quilt block can be a stunning focal point in any quilt project. In this tutorial, we’ll walk you through the process of creating the Morning Glory quilt block step by step, ensuring that even beginners can achieve beautiful results.
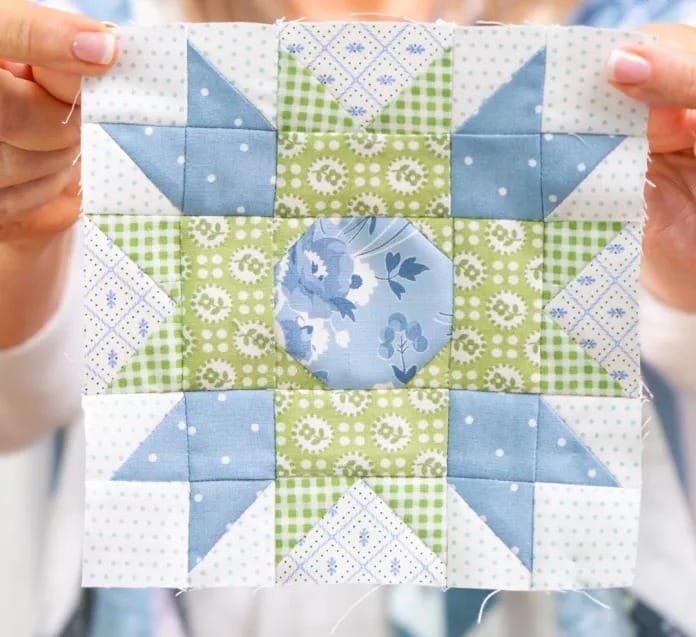
The Morning Glory quilt block is characterized by its unique and intricate flower design that resembles the blooms of the morning glory plant. With a bit of fabric, some essential tools, and this comprehensive guide, you’ll be able to create stunning blocks that showcase your personal style.
This quilt block is not only a lovely addition to quilts but also works well for home décor items like table runners or wall hangings.
Throughout this tutorial, we will explore the materials needed, step-by-step instructions, and tips to make your quilting experience enjoyable. By the end, you’ll have a gorgeous Morning Glory Quilt Block ready to be incorporated into your quilting project. So, let’s get started!
1. Materials Needed for the Morning Glory Quilt Block
Before diving into the construction of the Morning Glory Quilt Block, it’s essential to gather all the necessary materials. Having everything prepared will streamline the process and make your quilting experience more enjoyable.
- Fabric: Choose your fabrics wisely! For a classic Morning Glory look, select a combination of colorful cotton fabrics. You’ll need different colors for the petals, leaves, and background. Consider using shades of blue, purple, and green to mimic the natural colors of the morning glory flower.
- Rotary cutter and cutting mat: A rotary cutter is a must-have tool for precise fabric cutting. Pair it with a cutting mat to protect your surfaces. This will allow you to cut your fabric quickly and accurately, making the process much more efficient.
- Quilting ruler: A clear acrylic quilting ruler will help you measure and cut your fabric accurately. It’s essential for creating straight edges and ensuring that your pieces fit together perfectly.
- Sewing machine: While some may prefer hand-sewing, a sewing machine will speed up the process and ensure consistent stitch quality. Make sure your machine is in good working condition, and don’t forget to have coordinating thread ready!
- Iron and ironing board: Pressing your fabric before cutting and after sewing is crucial for a neat finish. An iron will help eliminate any creases and ensure your seams lay flat, resulting in a polished look for your quilt block.
- Scissors: Besides the rotary cutter, a pair of fabric scissors is useful for trimming threads and making small adjustments. Always keep them sharp for clean cuts.
2. Step-by-Step Instructions for Assembling the Block
Now that you have your materials ready, it’s time to get started on the Morning Glory Quilt Block. Follow these step-by-step instructions to create your beautiful quilt block.
- Cut your fabric: Begin by cutting your fabric pieces according to the pattern. You’ll need a combination of square and rectangular pieces for the petals, leaves, and background. Be sure to measure twice and cut once to ensure accuracy.
- Prepare the petals: To create the distinctive petals of the Morning Glory, you’ll want to cut them in a petal shape. Use your ruler to measure and draw the shape on the back of your fabric, then cut it out with your rotary cutter. Repeat this for the number of petals you need.
- Sew the petals together: Once you have all your petals cut, arrange them in a circle to form the flower. Pin them in place and sew them together using a quarter-inch seam allowance. Be careful to keep the edges aligned for a neat finish.
- Create the leaves: Next, cut out the leaf shapes using a green fabric. You can choose to make them simple triangles or more intricate shapes, depending on your preference. Once cut, sew the leaves onto the flower’s base, attaching them securely.
- Assemble the background: After you’ve completed the flower and leaves, it’s time to create the background for your block. Cut a larger piece of fabric to serve as the base. Position the flower and leaves on top of this background fabric and pin them in place.
- Finish the block: Finally, sew all layers together, ensuring everything is secure. Trim any excess fabric and press the finished block with an iron to ensure it lays flat. Your Morning Glory Quilt Block is now ready to be incorporated into your quilt!
3. Tips for a Successful Quilt Block
Creating a beautiful Morning Glory Quilt Block can be a rewarding experience, especially when you incorporate some helpful tips to enhance your quilting skills. Here are some suggestions to keep in mind as you work on your block.
- Choose high-quality fabric: The fabric you select will significantly impact the overall look of your quilt block. Invest in high-quality cotton fabrics that will hold up well over time and maintain their vibrant colors.
- Practice your cutting skills: Accurate cutting is essential in quilting. Spend some time practicing your cutting techniques to improve your precision. This will make a big difference in how well your pieces fit together.
- Use a consistent seam allowance: Maintaining a consistent quarter-inch seam allowance is crucial for achieving perfectly aligned blocks. Consider using a seam guide or marking your sewing machine to help you keep this measurement consistent.
- Press your seams: Always press your seams open or to one side after sewing. This helps reduce bulk and ensures that your block lays flat, making it easier to piece together with other blocks later.
- Don’t rush the process: Take your time as you work on your Morning Glory Quilt Block. Enjoy the process of creating something beautiful and don’t be afraid to rip out seams if necessary. It’s all part of the learning experience!
- Join a quilting community: Connecting with other quilters can be incredibly beneficial. Whether online or in-person, sharing tips, tricks, and experiences can help you grow as a quilter and inspire you to tackle new projects.
4. Incorporating the Morning Glory Block into Your Quilts
Now that you’ve successfully created your Morning Glory Quilt Block, you might be wondering how to incorporate it into larger quilt projects. Here are some ideas to inspire your creativity.
- Mix and match: The beauty of quilting lies in combining various blocks. Try pairing the Morning Glory block with other floral or geometric blocks to create a stunning quilt design. Experiment with different layouts until you find the perfect arrangement.
- Use sashing: Adding sashing (the strips of fabric between quilt blocks) can help to frame each block and create a cohesive look. Choose a fabric that complements your Morning Glory block to tie everything together.
- Create a themed quilt: Consider making an entire quilt based on a theme, such as flowers or gardens. Incorporate multiple Morning Glory blocks alongside other floral blocks for a beautiful garden quilt.
- Use it for smaller projects: If you don’t want to make a full quilt, consider using the Morning Glory Quilt Block for smaller items like table runners, wall hangings, or even pillow covers. These can make excellent gifts or decorative items for your home.
- Add borders: Once you’ve arranged your quilt blocks, think about adding borders to frame your work. A simple border can enhance the design and give your quilt a finished look.
- Experiment with color: Don’t be afraid to play with color schemes. Try using different color palettes for your Morning Glory blocks to see how they change the overall feel of your quilt.
FAQ
Q: What skill level is required to create the Morning Glory Quilt Block?
A: The Morning Glory Quilt Block is suitable for all skill levels, including beginners. The tutorial provides step-by-step instructions, making it easy for anyone to follow along.
Q: Can I use different fabrics for the Morning Glory Quilt Block?
A: Absolutely! Feel free to experiment with different fabrics, colors, and patterns to create a unique look for your Morning Glory Quilt Block. The choice of fabric can greatly influence the overall design.
Q: How many Morning Glory blocks do I need to make a quilt?
A: The number of blocks needed depends on the size of your quilt. Typically, a lap quilt may require around 12-20 blocks, while a larger quilt may need more. Plan your layout before cutting your fabric.
Q: What is the best way to store my quilt blocks?
A: To keep your quilt blocks in good condition, store them flat in a cool, dry place. Avoid folding them, as this can create creases. Use fabric or plastic bins for safe storage.
Q: Can I hand sew the Morning Glory Quilt Block instead of using a sewing machine?
A: Yes, you can hand sew the Morning Glory Quilt Block if you prefer. However, using a sewing machine can speed up the process and provide a more consistent stitch quality.
Q: Where can I find more quilting patterns?
A: Many online resources offer free and paid quilting patterns. Websites, quilting blogs, and social media platforms are excellent places to discover new patterns and tutorials.
Join our VIP broadcast list and gain access to exclusive patterns, all for free. As a VIP member, you’ll receive the best patterns daily, delivered directly to your device. ✨📱 It’s a unique opportunity to stay up-to-date with the latest trends and designs, curated just for you. Don’t miss out on enhancing your projects and discovering new inspirations with the best patterns every day! 🎨🔝
Conclusion
In this Morning Glory Quilt Block – Tutorial, we’ve covered everything from materials needed to step-by-step instructions, tips for success, and ideas for incorporating your quilt block into larger projects.
Creating a Morning Glory Quilt Block is a wonderful way to enhance your quilting skills while producing a beautiful piece of art for your home. We hope this tutorial has inspired you to try your hand at this delightful quilt block.
Please share your thoughts and suggestions in the comments below—we’d love to hear about your experiences and any other quilting ideas you have!

