The Snowflake Block Pattern – Tutorial is a perfect project for those who love quilting, especially during the winter season. This charming design captures the essence of snowflakes, making it an ideal addition to your winter decor or holiday gifts.
Whether you’re an experienced quilter or a beginner looking to learn new skills, this tutorial will guide you through the process of creating beautiful snowflake blocks that can be used in various projects, from quilts to table runners.
As winter approaches, many of us find joy in bringing the beauty of the season indoors. The snowflake motif not only evokes feelings of warmth and coziness but also adds a stunning visual element to your quilting projects.
In this article, we will explore the Snowflake Block Pattern in detail, breaking down the steps needed to create your own stunning snowflake blocks. We’ll cover the materials you’ll need, step-by-step instructions, and some creative ideas to personalize your project.
The Snowflake Block Pattern can be adapted to various sizes and styles, allowing you to customize it to your liking. With its intricate design and beautiful results, this pattern is sure to impress anyone who sees it. Let’s dive into the details of how to create these beautiful snowflake blocks!
1. Materials Needed for the Snowflake Block Pattern
Before you begin your Snowflake Block Pattern – Tutorial, it’s essential to gather all the necessary materials. Having everything ready will make your quilting experience smoother and more enjoyable. Here’s a list of materials you’ll need to create your snowflake blocks:
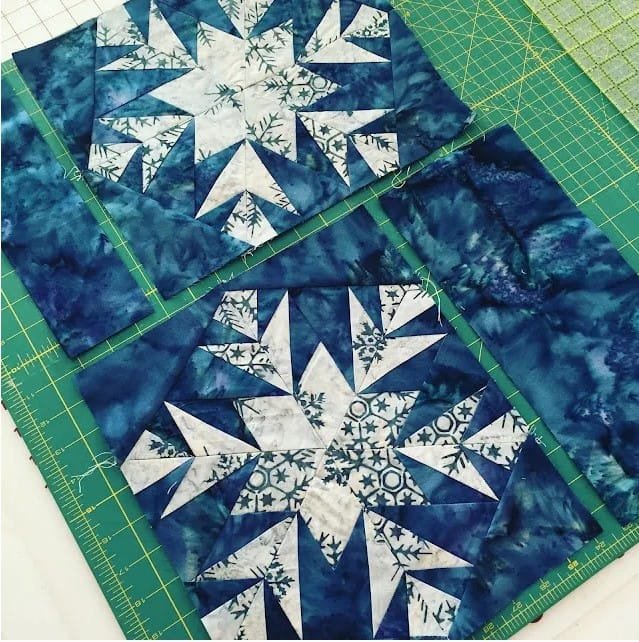
- Fabric: Choose a variety of fabrics in different shades of white, blue, or silver to mimic the look of real snowflakes. You’ll need around 1 yard of each fabric for a set of blocks, but adjust according to your project size.
- Rotary Cutter and Mat: A rotary cutter will help you cut your fabric into precise shapes and sizes. A self-healing cutting mat is essential to protect your surfaces and ensure accurate cutting.
- Ruler: A quilting ruler is crucial for measuring and cutting your fabric pieces accurately. Look for one with clear markings for easy reference.
- Sewing Machine: A reliable sewing machine is necessary for piecing your blocks together. Ensure it’s in good working order before starting your project.
- Thread: Use a quality thread that matches your fabric colors. A 50-weight cotton thread is a great choice for quilting projects.
- Iron and Ironing Board: Pressing your fabric and seams is essential for a polished finish. An iron will help you flatten your pieces and ensure they fit together nicely.
Gathering these materials will set you up for a successful experience as you create your Snowflake Block Pattern.
2. Step-by-Step Instructions for Creating Snowflake Blocks
Now that you have your materials ready, let’s move on to the step-by-step instructions for creating your Snowflake Block Pattern – Tutorial. Follow these detailed steps to craft beautiful snowflake blocks:
- Cut Your Fabric: Begin by cutting your chosen fabrics into the necessary pieces. For a standard snowflake block, you’ll need to cut squares and triangles. A common size for the blocks is 10 inches, but you can adjust according to your project.
- Arrange Your Pieces: Lay out the cut pieces on a flat surface to visualize the snowflake design. Experiment with different arrangements until you find one that you love. This is a great time to get creative and mix different fabrics.
- Sew the Squares Together: Start piecing your squares together. Use a quarter-inch seam allowance and ensure that your pieces are aligned correctly. Press the seams open or to one side, depending on your preference.
- Add the Triangles: After you’ve sewn your squares, it’s time to add the triangles to create the snowflake effect. Sew the triangles to the edges of the squares, ensuring that they align properly to form the snowflake design.
- Create the Center of the Snowflake: For added detail, consider creating a unique center for your snowflake block. You can use a different fabric or even add embellishments like buttons or appliqué for a personal touch.
- Assemble the Block: Once all the pieces are sewn together, assemble the block by sewing the sections together. Ensure all seams are pressed flat for a neat appearance.
By following these steps, you’ll create stunning snowflake blocks that can be used for various quilting projects.
3. Tips for a Successful Quilting Experience
To ensure a successful and enjoyable quilting experience while working on the Snowflake Block Pattern – Tutorial, consider these helpful tips:
- Take Your Time: Quilting is an art that requires patience. Don’t rush through the process; take your time with each step to ensure precision and quality.
- Use Quality Fabrics: Opt for high-quality cotton fabrics for durability and ease of sewing. Quality fabrics will also enhance the final appearance of your blocks.
- Press as You Go: Regularly press your seams and pieces as you work. This will help your blocks lie flat and make it easier to assemble them later.
- Keep Your Workspace Organized: A clean and organized workspace will help you stay focused and efficient. Keep your tools and materials within reach to avoid unnecessary disruptions.
- Experiment with Designs: Feel free to experiment with different designs and color combinations. The beauty of quilting is in the creative freedom it offers.
- Seek Inspiration: Don’t hesitate to look for inspiration online or in quilting books. There are countless resources available that showcase different snowflake designs and quilting techniques.
Implementing these tips will enhance your quilting experience and lead to beautiful results.
4. Creative Ideas for Using Snowflake Blocks
Once you’ve created your Snowflake Block Pattern, there are many creative ways to incorporate these beautiful blocks into your projects. Here are some ideas to inspire you:
- Quilts: Use multiple snowflake blocks to create a stunning winter quilt. Arrange them in a pleasing layout, alternating colors for added visual interest.
- Table Runners: Create a festive table runner by combining several snowflake blocks. This is a great way to showcase your sewing skills during holiday gatherings.
- Cushions and Pillows: Transform your snowflake blocks into decorative cushions or pillows. These can add a cozy winter touch to your home decor.
- Wall Hangings: Frame your snowflake blocks as wall hangings or quilts. This can be a beautiful way to celebrate the winter season and add a personal touch to your home.
- Gift Items: Consider making smaller items like pot holders or coasters using the snowflake design. These make lovely gifts for friends and family during the holidays.
- Seasonal Decor: Use your snowflake blocks as part of your seasonal decor. You can hang them as ornaments or incorporate them into garlands for a festive touch.
These creative ideas will allow you to showcase your Snowflake Block Pattern in various ways, adding beauty and warmth to your winter season.
FAQ
Q1: How difficult is the Snowflake Block Pattern for beginners?
A: The Snowflake Block Pattern is beginner-friendly, with simple shapes and straightforward instructions that make it accessible to novice quilters.
Q2: Can I use different fabric types for the snowflake blocks?
A: Yes! While cotton is preferred for its ease of sewing, you can experiment with different fabric types, such as flannel or even blends.
Q3: How can I make my snowflake blocks unique?
A: You can personalize your snowflake blocks by using different fabric combinations, adding embellishments, or varying the size of the blocks.
Q4: How should I care for my finished snowflake blocks?
A: To maintain the quality of your snowflake blocks, wash them gently in cold water and avoid harsh detergents. Air drying is recommended to preserve their shape.
Q5: Can I use this pattern for other quilting projects?
A: Absolutely! The Snowflake Block Pattern can be adapted for various projects, including quilts, table runners, and even clothing.
Q6: Where can I find additional resources for quilting?
A: There are many quilting books, online tutorials, and quilting communities that offer valuable resources and support for quilters at all skill levels.
Join our VIP broadcast list and gain access to exclusive patterns, all for free. As a VIP member, you’ll receive the best patterns daily, delivered directly to your device. ✨📱 It’s a unique opportunity to stay up-to-date with the latest trends and designs, curated just for you. Don’t miss out on enhancing your projects and discovering new inspirations with the best patterns every day! 🎨🔝
Conclusion
In this Snowflake Block Pattern – Tutorial, you’ve learned how to create beautiful snowflake blocks that capture the essence of winter. We explored the materials needed, provided step-by-step instructions, and shared creative ideas for using your blocks in various projects. By following this tutorial, you can enhance your quilting skills and create stunning pieces that will brighten your home during the winter season.
As you embark on your quilting journey, remember to enjoy the process and let your creativity shine. We encourage you to leave your honest feedback and suggestions about this tutorial, as your thoughts are invaluable. Happy quilting!

