Creating a Log Cabin Heart Quilt is a perfect way to combine the timeless appeal of the traditional log cabin quilt block with a fresh, heartfelt design. Whether you’re crafting it as a thoughtful gift or adding it to your personal collection, the process of making a Log Cabin Heart Quilt can be both enjoyable and rewarding.
In this tutorial, we will take you step-by-step through the process, making it easy for quilters of all skill levels to create a stunning, handmade quilt that will be cherished for years to come.
The Log Cabin Heart Quilt offers a unique spin on the classic log cabin design by incorporating a heart-shaped motif, perfect for adding a touch of warmth and love to any space.
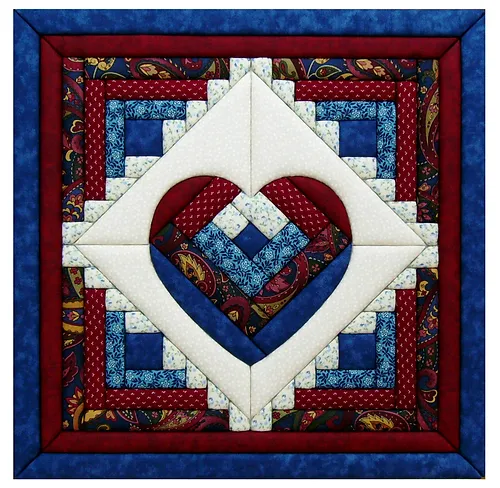
This quilt block, which symbolizes love and home, is a beautiful project to make for weddings, anniversaries, or as a gift for someone special. It’s also an excellent way to use up fabric scraps while creating something truly meaningful.
In this Log Cabin Heart Quilt – Tutorial, you’ll learn about the materials needed, the basic steps to create the log cabin blocks, how to piece them together into a heart shape, and ways to personalize your quilt. Follow along with these easy instructions, and you’ll soon have a finished quilt that’s full of charm and love.
1. Materials and Tools Needed for a Log Cabin Heart Quilt
Before you begin your Log Cabin Heart Quilt, gathering all your materials and tools is crucial to ensuring a smooth quilting process. Here’s a list of what you’ll need:
- Fabric: Select a variety of fabrics in coordinating colors or patterns. You’ll need a mixture of light and dark shades to create contrast within the quilt blocks. The heart shape typically uses red or pink fabrics, but feel free to get creative with your color choices.
- Rotary Cutter and Cutting Mat: A rotary cutter allows for precise fabric cutting, and a cutting mat ensures that your workspace is protected.
- Ruler: A clear, gridded ruler will help you cut fabric strips accurately to size. This is especially important for the log cabin design, where straight lines and even measurements are key.
- Thread: Use a high-quality, 100% cotton thread that matches your fabric. Neutral colors like white or beige usually blend well with most fabrics.
- Sewing Machine: A standard sewing machine with a straight stitch will work perfectly for this project.
- Pins and Clips: These will hold your fabric pieces together while you sew, ensuring that your blocks stay aligned.
Having these materials and tools ready will make it easier for you to follow along with the Log Cabin Heart Quilt – Tutorial and ensure your quilt is both beautiful and durable.
2. How to Create Log Cabin Quilt Blocks
The log cabin block is the foundation of your Log Cabin Heart Quilt, and learning how to make this block is an essential first step. The block is made up of strips of fabric sewn around a central square, creating a spiral effect. Here’s how to get started:
- Cut Your Fabric Strips: Start by cutting your fabric into strips. For a standard block, you’ll need strips that are 1.5 to 2 inches wide, depending on the size of the block you want to create.
- Create the Center Square: The log cabin block begins with a small center square, typically around 2 inches by 2 inches. This square represents the “heart” of the block.
- Add Light and Dark Strips: Sew light-colored fabric strips to one side of the square, followed by dark strips on the adjacent side. This contrast between light and dark fabrics creates the characteristic look of the log cabin block.
- Continue Building the Block: Keep adding alternating light and dark strips to the center square until your block reaches the desired size. Typically, a log cabin block consists of about six rounds of fabric strips.
- Press the Seams: After each addition of a strip, press the seams to ensure your block lays flat. This step is essential for keeping your blocks neat and aligned.
- Trim the Block: Once your block is complete, trim any excess fabric to ensure it is square and all sides are even.
These log cabin blocks will form the basis of your Log Cabin Heart Quilt and will be arranged in a way that creates a heart shape in the finished quilt.
3. Assembling the Log Cabin Heart Design
Now that you’ve made several log cabin blocks, it’s time to assemble them into the heart shape that gives the Log Cabin Heart Quilt its unique and sentimental design. Here’s how you can piece it together:
- Layout the Blocks: Begin by laying out your log cabin blocks on a flat surface. Arrange them in rows, with the light strips forming the top and sides of the heart and the darker strips forming the lower curves.
- Form the Heart Shape: The heart shape is created by arranging the blocks in a specific pattern. The top of the heart is wider, while the bottom narrows into a point. Play around with the arrangement until the heart shape is clearly visible.
- Sew the Blocks Together: Once you’re satisfied with the layout, begin sewing the blocks together row by row. Use a ¼ inch seam allowance for precision.
- Match Seams Carefully: As you sew the blocks together, be sure to match the seams where the blocks meet. This will ensure that your quilt looks professional and the design remains sharp.
- Press the Seams: After sewing each row together, press the seams to one side. This step helps reduce bulk and keeps the quilt top flat.
- Complete the Quilt Top: Continue sewing the rows together until the entire quilt top is assembled. At this point, you’ll see the heart shape come to life within the log cabin design.
With your blocks assembled into a heart shape, your Log Cabin Heart Quilt is really starting to take shape. The next step is quilting and binding.
4. Quilting and Finishing Touches
The final steps in creating your Log Cabin Heart Quilt involve quilting the layers together and adding the finishing touches. This is where your quilt becomes both functional and beautiful.
- Create a Quilt Sandwich: Lay your quilt backing fabric flat on a surface, followed by the batting (the inner layer of the quilt), and then place your quilt top on top. Smooth out any wrinkles and pin the layers together using safety pins.
- Choose Your Quilting Design: Decide how you want to quilt your Log Cabin Heart Quilt. You can opt for simple straight-line quilting, following the seams of the log cabin blocks, or get creative with free-motion quilting designs.
- Start Quilting: Using a walking foot on your sewing machine, begin quilting through all the layers. Start in the center and work your way out to avoid any puckering or bunching.
- Trim the Excess: Once the quilting is complete, trim away any excess batting and backing fabric so that everything is even with the quilt top.
- Add the Binding: Finally, cut strips of fabric for the binding and sew them around the edges of the quilt to give it a clean, finished look. You can hand-stitch the binding for a more polished finish or use your machine.
- Label Your Quilt: Consider adding a small label to the back of your quilt with your name, the date, and any special message. This adds a personal touch and makes the quilt even more meaningful.
By following these steps, your Log Cabin Heart Quilt will be complete, ready to use, display, or give as a heartfelt gift.
FAQ
Q1: What size should a Log Cabin Heart Quilt be?
A: The size of your quilt can vary depending on your preference. It can be a small wall hanging or a larger throw. Adjust the size of your log cabin blocks to create a quilt that fits your desired dimensions.
Q2: How long does it take to make a Log Cabin Heart Quilt?
A: The time it takes to complete the quilt depends on your skill level and how much time you dedicate to the project. On average, it may take a couple of weeks to finish, especially if you’re quilting by hand.
Q3: Can I use fabric scraps for this quilt?
A: Absolutely! The log cabin design is perfect for using up fabric scraps. Just be sure to choose fabrics that have enough contrast between light and dark to make the heart shape stand out.
Q4: Is this quilt suitable for beginners?
A: Yes! The log cabin block is a beginner-friendly design. As long as you follow the instructions and take your time, you should have no trouble creating a beautiful quilt.
Q5: Can I machine quilt the Log Cabin Heart Quilt?
A: Yes, machine quilting is a great option for this quilt. It can save time and provide a professional finish, especially if you use straight-line quilting or a walking foot.
Q6: How do I care for my finished quilt?
A: Wash your quilt in cold water on a gentle cycle and air dry or tumble dry on low. Be sure to use a mild detergent to preserve the fabric and colors.
Conclusion
In this Log Cabin Heart Quilt – Tutorial, we’ve walked through the entire process of making a heartfelt quilt, from gathering materials to quilting and finishing touches. This project is not only a beautiful way to showcase your quilting skills, but it also carries a special sentiment with its heart-shaped design. We hope this tutorial has inspired you to create your own Log Cabin Heart Quilt, whether for yourself or as a gift.
PATTERN HERE
Please feel free to share your thoughts, feedback, and suggestions in the comments below. Happy quilting!

