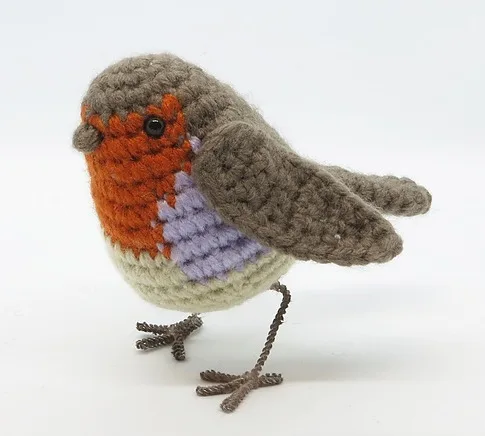
If you’re looking to add a touch of charm to your crochet collection, the European Robin Amigurumi – Free Crochet Pattern is an excellent choice. This adorable little bird, known for its vibrant orange breast and cheerful demeanor, is a delightful project for crochet enthusiasts of all skill levels.
Not only does this amigurumi bring a smile to your face, but it also allows you to explore various crochet techniques while creating a beautiful piece of art.
Amigurumi is a Japanese word that means “crocheted or knitted stuffed toy.” The art of amigurumi has gained immense popularity worldwide due to its intricate designs and cute finished products.
This European Robin Amigurumi pattern is perfect for those who want to dive into the world of amigurumi, providing step-by-step instructions to guide you through the process.
As you work on this project, you’ll discover the joy of creating your own stuffed animals, which can be perfect gifts for friends or charming decorations for your home.
So grab your yarn, hooks, and enthusiasm as we embark on this creative journey with the European Robin Amigurumi – Free Crochet Pattern.
1. Materials Needed for the European Robin Amigurumi
Before we begin the crochet pattern, let’s gather all the materials you’ll need to create your European Robin Amigurumi. Having everything ready will ensure a smooth and enjoyable crafting experience.
First and foremost, you’ll need yarn in various colors: orange, brown, white, and black. You can use medium-weight yarn (like worsted weight) to achieve a good balance between softness and sturdiness. The vibrant orange will form the robin’s chest, while the brown and black will provide the necessary contrast for its wings and eyes.
Next, you’ll need a crochet hook, ideally a size 3.5 mm or 4 mm, depending on your yarn’s thickness. The hook size can affect the tightness of your stitches and the overall appearance of your amigurumi, so choose one that feels comfortable for you.
Don’t forget to include a yarn needle for sewing together your pieces and weaving in any loose ends. A pair of safety eyes is also essential for giving your robin its charming expression. Lastly, some stuffing material, such as polyester fiberfill, will help give your amigurumi its shape and softness.
With these materials on hand, you’re all set to start creating your European Robin Amigurumi!
2. Step-by-Step Instructions for the European Robin Amigurumi
Now that we have all our materials ready, let’s dive into the step-by-step instructions for the European Robin Amigurumi – Free Crochet Pattern. This section will break down the process into manageable parts, ensuring you have a clear understanding of each step.
- Start with the Body: Begin by creating a magic ring with your brown yarn. Work a series of single crochets (sc) into the ring until you have a tight circle. Continue to increase your stitches to create a rounded shape, following the pattern instructions for the body.
- Add the Chest: Once your body is complete, switch to the orange yarn to crochet the robin’s chest. This section is essential for capturing the essence of the European Robin, so make sure to keep your tension consistent for a smooth finish.
- Create the Wings: Using your brown yarn, crochet two small wings by working in rows. You’ll be decreasing stitches to give them a more natural, rounded shape. Attach the wings to the sides of the body once they’re finished, sewing them securely.
- Make the Head: For the head, use the same technique as the body, starting with a magic ring and increasing stitches. The head should be proportionate to the body for a well-balanced look.
- Add Features: This is where you can get creative! Attach safety eyes to the head and use black yarn to crochet a small beak. You can also create little feet using a few slip stitches and attach them at the base of the body.
- Final Touches: Once everything is sewn together, take a moment to check your work for any loose ends or areas that need extra attention. Give your European Robin Amigurumi a gentle squeeze to fluff it up, and you’re ready to display your creation!
3. Customizing Your European Robin Amigurumi
One of the best aspects of crocheting amigurumi is the ability to customize your creations. The European Robin Amigurumi can be tailored to fit your style and preferences in various ways.
Consider experimenting with different yarn colors to create variations of the robin. For instance, you could use brighter shades or even a speckled yarn to give your robin a unique flair. This customization not only enhances your project but also makes it more personal.
You might also try adding accessories to your amigurumi, such as a tiny scarf or a little hat, to reflect the seasons or special occasions. These small touches can add character and charm to your creation, making it a delightful gift or decoration.
If you’re feeling adventurous, you can modify the pattern to create different bird species. By adjusting the colors and shapes, you can craft a variety of charming amigurumi birds, each with its distinct personality.
Lastly, consider creating a whole set of birds! By varying the sizes and colors, you can display your collection together, showcasing your crochet skills and creativity. The possibilities are endless when it comes to customizing your European Robin Amigurumi.
4. Caring for Your Amigurumi
After putting in so much effort to create your European Robin Amigurumi, it’s essential to know how to care for it properly. This ensures that your adorable bird stays in excellent condition for years to come.
Firstly, avoid exposing your amigurumi to direct sunlight for extended periods, as this can cause colors to fade. If your bird collects dust, you can gently wipe it with a soft, damp cloth to keep it looking fresh.
If your amigurumi gets dirty, it’s best to hand wash it. Fill a bowl with lukewarm water and a gentle detergent, then lightly scrub your amigurumi without submerging it completely. Rinse thoroughly and reshape it while it dries to maintain its form.
For long-term storage, keep your European Robin Amigurumi in a cool, dry place away from pests. A cotton bag or a well-ventilated box works perfectly.
Finally, if you ever notice loose threads or seams, take a moment to reinforce them with your yarn needle to ensure your amigurumi remains sturdy and intact. By taking these simple steps, you can enjoy your European Robin Amigurumi for years to come.
FAQ about the European Robin Amigurumi
1. Is the European Robin Amigurumi suitable for beginners?
Yes, this pattern is beginner-friendly and includes step-by-step instructions to guide you.
2. What type of yarn is best for this project?
Medium-weight yarn, such as worsted weight acrylic, is recommended for its softness and durability.
3. How long does it take to make the European Robin Amigurumi?
Completion time varies, but most people can finish it in a few hours to a day, depending on their crochet experience.
4. Can I sell the finished amigurumi?
Yes, as long as you credit the original pattern creator.
5. What should I do if I make a mistake?
You can easily unravel your stitches and redo them until you achieve the desired result.
6. How do I attach the safety eyes securely?
Follow the instructions carefully, ensuring the safety eyes are pushed through the stitches tightly for security.
Join our VIP broadcast list and gain access to exclusive patterns, all for free. As a VIP member, you’ll receive the best patterns daily, delivered directly to your device. ✨📱 It’s a unique opportunity to stay up-to-date with the latest trends and designs, curated just for you. Don’t miss out on enhancing your projects and discovering new inspirations with the best patterns every day! 🎨🔝
Conclusion
In this European Robin Amigurumi – Free Crochet Pattern, we explored the necessary materials, provided step-by-step instructions, discussed customization options, and outlined proper care techniques. Creating your own amigurumi brings joy and satisfaction, allowing you to express your creativity through crochet.
As you embark on your journey to make the European Robin Amigurumi, we hope you feel inspired and excited to share your creation with others. Please leave your thoughts, opinions, and suggestions in the comments below, and happy crocheting!

