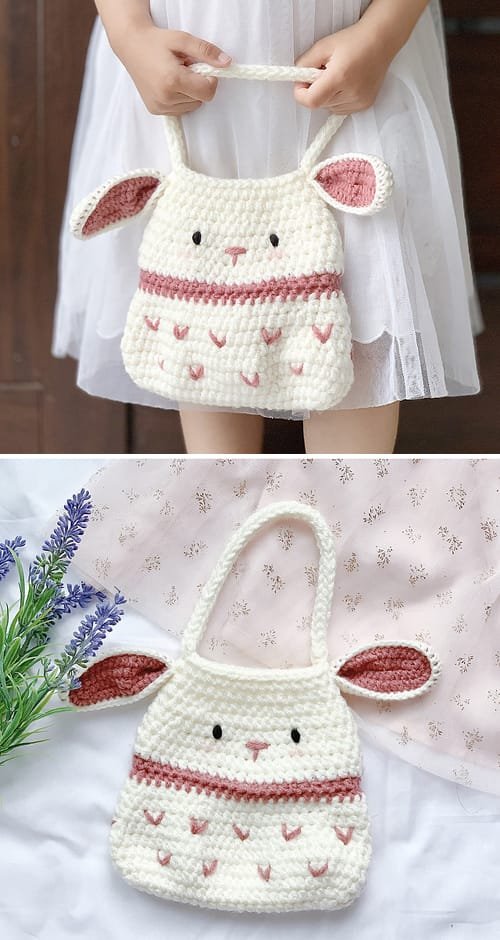
If you’re looking for an adorable and functional crochet project, this Little Bunny Bag – Free Pattern is perfect! Whether you’re making it as a gift for a child or simply want a cute accessory, this pattern offers the ideal blend of fun and creativity.
The Little Bunny Bag can be customized with different colors and yarn textures, making it a versatile project for any skill level. In this tutorial, we’ll walk you through each step to create your very own Little Bunny Bag.
This charming bunny-shaped bag is not only adorable but also practical. It can be used as a small tote for toys, Easter egg hunts, or even a handbag for little ones to carry their treasures.
The Little Bunny Bag – Free Pattern is easy to follow and quick to crochet, making it a great weekend project. Plus, with the detailed instructions provided, even beginners can feel confident in tackling this design.
By the end of this Little Bunny Bag – Free Pattern, you’ll have a beautiful handmade item that’s sure to bring smiles. Let’s jump into the materials you’ll need and get started on this cute project!
1. Materials You Will Need for the Little Bunny Bag
Before you begin working on the Little Bunny Bag, make sure you have all the necessary materials. Having everything organized and ready will make the process much smoother and enjoyable. Here’s a comprehensive list of what you’ll need.
First, you’ll need to choose the yarn. For this Little Bunny Bag – Free Pattern, it’s recommended to use a soft, worsted weight yarn. You can choose traditional bunny colors like white, grey, or brown, or go for something more whimsical like pink or blue. The yarn choice will affect the size and texture of the finished bag, so feel free to experiment with different fibers.
Next, grab your crochet hook. For most worsted weight yarns, a 4.0mm to 5.0mm hook works well. The specific hook size will depend on how tight or loose you crochet, so check your gauge if necessary. Using the right hook size will ensure that your bag holds its shape without being too stiff or too floppy.
You’ll also need some basic crochet tools. This includes scissors, a yarn needle for weaving in ends, and stitch markers to keep track of your rounds. Stitch markers are especially useful for beginners, helping to avoid mistakes when working in the round.
Additionally, don’t forget the details. For the bunny’s facial features, you’ll need some black and pink yarn or embroidery thread to create the nose, eyes, and whiskers. Alternatively, you can use small buttons or safety eyes for a different look. If you want to make the ears extra cute, consider using a contrasting color for the inside of the ears.
Finally, a small amount of stuffing may be needed for the bunny ears if you want them to have more structure. This is optional but adds a nice touch to the overall look of the Little Bunny Bag.
2. Creating the Body of the Little Bunny Bag
Now that you have all your materials ready, let’s move on to crocheting the main body of the Little Bunny Bag. The body of the bag is worked in the round, starting from the bottom and building upward.
Start by making a magic circle. This is a popular technique for starting crochet projects worked in the round, as it allows you to adjust the size of the starting hole. If you’re unfamiliar with this technique, there are plenty of tutorials online to guide you through it. Alternatively, you can chain a few stitches and join them in a loop to begin.
Once your magic circle is ready, begin crocheting the base of the bag. Work in rounds, increasing the number of stitches in each round to form a flat circle. The base size can be adjusted depending on how large or small you want your Little Bunny Bag to be. Follow the Little Bunny Bag – Free Pattern for specific stitch counts and rounds.
As you continue crocheting, you’ll transition from the flat base to the sides of the bag. To do this, simply stop increasing your stitches and crochet evenly in the round. This will cause the edges to start curling upwards, forming the body of the bag. Continue crocheting in this manner until the bag reaches the desired height.
Once the body is the right size, you can add some finishing touches. If you want a sturdier bag, consider crocheting a few extra rows of single crochet at the top to reinforce the edges. This will also give the bag a more polished look.
Finally, add a drawstring or handles. For a simple drawstring closure, crochet a long chain and weave it through the top edge of the bag. You can also add crochet handles for a tote-style bag by chaining and attaching them to opposite sides of the bag.
3. Adding the Bunny Ears and Face to Your Little Bunny Bag
One of the most fun parts of making the Little Bunny Bag is adding the bunny ears and facial details. These features give the bag its personality and charm.
Start with the bunny ears. The ears are typically made by crocheting two separate pieces and then attaching them to the top of the bag. Each ear is worked in rows, starting with a small number of stitches and increasing as you go to create the ear shape. If you want the ears to be more structured, consider adding a little bit of stuffing inside before closing them up.
Once your bunny ears are complete, attach them to the top of the bag. You can either sew them on with a yarn needle or crochet them directly onto the bag for a seamless look. Make sure the ears are evenly spaced to keep the Little Bunny Bag symmetrical.
Next, create the bunny’s face. Use a yarn needle and embroidery thread or small pieces of yarn to stitch the nose, eyes, and whiskers onto the front of the bag. For a classic look, a small triangle for the nose and two simple lines for the whiskers work well. You can get creative with the eyes by using buttons, safety eyes, or even crocheting small circles for a handmade touch.
Don’t forget to add some cute details! Consider adding a pom-pom for the bunny’s tail on the back of the bag. This small addition really enhances the overall cuteness of the Little Bunny Bag.
4. Customizing Your Little Bunny Bag and Final Touches
One of the best things about the Little Bunny Bag – Free Pattern is that it’s highly customizable. You can easily adjust the size, colors, and even the bunny’s expression to suit your personal taste.
If you’re making this bag for a child, consider adding some extra elements. For example, you could sew on small patches or appliqués to give the bunny a more playful appearance. You can also change up the yarn colors to match their favorite hues. Don’t be afraid to mix and match different textures of yarn for a unique look.
Another great way to personalize the Little Bunny Bag is by adding embellishments. You can crochet small flowers or bows to attach to the bunny’s ears or along the sides of the bag. These little touches make the bag feel even more special and one-of-a-kind.
When it comes to finishing your bag, don’t forget to block it. Blocking helps to even out your stitches and gives your crochet project a professional finish. Simply dampen the bag and lay it flat to dry, shaping it as you go. This step is especially important if your bag is slightly misshapen after crocheting.
If you plan to use the Little Bunny Bag as a gift bag, consider adding a fabric lining to the inside. This can be done by hand-sewing a small fabric pouch and inserting it inside the bag. A lining not only adds a touch of luxury but also provides extra durability for carrying heavier items.
Lastly, make sure to secure all loose ends by weaving them into the project with a yarn needle. This will prevent the bag from unraveling and ensure that it holds up well with regular use.
FAQ
1. Is the Little Bunny Bag – Free Pattern suitable for beginners?
Yes! This pattern is beginner-friendly and comes with easy-to-follow instructions. Even if you’re new to crochet, you can confidently create this adorable bag with a little practice.
2. Can I customize the size of the Little Bunny Bag?
Absolutely! You can adjust the size of the bag by increasing or decreasing the number of rounds in the base and sides of the bag. Just be mindful that any changes may affect the proportions of the bunny face and ears.
3. What type of yarn should I use for this project?
A soft worsted weight yarn is recommended for the Little Bunny Bag. However, you can experiment with other types of yarn, such as cotton or acrylic, depending on the look and feel you want for the bag.
4. How long does it take to complete the Little Bunny Bag?
This project can be completed in a day or two, depending on your crochet speed. It’s a relatively quick project, making it perfect for last-minute gifts or weekend crafting.
5. Can I sell the bags I make using this pattern?
Yes, you can sell the finished items made from the Little Bunny Bag – Free Pattern, but please credit the pattern designer if applicable and adhere to any licensing terms associated with the pattern.
6. How do I care for the Little Bunny Bag?
The care instructions will depend on the yarn you use. In general, hand-washing with cold water and laying flat to dry is the best way to care for handmade crochet items to prevent stretching and damage.
Join our VIP broadcast list and gain access to exclusive patterns, all for free. As a VIP member, you’ll receive the best patterns daily, delivered directly to your device. ✨📱 It’s a unique opportunity to stay up-to-date with the latest trends and designs, curated just for you. Don’t miss out on enhancing your projects and discovering new inspirations with the best patterns every day! 🎨🔝
Conclusion
The Little Bunny Bag – Free Pattern is an enjoyable and versatile crochet project that’s perfect for anyone looking to create a cute, functional, and personalized item. Whether you’re making it as a gift or for personal use, this bag is sure to bring joy to whoever carries it. From the bunny ears to the customizable colors, the possibilities are endless with this fun pattern.
We hope this tutorial has been helpful in guiding you through the process. If you’ve enjoyed making your Little Bunny Bag, please share your thoughts and any suggestions you may have. We’d love to hear your feedback! Happy crocheting!

