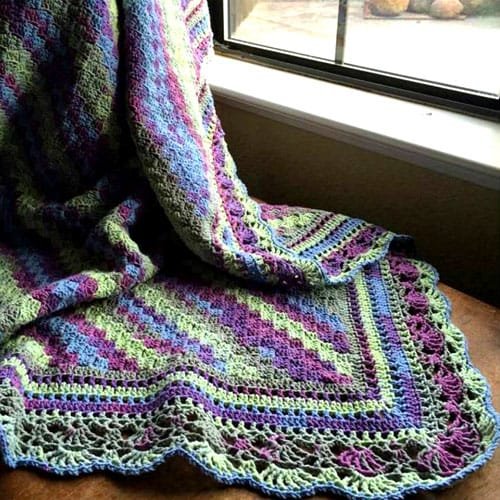
If you’ve been looking for a fun and visually captivating crochet project, the C2C Blanket with Fabulous Edge – Tutorial is exactly what you need! Corner-to-corner (C2C) crochet is a popular technique that allows you to work a blanket diagonally from one corner to the other, producing a beautiful, pixel-like texture.
Adding a fabulous edge to this design takes the blanket to the next level, making it a piece that’s not only functional but also incredibly stylish.
In this tutorial, we’ll walk you through the steps of creating your very own C2C Blanket with Fabulous Edge. From choosing the perfect yarn to finishing it off with a striking border, you’ll find everything you need to create a masterpiece.
This technique may seem intimidating at first, but with our step-by-step guidance, you’ll soon be confidently working through each part of the process.
The C2C Blanket with Fabulous Edge is perfect for any occasion – whether you’re crafting a cozy throw for your living room, a baby blanket, or even a bedspread.
The customization options are endless, and once you’ve mastered the technique, you can easily adapt it to any size. So, let’s dive in and start creating your beautiful C2C Blanket with Fabulous Edge!
1. Getting Started: Materials and Yarn Selection
To begin your C2C Blanket with Fabulous Edge – Tutorial, it’s important to gather the right materials. Having everything ready will help make the process smoother and more enjoyable.
- Choosing the Right Yarn: When selecting yarn for your C2C Blanket, consider both texture and color. For a soft and cozy blanket, choose a high-quality acrylic or cotton yarn. These materials hold up well over time and are easy to care for. Choose a weight that suits your project – medium-weight yarn works well for a blanket that has both warmth and drape.
- Selecting Your Hook: For this project, you’ll want a crochet hook that pairs well with your yarn choice. Most medium-weight yarns work best with a 5mm to 6mm hook. If you prefer a looser, more flexible fabric, go up a hook size.
- Color Considerations: The beauty of the C2C Blanket lies in its versatility. You can use a single color for a minimalist look or go bold with a multi-colored design. Choose colors that complement your home décor or the preferences of the person you’re making it for.
- Tools You’ll Need: Besides your yarn and hook, you’ll need scissors and a yarn needle to weave in the ends. Having a stitch marker handy is also helpful to keep track of your rows.
- Size Matters: Before you start, decide on the size of your C2C Blanket. If you’re making a baby blanket, aim for a smaller size like 30×30 inches, while a throw might be around 50×60 inches. Larger blankets, such as queen-sized bedspreads, require more yarn and time but are totally worth it!
- Planning the Fabulous Edge: The fabulous edge is what sets this blanket apart. You can choose a simple border or go for something intricate like a picot or shell stitch edging. Plan your edge style before you begin so you can ensure you have enough yarn to complete it.
2. Understanding the C2C Crochet Technique
Now that you’ve gathered your materials, let’s dive into the C2C Blanket with Fabulous Edge – Tutorial by mastering the C2C crochet technique. This method involves working small blocks of double crochets diagonally, giving your blanket a unique look.
- Starting in the Corner: As the name suggests, C2C begins at one corner of the blanket. Start by chaining six stitches, then work three double crochets into the fourth chain from the hook. This forms your first block.
- Increasing Rows: To grow your blanket, you’ll need to increase the number of blocks in each row. Begin each row with a chain six, then work three double crochets into the chain from the previous row. Keep adding blocks to form a triangle shape.
- Diagonal Progression: Unlike traditional blankets, which are worked in horizontal or vertical rows, the C2C Blanket grows diagonally. This method creates a pixelated effect, making it perfect for color changes and creating patterns.
- Changing Colors: If you’re using multiple colors, you can change yarn whenever you like. To switch colors seamlessly, join the new color in the last stitch of the previous block and carry on as usual. This technique allows you to create stripes, gradients, or even images.
- Decreasing Rows: Once your blanket has reached the desired width, it’s time to start decreasing. Instead of adding blocks to both ends of the row, you’ll skip adding blocks at the beginning of the row and only add them at the end. This tapers the blanket back into a square or rectangle.
- Finishing the C2C Base: Continue decreasing until you reach the final corner. At this point, your blanket’s base is complete, but don’t forget that the fabulous edge is what will make it truly stand out!
3. Adding the Fabulous Edge to Your C2C Blanket
The fabulous edge is what transforms a simple C2C blanket into a work of art. There are several border styles to choose from, depending on the look you’re going for.
- Basic Single Crochet Border: For a clean, minimalist look, you can simply work a round of single crochet stitches around the edges of the blanket. This is a great choice if you want a modern finish without too much detail.
- Shell Stitch Border: If you’re looking for a more decorative edge, the shell stitch is a classic option. To create this border, work five double crochets into the same stitch to form a shell, then skip a few stitches and repeat.
- Picot Edge: The picot stitch creates tiny loops along the edge, adding a delicate touch to your blanket. To make a picot, chain three, then slip stitch into the first chain. This border works well for a dainty, feminine finish.
- Scalloped Edge: For a wavy, textured edge, the scalloped stitch is perfect. Work a combination of double and single crochets in alternating stitches to create a soft, rounded look.
- Lacy Border: A lacy border adds an airy, elegant touch to your blanket. This style is created by working a series of chains and slip stitches, giving the edge a light, open feel. It’s ideal for spring or summer blankets.
- Customizing Your Edge: Feel free to get creative with your edge! Combine different techniques or come up with your own design. The C2C Blanket with Fabulous Edge is all about adding your personal touch, so don’t be afraid to experiment.
4. Finishing Touches and Blocking Your Blanket
The final step in this C2C Blanket with Fabulous Edge – Tutorial is finishing and blocking your blanket. These details will ensure your project looks polished and professional.
- Weaving in the Ends: Use a yarn needle to weave in any loose ends from color changes or finishing off the border. Be sure to secure them well so they don’t unravel over time.
- Blocking Your Blanket: Blocking is the process of wetting or steaming your blanket and laying it flat to dry. This step is especially important for C2C blankets, as it helps even out the tension and enhances the shape of your fabulous edge.
- Choosing a Blocking Method: You can wet block your blanket by soaking it in water, then pinning it to a flat surface. Alternatively, you can steam block it by using a steamer or iron on a low setting. Both methods work well, but choose one that suits your yarn type.
- Pinning the Edges: While blocking, pay special attention to the edges. Use blocking pins to stretch the border evenly, ensuring that the fabulous edge lays flat and showcases its design.
- Let It Dry Completely: Once your blanket is blocked and pinned, let it dry completely before removing the pins. This will ensure that the shape holds and the edges remain crisp.
- Admire Your Work: After your blanket is dry, it’s ready to use or gift. Step back and admire the beauty of your C2C Blanket with Fabulous Edge, knowing that you’ve created a stunning, handmade piece!
FAQ
Q: What size should I make my C2C blanket?
A: The size of your blanket depends on its intended use. Baby blankets are usually around 30×30 inches, throws are typically 50×60 inches, and bedspreads vary depending on the bed size.
Q: How long does it take to complete a C2C blanket?
A: The time it takes to complete a C2C Blanket depends on the size of the project and your crochet speed. Smaller projects can take a few days, while larger blankets may take several weeks.
Q: Can I use different yarn weights for a C2C blanket?
A: Yes, you can use different yarn weights, but keep in mind that this will affect the overall texture and drape of the blanket. Thicker yarns create bulkier blankets, while thinner yarns produce lighter, more delicate results.
Q: Is the C2C technique suitable for beginners?
A: The C2C crochet technique is beginner-friendly, but it may take a few rows to get comfortable with the diagonal increases and decreases. Once you get the hang of it, it’s a straightforward and enjoyable method.
Q: Can I customize the edge of my C2C blanket?
A: Absolutely! The fabulous edge is what makes this blanket stand out. You can customize it with different border styles, such as a shell stitch, picot, or scalloped edge.
Q: Do I need to block my blanket?
A: Blocking is not mandatory, but it’s highly recommended, especially for C2C blankets with a detailed edge. Blocking helps to even out the stitches and gives the edge a polished, professional look.
Join our VIP broadcast list and gain access to exclusive patterns, all for free. As a VIP member, you’ll receive the best patterns daily, delivered directly to your device. ✨📱 It’s a unique opportunity to stay up-to-date with the latest trends and designs, curated just for you. Don’t miss out on enhancing your projects and discovering new inspirations with the best patterns every day! 🎨🔝
Conclusion
In this C2C Blanket with Fabulous Edge – Tutorial, we’ve covered everything from choosing materials to adding a striking border. With the steps outlined above, you now have the tools to create a beautiful and unique C2C blanket that reflects your style and creativity.
Don’t forget to block your blanket for that final, professional finish. We’d love to hear from you – please leave your thoughts, opinions, and any suggestions in the comments below!

