If you’re eager to dive into the world of quilting, then this Seven Sisters Quilt Blocks – Free Tutorial is perfect for you! The Seven Sisters quilt block is a beautiful and intricate design that not only showcases your sewing skills but also allows for endless creativity.
In this tutorial, we’ll guide you through the process of creating these stunning quilt blocks step by step. Whether you’re a seasoned quilter or just starting out, this pattern will help you develop your skills while creating a quilt that can be cherished for years to come.
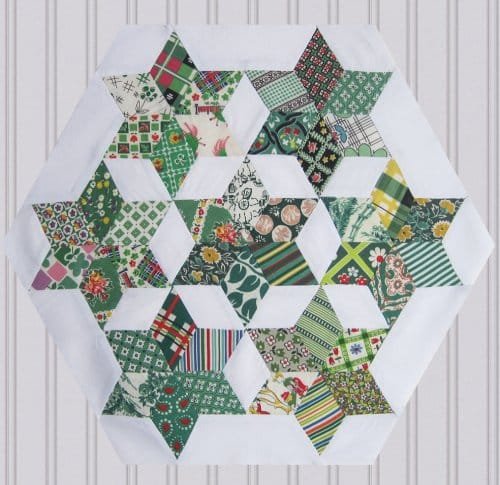
The Seven Sisters quilt block is named for its resemblance to the seven stars of the Pleiades constellation. This design features a central hexagon surrounded by six additional triangles, creating a unique and eye-catching effect.
The block can be made using various colors and fabrics, allowing you to personalize it to your taste. It’s perfect for a wide range of projects, including lap quilts, bed quilts, or even wall hangings.
As we delve into this tutorial, we will cover the necessary materials, the techniques required, and tips for successful quilting.
By the end, you’ll have the confidence to create your own Seven Sisters quilt blocks and make a stunning quilt that reflects your unique style. So, gather your supplies, and let’s get started!
1. Materials Needed
Before you begin your Seven Sisters Quilt Blocks – Free Tutorial, it’s essential to gather all the necessary materials. Here’s a comprehensive list to help you get organized:
First, you’ll need a selection of fabrics. Choose at least three different fabrics for your quilt blocks: one for the central hexagon, and two or more for the surrounding triangles. It’s best to use contrasting colors or patterns to create visual interest in your blocks.
Next, ensure you have a rotary cutter and a cutting mat. These tools will make cutting your fabric into precise shapes much easier. A ruler is also essential for accurate measurements, especially when cutting the hexagons and triangles.
You will also need a sewing machine with a quarter-inch foot attachment, as this will help you achieve consistent seam allowances throughout your blocks. If you prefer hand sewing, you can use a needle and thread instead.
Don’t forget to have some quilt batting and a backing fabric ready for when you finish your quilt. This will add warmth and structure to your completed project.
Finally, you will need basic sewing supplies such as pins, scissors, and an iron for pressing your seams. Having everything organized will make the quilting process much smoother and more enjoyable.
Now that you have your materials ready, let’s move on to the next step: understanding the basic techniques involved in creating the Seven Sisters quilt blocks.
2. Basic Techniques for Seven Sisters Quilt Blocks
Creating Seven Sisters quilt blocks requires several essential techniques that will help you achieve professional-looking results. Here’s an overview of the techniques you’ll be using throughout this tutorial:
First, mastering the hexagon shape is crucial. To create your hexagon, start with a square of fabric and cut it into six equal triangular pieces. You can use a hexagon template or a rotary cutter for precision. Make sure each side of the hexagon measures the same for uniformity.
Next, the seam allowance is vital for the accuracy of your quilt blocks. A quarter-inch seam is the standard in quilting. To maintain this allowance, consider using a sewing machine foot designed for quilting or a guide on your machine. This will ensure that all your pieces fit together correctly.
Pressing your seams as you go is another important technique. After sewing two pieces together, use an iron to press the seams open or to one side. This will help reduce bulk in your blocks and ensure they lay flat.
You will also need to learn how to match points when sewing your triangles to the hexagon. Pinning the edges carefully will help you align the points accurately. Take your time with this step, as matching points is crucial for a polished final look.
When assembling the triangles around the hexagon, remember to sew them in a specific order. This helps to create the overall design and maintains symmetry in your quilt blocks. Following a consistent assembly process will yield the best results.
Finally, don’t be afraid to experiment with different fabrics and layouts. The beauty of the Seven Sisters quilt blocks is that they can be customized to suit your taste. Try using different color combinations to see how they change the overall appearance of your quilt.
3. Step-by-Step Instructions for Seven Sisters Quilt Blocks
Now that you understand the basic techniques, let’s dive into the step-by-step instructions for creating your Seven Sisters quilt blocks.
To begin, cut your fabric into the required shapes. Start with the hexagon shape, which will be the center of your block. Then, cut six triangles from your chosen fabrics for the surrounding pieces. Make sure to follow the correct measurements to ensure everything fits together properly.
Next, take one of the triangles and pin it to one side of the hexagon. Ensure that the edges align perfectly, and use your quarter-inch foot to sew along the edge. Once you’ve sewn the triangle to the hexagon, press the seam open with your iron for a crisp finish.
Repeat this process with the remaining triangles, attaching them one at a time around the hexagon. Remember to press each seam after sewing to maintain a neat and flat appearance.
Once all six triangles are attached to the hexagon, you should have a completed Seven Sisters quilt block! Now, take a moment to admire your work before moving on to the next step. If you’re making multiple blocks, repeat this process until you have the desired number.
After completing your blocks, it’s time to assemble them into a quilt. Lay out your blocks in the desired arrangement, considering color placement and balance. Once you’re satisfied with the layout, begin sewing the blocks together in rows.
When all the blocks are connected, add a backing fabric and batting to complete your quilt. Sew around the edges to hold everything in place, and consider adding quilting stitches to enhance the design further.
Finally, trim any excess batting or backing fabric and give your quilt a final press. Congratulations! You’ve successfully completed your Seven Sisters quilt blocks and created a beautiful quilt.
4. Tips for Success and Troubleshooting
As you embark on your journey to create Seven Sisters quilt blocks, here are some tips and troubleshooting advice to ensure your success:
First, take your time with the cutting process. Precise cutting is the foundation of a great quilt, so double-check your measurements and make adjustments if necessary. It’s better to take a little extra time now than to fix mistakes later.
Second, consider using a design wall to layout your blocks. This can help you visualize how the colors and patterns will come together before you start sewing. A design wall can be as simple as a large piece of batting or flannel hung on a wall, allowing you to easily rearrange your blocks until you’re happy with the layout.
Third, if you encounter puckering or uneven seams, don’t be discouraged. It’s a common issue in quilting, especially for beginners. To minimize puckering, always press your seams gently and avoid pulling on the fabric while sewing.
Fourth, remember to clean your sewing machine regularly. Dust and lint can build up, affecting the performance of your machine and the quality of your stitches. Make it a habit to clean your machine after every few sewing sessions.
Fifth, join a quilting community or take a class. Surrounding yourself with fellow quilters can provide support, inspiration, and valuable tips. You can learn from their experiences and share your own progress.
Lastly, enjoy the process! Quilting is not just about the final product; it’s about the creativity and joy that comes with creating something beautiful. Embrace any challenges that arise, and remember that practice makes perfect.
FAQ
What are Seven Sisters quilt blocks?
Seven Sisters quilt blocks are a quilting design that features a central hexagon surrounded by six triangles, resembling the Pleiades star cluster.
What materials do I need for this tutorial?
You will need fabric, a rotary cutter, a cutting mat, a sewing machine or hand sewing supplies, quilt batting, and basic sewing tools like pins and scissors.
Can I use different fabrics for my quilt blocks?
Absolutely! Using different colors and patterns is encouraged to create a personalized look for your Seven Sisters quilt blocks.
What is the best way to ensure accurate cutting?
Take your time measuring and cutting your fabric. Using a rotary cutter and ruler will help you achieve precise shapes.
How do I troubleshoot puckering in my quilt blocks?
If you notice puckering, check your seam allowance, press your seams gently, and avoid pulling the fabric while sewing.
Are there any tips for assembling my quilt?
Use a design wall to lay out your blocks, clean your sewing machine regularly, and take your time when connecting blocks to ensure a neat finish.
Join our VIP broadcast list and gain access to exclusive patterns, all for free. As a VIP member, you’ll receive the best patterns daily, delivered directly to your device. ✨📱 It’s a unique opportunity to stay up-to-date with the latest trends and designs, curated just for you. Don’t miss out on enhancing your projects and discovering new inspirations with the best patterns every day! 🎨🔝
Conclusion
In this comprehensive Seven Sisters Quilt Blocks – Free Tutorial, we’ve covered everything you need to know to create these stunning quilt blocks. From gathering materials and mastering essential techniques to step-by-step instructions and helpful tips, you are now equipped to embark on your quilting journey.
Creating beautiful quilts is a rewarding experience, and the Seven Sisters quilt blocks are a fantastic addition to any project. We hope this tutorial inspires you to try your hand at quilting and explore your creativity. Please feel free to share your thoughts and suggestions on this tutorial, as we love hearing from our readers. Happy quilting!

