If you’re looking for a delightful project to crochet for a little one, the Bunny Lovey Parts & Pieces is the perfect choice! This charming pattern combines a soft lovey blanket with an adorable bunny head, making it an ideal gift for babies and toddlers alike.
In this article, we will walk you through the details of the Bunny Lovey Parts & Pieces, providing a comprehensive guide to help you create this precious item. Whether you’re a seasoned crocheter or a beginner, this pattern is easy to follow and full of personality.
Crocheting a lovey for a child is a wonderful way to create something special that can be cherished for years to come. The Bunny Lovey not only serves as a comforting blanket but also provides a playful companion for little ones.
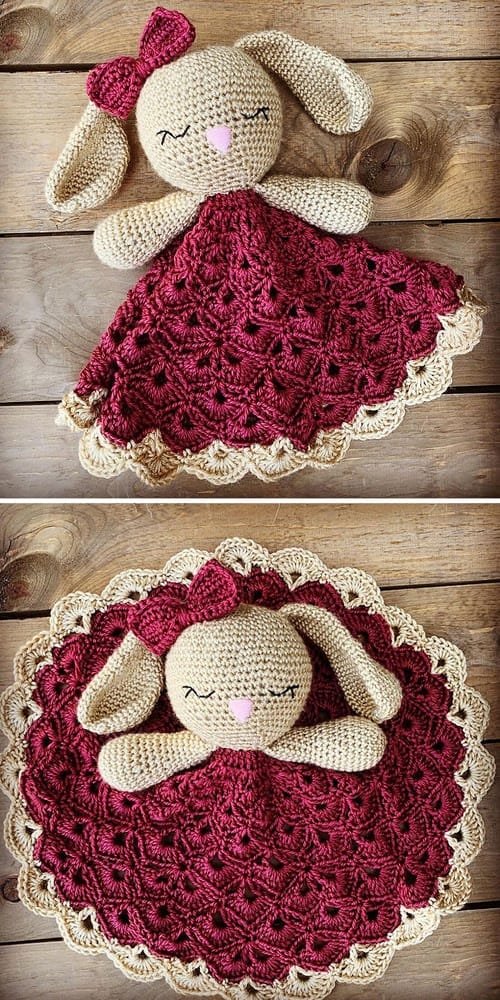
It can be made in a variety of colors and yarn types, allowing you to personalize it to match the child’s nursery or preferences. With its cute bunny face and cozy feel, this lovey is sure to become a beloved item in any child’s life.
Before we dive into the pattern and instructions, let’s gather the necessary materials and understand the basic stitches involved in creating your Bunny Lovey Parts & Pieces. This will ensure that you’re well-prepared to embark on your crochet adventure!
1. Materials Needed
To create your Bunny Lovey Parts & Pieces, you will need the following materials:
Start with a soft and cozy yarn. A worsted weight yarn (#4) works best for this project, as it provides the perfect balance of softness and durability. Choose colors that appeal to you; classic white or soft pastel shades can make for a traditional bunny look, while brighter colors can add a playful touch.
Next, select a suitable crochet hook. A size H/8 (5.0 mm) hook is recommended for most worsted weight yarns. This size helps create a nice, even tension in your stitches, resulting in a beautiful finished product.
You will also need a tapestry needle for weaving in ends and assembling the lovey. Scissors are essential for cutting your yarn, and a measuring tape will help ensure your pieces are the correct size as you work.
Lastly, having a pattern printout or digital copy of the instructions will be beneficial. While this article will guide you through the process, having a reference on hand can help you keep track of your progress and make it easier to spot any mistakes.
With your materials ready, let’s move on to the basic stitches you’ll use to create the Bunny Lovey Parts & Pieces.
2. Understanding the Basic Stitches
Before starting your Bunny Lovey Parts & Pieces, it’s essential to understand the basic stitches that will be used in the pattern. Familiarizing yourself with these stitches will make the process smoother and more enjoyable.
The chain stitch (ch) is the foundation of most crochet projects. You’ll start by making a chain to create the base for your lovey, so it’s crucial to make a consistent and even chain to avoid any tightness.
The single crochet (sc) is one of the most commonly used stitches in crochet. This stitch is perfect for creating a tight fabric, making it ideal for the bunny head and lovey blanket. Practice your single crochet to ensure you’re comfortable with it.
The double crochet (dc) stitch is another essential stitch you’ll encounter in the pattern. It creates height and adds a lovely texture to your work. Remember to yarn over before inserting your hook for this stitch.
The slip stitch (sl st) is often used to join pieces or rounds. This stitch helps maintain a neat finish, especially when you’re closing off rounds or attaching different parts of the lovey.
The decrease stitch (sc2tog) is used to shape your bunny’s head and features. This stitch involves crocheting two single crochets together, effectively reducing the stitch count and allowing you to create a more rounded shape.
Lastly, the magic ring technique may be used for starting the bunny head. This method creates a tight center for your work, perfect for amigurumi projects like the bunny’s head. If you’re not familiar with this technique, consider watching a tutorial to help you master it.
Understanding these basic stitches will greatly enhance your crocheting experience as you create your Bunny Lovey Parts & Pieces.
3. Step-by-Step Instructions
Now that you have your materials and understand the basic stitches, let’s dive into the step-by-step instructions for making the Bunny Lovey Parts & Pieces.
To begin, create the bunny head by making a magic ring. Chain 2 (this will not count as a stitch) and work 6 single crochets into the ring. Pull the tail to close the ring tightly, and join with a slip stitch to the first single crochet.
In the second round, increase each stitch by working 2 single crochets in each stitch. You should have a total of 12 stitches by the end of this round.
For the third round, continue to increase by placing 1 single crochet in the first stitch and 2 single crochets in the second stitch, repeating this pattern around. This will give you 18 stitches in total.
In the following rounds, you will maintain your stitch count while creating the shape of the head. Work 5 rounds of single crochet without increases, allowing the head to gain height and roundness.
Next, it’s time to shape the head. Start decreasing by placing 2 single crochets together (sc2tog) in every stitch around for the next round. This will help you close off the head and create a rounded shape.
Once the head is the desired size, stuff it lightly with fiberfill, making sure it maintains its shape. Continue decreasing until you have a small opening left, then finish off and weave in the ends using your tapestry needle.
Next, move on to the lovey blanket. Start by chaining a length that suits your desired size, typically around 30-36 inches, depending on how large you want your lovey to be.
For the first row, work a row of double crochets. This will provide a nice base for your blanket. Continue with additional rows, alternating between single crochet and double crochet stitches to create texture and visual interest.
You can add borders to your lovey blanket by working a row of single crochet around the edges. This not only gives it a polished look but also helps to keep the blanket from curling.
Finally, once the blanket is complete, use your tapestry needle to attach the bunny head to one corner of the lovey. Make sure it’s securely fastened so it can withstand all the cuddling and love it will receive.
Congratulations! You’ve successfully created your Bunny Lovey Parts & Pieces.
4. Tips and Tricks for Success
Creating your Bunny Lovey Parts & Pieces can be an enjoyable experience, and there are several tips and tricks to help you achieve the best results:
First, take your time with the magic ring technique. It can be a bit tricky at first, but practicing will help you create a tighter, neater start for your bunny head.
Second, always keep your tension consistent. If your stitches are too tight, it may become difficult to work into them. Conversely, if they are too loose, your lovey may not hold its shape.
Third, use a stitch marker to keep track of your rounds, especially when working in the round. This will help you stay organized and ensure that you maintain your stitch counts.
Fourth, don’t hesitate to customize your bunny lovey! You can add embroidered features, like eyes and a nose, or even crochet accessories such as bows or flowers to enhance its charm.
Fifth, remember to take breaks if you start feeling fatigued or frustrated. Stepping away for a moment can help you return to your project with fresh eyes and renewed energy.
Lastly, enjoy the process! Crocheting is not just about the end product; it’s also about the journey. Allow yourself to experiment and learn as you create your Bunny Lovey Parts & Pieces.
FAQ
What is a Bunny Lovey?
A Bunny Lovey is a combination of a small blanket and a bunny head, designed to provide comfort and companionship for babies and toddlers.
What materials do I need to make a Bunny Lovey?
You will need soft yarn, a suitable crochet hook, a tapestry needle, scissors, and a measuring tape.
How do I ensure my stitches are even?
To maintain even stitches, practice your tension and use a stitch marker to track your rounds.
Can I wash the Bunny Lovey?
Yes! Most crochet loveys made from acrylic or cotton yarn can be machine washed. Always check your yarn label for specific care instructions.
Is this pattern suitable for beginners?
Absolutely! The Bunny Lovey Parts & Pieces pattern is beginner-friendly and involves basic crochet stitches.
How can I customize my Bunny Lovey?
You can change the yarn color, add embroidery, or include accessories to personalize your Bunny Lovey to fit your style.
Join our VIP broadcast list and gain access to exclusive patterns, all for free. As a VIP member, you’ll receive the best patterns daily, delivered directly to your device. ✨📱 It’s a unique opportunity to stay up-to-date with the latest trends and designs, curated just for you. Don’t miss out on enhancing your projects and discovering new inspirations with the best patterns every day! 🎨🔝
Conclusion
In this article, we explored the Bunny Lovey Parts & Pieces – Free Crochet Pattern, providing you with everything you need to create this delightful project. From gathering materials to step-by-step instructions and tips for success, we hope this guide has inspired you to crochet your own lovey.
Remember, the joy of creating something special for a child is immeasurable. We would love to hear your feedback and suggestions on this pattern. Happy crocheting!

