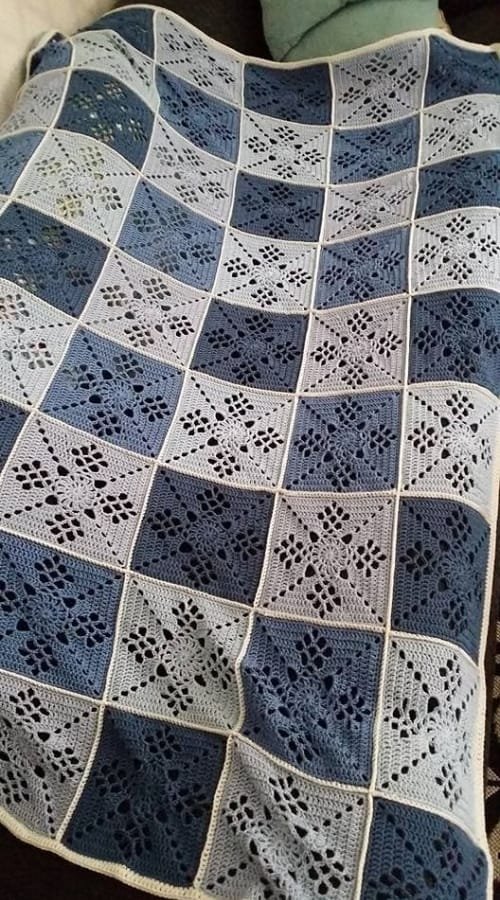
The Victorian Lattice Square is a beautiful and versatile crochet pattern that can be used for various projects, from blankets to table runners and everything in between.
This stunning square combines intricate stitches and a lovely lace design, making it a favorite among crocheters of all skill levels.
In this article, we will delve into the details of the Victorian Lattice Square crochet pattern, providing you with a step-by-step guide, tips, and tricks to help you create your masterpiece.
Crochet enthusiasts love the Victorian Lattice Square for its unique appearance and versatility. Whether you’re looking to create a cozy throw, a decorative pillow cover, or even a stylish shawl, this pattern offers endless possibilities.
With its combination of open and solid stitches, the square creates a delicate yet sturdy fabric, making it perfect for any crochet project.
Before we dive into the pattern itself, it’s essential to gather the right materials and understand the stitches involved. In the following sections, we’ll provide detailed instructions to ensure your experience with the Victorian Lattice Square is enjoyable and fulfilling.
1. Materials Needed
To get started with the Victorian Lattice Square, you will need the following materials:
First, you’ll need a medium-weight yarn. This pattern works well with yarn labeled as worsted weight (#4) or any similar thickness. Choose a color that inspires you, as this will set the tone for your finished project.
Next, select a crochet hook. A size H/8 (5.0 mm) hook is ideal for this pattern, but you can adjust the hook size depending on your yarn choice and tension. Always check your gauge to ensure your square turns out the correct size.
You will also require a tapestry needle for weaving in ends and sewing any squares together if you’re making a larger project. Scissors will be necessary for cutting the yarn, and a measuring tape will help you check the dimensions of your square as you work.
Lastly, don’t forget to have a pattern printout or digital copy handy. While this article will guide you through the pattern, having a written reference will make it easier to keep track of your progress and avoid mistakes.
With all your materials ready, you can confidently move on to the next steps in creating your Victorian Lattice Square.
2. Understanding the Stitches
Before starting the pattern, it’s essential to familiarize yourself with the basic stitches you’ll be using in the Victorian Lattice Square. Here are the key stitches to master:
The chain stitch (ch) is the foundation of most crochet projects. You’ll begin with a chain to set up your square, and it’s important to make a smooth, even chain to avoid tightness.
The double crochet (dc) is another fundamental stitch used in this pattern. It creates height in your work and adds texture to your square. Make sure to yarn over before inserting your hook, and practice the stitch until you feel comfortable with it.
You’ll also use the slip stitch (sl st) in this pattern. This stitch is often used to join rounds or pieces together and provides a neat finish.
The shell stitch is a more advanced stitch that adds the intricate lattice design to your square. It typically involves working multiple double crochets into the same stitch to create a fan-like effect.
Lastly, the chain space (sp) refers to the gaps created by chain stitches, which will be crucial for the lace effect of the Victorian Lattice Square. These spaces will allow for more open and airy designs.
Understanding these stitches will not only help you follow the pattern more easily but also enhance your overall crochet skills. Take your time to practice each stitch if you’re new to them.
3. Step-by-Step Instructions
Now that you have your materials and understand the basic stitches, it’s time to dive into the step-by-step instructions for the Victorian Lattice Square. Follow these detailed steps to create your square:
Start by making a slip knot and chaining 6 stitches. This will form your starting ring. Join the last chain to the first chain with a slip stitch to create a loop.
Next, you will begin working into the center of the ring. Chain 3 (this counts as your first double crochet), and then work 11 double crochets into the ring. You should have a total of 12 double crochets. Join with a slip stitch to the top of the initial chain 3 to complete the first round.
In the next round, chain 3 again, then work a double crochet in the same stitch. This will create a shell stitch. Skip the next stitch, then work a shell stitch (2 double crochets, chain 1, 2 double crochets) in the following stitch. Repeat this pattern around, joining with a slip stitch at the end.
For the third round, start by chaining 3, and then work a double crochet in the same stitch. This time, your pattern will change slightly. Work a shell stitch in each chain space created in the previous round. Continue this for the entire round, joining with a slip stitch to complete.
As you work the subsequent rounds, continue following the established pattern of shell stitches and double crochets. The beauty of the Victorian Lattice Square comes from the consistent repetition of these stitches, so take your time to ensure each round is uniform and neat.
Finally, when you reach your desired size (usually about 12 inches), finish off by cutting your yarn and pulling it through the last loop. Weave in all your ends using the tapestry needle, and admire your beautiful Victorian Lattice Square!
4. Tips and Tricks for Success
Creating the Victorian Lattice Square can be a delightful experience, and there are several tips and tricks to help you succeed in your crochet journey:
First, always check your gauge before starting the project. This ensures that your square will be the right size, which is particularly important if you plan to join multiple squares together.
Second, keep your tension consistent throughout the project. A uniform tension will create an even square, which is crucial for a polished final product. If you notice your stitches tightening or loosening, adjust your grip on the yarn and hook.
Third, take breaks as needed. If you find yourself getting frustrated or fatigued, step away for a bit. This will help prevent mistakes and keep your creativity flowing.
Fourth, don’t hesitate to experiment with different yarn colors and textures. The Victorian Lattice Square can look entirely different based on your choices, so have fun with it!
Fifth, consider using stitch markers to help keep track of rounds, especially if you’re working on multiple squares. This will help you avoid losing your place in the pattern.
Lastly, always remember that practice makes perfect. If your first square doesn’t turn out exactly as you envisioned, keep trying! Each attempt will help you improve your skills and gain confidence in your crochet abilities.
FAQ
What is the Victorian Lattice Square pattern?
The Victorian Lattice Square is a crochet pattern characterized by its intricate lattice design made from a combination of shell stitches and double crochets.
What type of yarn is best for this pattern?
A medium-weight yarn (worsted weight #4) works best for the Victorian Lattice Square. Choose a color that complements your project.
Can I use this square in different projects?
Yes! The Victorian Lattice Square can be used in various projects, including blankets, table runners, and pillows.
How big will my square be?
The finished square typically measures about 12 inches, but you can adjust the size by adding or removing rounds.
Do I need to block my finished square?
Blocking is recommended to help your square maintain its shape and to enhance the intricate design.
Can beginners crochet this pattern?
Yes, beginners can crochet the Victorian Lattice Square with a basic understanding of stitches. Take your time and follow the instructions closely.
Join our VIP broadcast list and gain access to exclusive patterns, all for free. As a VIP member, you’ll receive the best patterns daily, delivered directly to your device. ✨📱 It’s a unique opportunity to stay up-to-date with the latest trends and designs, curated just for you. Don’t miss out on enhancing your projects and discovering new inspirations with the best patterns every day! 🎨🔝
Conclusion
In this article, we explored the Victorian Lattice Square – Free Crochet Pattern, covering everything from the materials needed to step-by-step instructions for creating your square. We also shared tips and tricks to help you succeed in your crochet journey. This pattern is not only beautiful but also versatile, making it a wonderful addition to your crochet repertoire.
We hope you find joy in creating your Victorian Lattice Square and that this guide has been helpful. We’d love to hear your thoughts and any suggestions you might have. Happy crocheting!

