Looking to create a festive and beautiful quilt block? This Candy Striped Holly Star – Free Tutorial will guide you through the steps to make a stunning quilt block that is perfect for the holiday season or any time you want to add a bit of charm to your quilt.
With its candy-striped design and classic holly star shape, this block will bring both color and tradition to your quilting project.
Whether you’re a beginner or an experienced quilter, this tutorial makes the process easy to follow.
The Candy Striped Holly Star is versatile and can be made in a variety of color schemes, but the traditional red, white, and green combination is perfect for Christmas-themed quilts. In this article, we’ll explain how to create your own Candy Striped Holly Star with step-by-step instructions that are simple, clear, and optimized for any skill level.
Before we dive into the tutorial, make sure you have the necessary materials and tools. You’ll need fabric in a few different colors, a sewing machine, thread, a rotary cutter, and your quilting ruler.
Let’s start building this beautiful quilt block and enjoy the satisfaction of creating a piece that’s both unique and festive.
1. Selecting and Preparing Your Fabrics
Choosing the right fabrics for your Candy Striped Holly Star – Free Tutorial is the first step toward a successful project. Since this block involves stripes and stars, it’s important to select colors that contrast well but still create harmony in the final design.
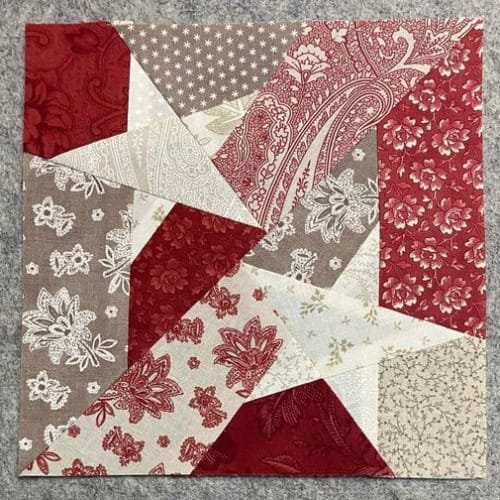
Start with classic holiday colors: red, green, and white. The red and white stripes will represent the “candy” part of the Candy Striped Holly Star, while the green can form the star itself, symbolizing holly leaves. You could also experiment with other colors to make this design work for different themes and seasons.
Before you cut your fabric, make sure it’s properly washed and ironed. Pre-washing prevents shrinking later, and ironing ensures that your cuts will be accurate. It’s always good practice to handle fabric with care during this stage to avoid warping or wrinkles that could affect your block’s alignment.
Once your fabric is prepped, it’s time to cut your pieces. For the Candy Striped Holly Star, you’ll need both triangles and strips. The stripes will form the background, while the star will be made up of smaller triangles. Be sure to use a sharp rotary cutter for clean, precise cuts, and measure carefully with a quilting ruler.
Next, organize your fabric pieces by color and shape. Having everything laid out neatly before you begin sewing will make the process smoother and help you visualize how the block will come together.
Finally, consider arranging the stripes in an alternating pattern to create the candy stripe effect. This adds visual interest and helps the star stand out against the striped background. The clearer the contrast between your stripes and star, the more defined your Candy Striped Holly Star will appear.
2. Assembling the Star
The second part of the Candy Striped Holly Star – Free Tutorial focuses on assembling the star at the center of the block. This star will be made up of small triangles that come together to create the holly-inspired design.
Begin by taking the triangles that will form the points of the star. Pair them up so that the right sides of the fabric face each other. Sew along the long edges, making sure to leave a ¼ inch seam allowance. This is standard for most quilting blocks and ensures that your block will fit perfectly into a larger quilt if needed.
Once you’ve sewn the star points, press the seams open with an iron. This will help the block lay flat and make it easier to assemble the other sections. Be careful not to stretch the fabric while ironing, as this can distort the triangles.
Next, arrange your sewn triangles in a star shape. The points of the star should radiate from the center, forming the classic holly star pattern. Pin the pieces together to ensure that everything stays in place while you sew.
Sew the star points together, being mindful to match up the seams at the center of the block. This can be tricky, so take your time to ensure accuracy. If necessary, use a seam ripper to adjust any mismatches before continuing.
Once the star is fully assembled, press the block again. At this point, you’ll start to see the Candy Striped Holly Star take shape. The contrast between the striped background and the solid star will create a striking visual effect that’s perfect for holiday quilts or any project requiring a bold, geometric design.
Finally, trim any excess fabric around the edges of the block to ensure it’s square. This will make it easier to sew the block into a larger quilt or use it as a standalone decoration.
3. Creating the Candy Stripe Effect
Now that the star is assembled, it’s time to focus on the candy stripe background. This part of the Candy Striped Holly Star – Free Tutorial adds a festive touch to the block, making it perfect for holiday projects.
Start by cutting strips of fabric in red and white (or whatever colors you’ve chosen for your candy stripes). The width of the strips can vary depending on your personal preference, but aim for a width of about 1 inch for a balanced look.
Lay out the strips in an alternating pattern, red and white, to create the candy stripe effect. Be sure to measure carefully and keep the stripes straight as you sew. If the stripes are crooked, it could detract from the overall look of the block.
Sew the strips together, right sides facing, using a ¼ inch seam allowance. Press the seams open as you go to keep the block flat and make assembly easier. Once all the strips are sewn together, you should have a piece of striped fabric that will form the background for your Candy Striped Holly Star.
Now, it’s time to attach the star to the striped background. Place the star on top of the stripes, centering it carefully. Pin the star in place, then sew around the edges to secure it to the background. If desired, you can use a decorative stitch to add some flair to the edges of the star.
Once the star is attached, press the entire block one final time. The candy stripe background should now perfectly complement the holly star, creating a festive and eye-catching quilt block.
4. Finishing Your Quilt Block
With the star and stripes assembled, the final step of the Candy Striped Holly Star – Free Tutorial is to finish the quilt block and prepare it for use in a larger quilt or as a standalone project.
First, check the block for any loose threads or uneven seams. Trim any excess fabric and make any necessary adjustments to ensure that the block is square and even on all sides.
If you’re planning to use the block in a larger quilt, this is the time to decide on your quilt’s overall design. The Candy Striped Holly Star can be repeated across a quilt for a cohesive holiday theme, or you can mix it with other blocks for a more eclectic look.
To give the block a finished edge, you may want to add a border. Choose a complementary fabric and cut strips to sew around the edges of the block. This will frame the Candy Striped Holly Star and make it stand out even more in your final quilt.
Once the block is finished, you can either add it to your quilt top or use it as a standalone piece. This block works beautifully as a holiday pillow, wall hanging, or even a table runner. The possibilities are endless with this versatile design.
Finally, press the completed block one last time to ensure that everything is smooth and ready for your next quilting project.
FAQ
1. Can beginners make the Candy Striped Holly Star?
Yes! The Candy Striped Holly Star – Free Tutorial is designed to be beginner-friendly. The step-by-step instructions make it easy for quilters of all levels to create this festive block.
2. What colors should I use for the Candy Striped Holly Star?
Traditional holiday colors like red, green, and white work well for this block, but you can use any color combination that suits your project.
3. How large should the quilt block be?
A standard size for this block is around 12×12 inches, but you can adjust the size based on your overall quilt design.
4. Can I personalize my Candy Striped Holly Star block?
Absolutely! You can add embellishments like embroidery, quilting stitches, or even fabric paint to make your block unique.
5. How can I keep my stripes straight while sewing?
Using a quilting ruler and carefully measuring your strips will help keep the stripes straight. Pressing the seams as you go will also help maintain a clean, straight line.
6. What is the best way to finish the quilt block?
You can add a border to frame the block, or simply trim it to size and add it to a larger quilt top.
Join our VIP broadcast list and gain access to exclusive patterns, all for free. As a VIP member, you’ll receive the best patterns daily, delivered directly to your device. ✨📱 It’s a unique opportunity to stay up-to-date with the latest trends and designs, curated just for you. Don’t miss out on enhancing your projects and discovering new inspirations with the best patterns every day! 🎨🔝
Conclusion
This Candy Striped Holly Star – Free Tutorial offers a fun and festive way to add a holiday-themed block to your quilting projects. With its striking combination of candy stripes and a holly-inspired star, this block is sure to stand out in any quilt. Whether you’re creating a holiday gift or a keepsake for yourself, this tutorial provides easy-to-follow instructions that quilters of all levels can enjoy.
If you try this tutorial, we’d love to hear from you! Please leave your feedback and suggestions in the comments below. Happy quilting!

