The Scrappy Heart Quilt Block is a charming and versatile design that adds a touch of warmth and love to any quilt project. Perfect for quilters of all skill levels, this block allows you to use up your fabric scraps while creating a stunning heart pattern.
Whether you’re making a quilt for a loved one or simply want to brighten up your home, the Scrappy Heart Quilt Block offers an excellent opportunity for creativity and expression.
This tutorial will guide you through each step of the process, from selecting your fabric to assembling the quilt block. You’ll find that this design is not only visually appealing but also practical, allowing you to repurpose leftover fabric.
By the end of this tutorial, you’ll have a completed Scrappy Heart Quilt Block that you can be proud of and incorporate into your larger quilting projects.
As we delve into the details of creating the Scrappy Heart Quilt Block, keep in mind that quilting is a delightful blend of art and craft.
Take your time with each step, enjoy the process, and don’t hesitate to let your creativity shine through. Now, let’s get started on this exciting quilting journey!
1. Materials Needed
Before you begin making your Scrappy Heart Quilt Block, it’s important to gather all the necessary materials. Having everything on hand will streamline the process and make your experience more enjoyable. Here’s what you will need:
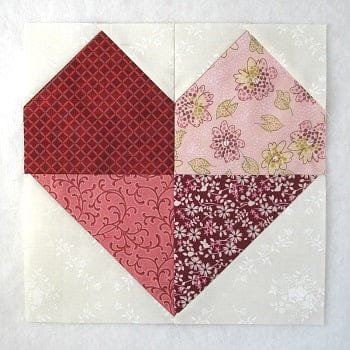
- Fabric Scraps: The beauty of the Scrappy Heart Quilt Block lies in its use of various fabric scraps. Gather pieces in different colors and patterns, particularly in reds, pinks, and whites, to create a vibrant heart.
- Background Fabric: In addition to your scraps, choose a solid fabric for the background. This will help your heart stand out and give your quilt block a clean, finished look.
- Rotary Cutter and Mat: A rotary cutter, along with a cutting mat, is essential for making precise cuts in your fabric. This tool ensures clean edges, which is crucial for a polished quilt block.
- Quilting Ruler: A clear quilting ruler will assist you in measuring and cutting your fabric accurately. This is especially important for achieving consistent block sizes.
- Sewing Machine: Ensure your sewing machine is ready for use. It is your primary tool for assembling the quilt block, so it should be in good working condition.
- Thread: Choose high-quality thread that matches your fabric colors. This will enhance the overall appearance of your Scrappy Heart Quilt Block.
Once you have gathered your materials, you’re ready to start cutting and preparing your fabric for the next steps.
2. Cutting Your Fabric
The next step in creating your Scrappy Heart Quilt Block is to cut your fabric into the appropriate shapes. Follow these guidelines for accurate cutting:
- Choose Your Scraps: Start by selecting a variety of fabric scraps. Aim for a mix of different patterns and colors to create visual interest in your heart design.
- Measure and Mark: Use your quilting ruler to measure out the sizes of the squares and triangles needed for the heart. You will typically need a combination of both to construct the block effectively.
- Cutting Squares: Cut out squares from your fabric scraps. The size of the squares will depend on your specific heart design, but they are usually around 2.5 inches.
- Cutting Triangles: For the heart shape, you will need to cut triangles from the same or contrasting fabrics. You can achieve this by cutting squares diagonally.
- Background Fabric: Cut your background fabric into squares that match the size of your heart block. This will frame your heart and provide a backdrop for your design.
- Organize Your Pieces: As you cut each fabric piece, organize them by type and color. This will help you see how your finished Scrappy Heart Quilt Block will look and streamline the sewing process.
With your fabric pieces cut and organized, you are ready to move on to assembling the quilt block.
3. Assembling the Scrappy Heart Quilt Block
Now that you have all your fabric pieces ready, it’s time to assemble your Scrappy Heart Quilt Block. Follow these steps to ensure a successful assembly:
- Layout Your Design: Before sewing, lay out your fabric pieces according to your desired design. This will help you visualize the finished block and make any necessary adjustments.
- Sew the Heart Pieces: Start by sewing the squares and triangles together to form the heart shape. Use a 1/4 inch seam allowance to ensure everything aligns properly.
- Press Your Seams: After sewing each section, press the seams open with an iron. This will help your fabric lay flat and create crisp edges.
- Assemble the Heart: Once you’ve completed the heart shape, sew the individual pieces together to form the complete heart block. Make sure everything lines up correctly.
- Attach the Background: After the heart is assembled, sew it to the background fabric. This step adds stability to your block and enhances the overall design.
- Final Press: Give your Scrappy Heart Quilt Block a final press to remove any wrinkles and ensure everything is lying flat. This will make your block look neat and ready for the next stage.
Congratulations! You’ve now assembled your Scrappy Heart Quilt Block.
4. Tips for Success
To ensure a smooth quilting experience and a beautiful final product, keep these tips in mind as you create your Scrappy Heart Quilt Block:
- Maintain a Consistent Seam Allowance: A consistent 1/4 inch seam allowance is essential for accurate piecing. This will help ensure that all your blocks fit together correctly in the final quilt.
- Use Pins: Pinning your fabric pieces together before sewing can help keep them in place and prevent shifting, leading to neater seams.
- Take Your Time: Quilting is an art, so take your time with each step. Rushing can lead to mistakes, so enjoy the process and focus on your craftsmanship.
- Practice with Scraps: If you’re new to quilting or this particular block, practice with scrap fabric first. This will build your confidence and allow you to refine your technique.
- Join a Quilting Community: Engaging with other quilters can provide inspiration and support. Consider joining local quilting groups or online forums to connect with like-minded individuals.
- Experiment with Colors: The Scrappy Heart Quilt Block is a great opportunity to play with color and pattern. Don’t be afraid to mix and match fabrics to create a unique design that reflects your personality.
With these tips in mind, you can confidently tackle the Scrappy Heart Quilt Block and create a beautiful addition to your quilting collection.
FAQ
1. What is a Scrappy Heart Quilt Block?
The Scrappy Heart Quilt Block is a quilting design that features a heart shape made from various fabric scraps. It’s a creative way to use leftover fabrics while creating a visually appealing block.
2. What materials do I need for the Scrappy Heart Quilt Block?
You will need fabric scraps, background fabric, a rotary cutter, a quilting ruler, a sewing machine, and thread to complete the Scrappy Heart Quilt Block.
3. How do I cut the fabric for this quilt block?
Measure and cut your fabric into squares and triangles based on the dimensions of your chosen heart design. Using a rotary cutter and quilting ruler will help achieve precise cuts.
4. What seam allowance should I use for quilting?
A standard seam allowance for quilting is 1/4 inch. Maintaining this seam allowance is crucial for ensuring that all your blocks fit together correctly.
5. Can I use different fabrics for the Scrappy Heart Quilt Block?
Absolutely! The Scrappy Heart Quilt Block is designed to use various fabric scraps, allowing you to mix and match colors and patterns for a unique look.
6. How can I improve my quilting skills?
Practice regularly, take your time with each project, and consider joining a quilting group for support and advice from experienced quilters.
Join our VIP broadcast list and gain access to exclusive patterns, all for free. As a VIP member, you’ll receive the best patterns daily, delivered directly to your device. ✨📱 It’s a unique opportunity to stay up-to-date with the latest trends and designs, curated just for you. Don’t miss out on enhancing your projects and discovering new inspirations with the best patterns every day! 🎨🔝
Conclusion
In this tutorial, we explored how to create a Scrappy Heart Quilt Block, from gathering materials and cutting fabric to assembling and finishing the block. This project not only allows you to use up fabric scraps but also provides an opportunity for creative expression.
We would love to hear your thoughts on this tutorial! Please leave your honest feedback and any suggestions for future articles. Happy quilting!

