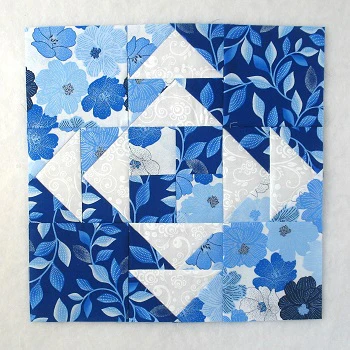
The Trees in the Park Traditional Quilt Block is a charming design that beautifully captures the essence of nature.
This quilt block features a depiction of trees, evoking a serene park setting, making it a perfect addition to any quilt project. Whether you’re a beginner or an experienced quilter, this free tutorial will guide you step by step through the process of creating this delightful quilt block.
With its simple yet elegant design, the Trees in the Park Traditional Quilt Block is versatile enough to be used in various quilting projects, from cozy lap quilts to stunning wall hangings.
In this tutorial, we will cover all the necessary materials and techniques to help you create the Trees in the Park Traditional Quilt Block with ease. You’ll find that this block is not only visually appealing but also a wonderful way to practice your quilting skills.
Additionally, we will share tips to enhance your quilting experience and ensure your finished block is nothing short of perfection. Let’s embark on this quilting journey together and bring the beauty of nature into your quilting projects.
Before we dive into the specifics of the tutorial, it’s important to gather your materials and familiarize yourself with the cutting process. This preparation will set you up for success as you create your Trees in the Park Traditional Quilt Block. Let’s get started!
1. Materials Needed
To create your Trees in the Park Traditional Quilt Block, you will need the following materials:
- Fabrics: Select a variety of fabric colors that represent trees and the park setting. Consider using greens for the trees, browns for the trunks, and a light blue or yellow for the background to simulate a sunny day.
- Rotary cutter and mat: These tools are essential for making precise cuts in your fabric. A rotary cutter will provide clean edges, while a cutting mat will protect your surfaces.
- Quilting ruler: A clear quilting ruler will help you accurately measure and cut your fabric pieces. This is crucial for achieving the correct sizes for each piece of the quilt block.
- Sewing machine: Ensure your sewing machine is in good working condition. This is your primary tool for assembling the quilt block, so having it ready to go is essential.
- Thread: Use high-quality cotton thread that complements your fabric colors. Matching thread colors will enhance the overall appearance of your quilt block.
- Iron and ironing board: Pressing your fabric pieces as you work is vital for achieving crisp seams. An iron helps remove wrinkles and keeps your fabric flat.
Once you have gathered all the necessary materials, you’re ready to move on to the cutting phase of your Trees in the Park Traditional Quilt Block tutorial.
2. Cutting Your Fabric
The next step is to cut your fabric pieces to the correct sizes. Follow these guidelines to ensure accuracy:
- Measure and mark: Use your quilting ruler to measure the dimensions of each fabric piece according to your pattern. The Trees in the Park Traditional Quilt Block will consist of squares and triangles, so ensure you have the correct measurements for each shape.
- Cutting squares: Begin by cutting squares for the background and the tree trunks. Depending on your pattern, you may need various sizes for different sections of the block.
- Cutting triangles: For the tree tops, cut triangles from your green fabrics. You can cut squares and then slice them diagonally to create the triangles needed for the trees.
- Organize your pieces: As you cut each fabric piece, keep them organized by type and color. This will streamline the assembly process and help you visualize the finished design.
- Press your fabric: After cutting, it’s advisable to press your fabric pieces to remove any wrinkles. This will ensure they lay flat, making sewing easier.
- Double-check your measurements: Before you start sewing, double-check that all your pieces are cut to the correct sizes. This extra step will save you time and prevent frustration later on.
With your fabric pieces cut and organized, you’re ready to start assembling your Trees in the Park Traditional Quilt Block.
3. Assembling the Trees in the Park Quilt Block
Now that you have your fabric pieces ready, it’s time to assemble the Trees in the Park Traditional Quilt Block. Follow these steps for a successful assembly:
- Create the background: Start by sewing together the background squares. Arrange them according to your design, ensuring the placement reflects the park setting.
- Sew the tree trunks: Next, sew the fabric pieces representing the tree trunks. Attach them to the background, positioning them where you’d like your trees to appear.
- Add the tree tops: Once the trunks are in place, sew the triangular pieces to form the tree tops. Make sure to align the triangles correctly with the trunks for a cohesive look.
- Press your seams: After attaching the tree tops, press the seams open. This will help the block lay flat and ensure clean lines and sharp points.
- Assemble the entire block: Once all parts are sewn together, assemble the complete quilt block. Make sure everything aligns properly, and adjust as necessary before sewing the final seams.
- Final press: After completing your Trees in the Park Traditional Quilt Block, give it a final press. This will remove any wrinkles and give your block a polished appearance.
Congratulations! You’ve successfully created your Trees in the Park Traditional Quilt Block.
4. Tips for Success
To enhance your quilting experience and ensure your Trees in the Park Traditional Quilt Block turns out beautifully, consider the following tips:
- Maintain a consistent seam allowance: A 1/4 inch seam allowance is standard for quilting. Keeping this consistent will help ensure that your pieces fit together correctly.
- Use pins for stability: Pin your fabric pieces together before sewing to prevent them from shifting. This will help create even seams and a neater finish.
- Take your time: Quilting is an art form, so take your time with each step. Rushing can lead to mistakes, so savor the process.
- Practice on scrap fabric: If you’re new to quilting or this block design, practice on scrap fabric first. This will give you confidence before using your chosen materials.
- Join a quilting community: Engaging with fellow quilters can provide support and inspiration. Consider joining local quilting groups or online forums to connect with others who share your passion.
- Experiment with colors and patterns: The Trees in the Park Traditional Quilt Block allows for creativity. Don’t hesitate to mix and match different fabrics and colors to create a unique quilt block that reflects your style.
With these tips in mind, you can confidently tackle the Trees in the Park Traditional Quilt Block and create a beautiful addition to your quilt.
FAQ
1. What is the Trees in the Park Traditional Quilt Block?
The Trees in the Park Traditional Quilt Block is a quilting design that features a representation of trees, evoking a peaceful park atmosphere. It combines squares and triangles to create a visually appealing block.
2. What materials do I need for this quilt block?
You will need fabrics, a rotary cutter, a quilting ruler, a sewing machine, thread, and an iron. These materials are essential for successfully completing the quilt block.
3. How do I cut the fabric for the Trees in the Park Quilt Block?
Measure and cut your fabric into squares and triangles according to the dimensions specified in your pattern. Using a rotary cutter and quilting ruler will help you achieve precise cuts.
4. What is the best seam allowance for quilting?
A standard seam allowance for quilting is typically 1/4 inch. Maintaining this consistency is crucial for ensuring your quilt pieces fit together accurately.
5. Can I use different fabrics for the Trees in the Park Quilt Block?
Yes! You can use a variety of fabrics and colors to create a unique and personalized Trees in the Park Traditional Quilt Block. Mixing different patterns can enhance the overall design.
6. How can I improve my quilting skills?
Practice regularly, take your time with each project, and consider joining a quilting group for support and advice from experienced quilters.
Join our VIP broadcast list and gain access to exclusive patterns, all for free. As a VIP member, you’ll receive the best patterns daily, delivered directly to your device. ✨📱 It’s a unique opportunity to stay up-to-date with the latest trends and designs, curated just for you. Don’t miss out on enhancing your projects and discovering new inspirations with the best patterns every day! 🎨🔝
Conclusion
In this tutorial, we have explored the process of creating a Trees in the Park Traditional Quilt Block. From gathering materials and cutting fabric to assembling the block and providing helpful tips, you now have the knowledge to create this beautiful quilt design.
We invite you to share your thoughts on this tutorial! Please leave us your honest feedback and any suggestions for future articles. Happy quilting!

