Creating beautiful quilts is a time-honored tradition that many crafters and artists cherish. One of the most striking and creative blocks you can add to your quilt is the God’s Eye Quilt Block Pattern.
This stunning design not only adds a visual appeal to your quilting projects but also tells a story of culture and craftsmanship. In this tutorial, we will explore the steps to create your very own God’s Eye Quilt Block, ensuring you understand the process thoroughly.
The God’s Eye Quilt Block Pattern has deep roots in various cultures, symbolizing protection and the connection between the earth and the divine. This block’s intricate design allows you to play with colors and patterns, making it an excellent choice for any quilter looking to express their creativity.
With this guide, you’ll learn how to make this beautiful block, whether you’re a beginner or an experienced quilter.
Before we dive into the specifics of the tutorial, it’s essential to gather your materials and understand the steps involved in creating the God’s Eye Quilt Block Pattern. Let’s explore the process together, ensuring that by the end of this article, you will be equipped with the knowledge to create this stunning quilt block.
1. Materials Needed
Before starting your God’s Eye Quilt Block Pattern, gather the following materials to ensure a smooth crafting experience:
- Fabric: Choose at least two contrasting fabrics. Cotton is a popular choice due to its durability and ease of use.
- Rotary Cutter: This tool will help you cut your fabric into precise squares and triangles, which is crucial for this pattern.
- Cutting Mat: A self-healing cutting mat will protect your surfaces while cutting your fabric.
- Ruler: A quilting ruler will help you measure and cut your fabric accurately.
- Sewing Machine: While hand sewing is possible, a sewing machine will make the process faster and more efficient.
- Thread: Choose a thread color that matches your fabric to ensure a seamless finish.
Once you have your materials ready, you’ll be able to move forward with confidence, knowing you have everything you need to create your God’s Eye Quilt Block Pattern.
2. Cutting Your Fabric
The next step in creating your God’s Eye Quilt Block Pattern is cutting your fabric pieces to the right size. Here’s how to do it:
- Measure and Mark: Using your ruler, measure out squares of fabric. A common size for this block is 10 inches, but you can adjust based on your desired finished size.
- Cut the Squares: Use your rotary cutter to cut the squares accurately. Ensure that your cutting mat is underneath to protect your surfaces.
- Cut the Triangles: For the “eyes,” you’ll need to cut triangles from your fabric. A quick way to do this is to cut each square diagonally from corner to corner, yielding two triangles per square.
- Choose Your Arrangement: Before sewing, lay out your squares and triangles to decide on the arrangement. This step allows you to play with colors and ensure a pleasing design.
- Label Your Pieces: If you’re working with multiple blocks, consider labeling your pieces to keep track of your arrangement.
- Prepare for Sewing: Once you’re satisfied with your layout, prepare to sew the pieces together, ensuring all edges are aligned correctly.
This preparation stage is crucial for creating a professional-looking God’s Eye Quilt Block Pattern.
3. Assembling the Block
With your fabric cut and organized, it’s time to assemble your God’s Eye Quilt Block Pattern. Follow these steps for a successful assembly:
- Start with the Squares: Begin by sewing two squares together along one edge, right sides facing. Use a quarter-inch seam allowance for a neat finish.
- Press the Seams: After sewing, press the seams open with an iron. This step ensures the fabric lies flat and makes it easier to assemble the block.
- Add the Triangles: Next, attach the triangles to the edges of your square. Align the triangles with the square’s corners, ensuring they overlap slightly.
- Sew and Press: Sew the triangles in place, then press the seams. Repeat this process for all four corners of your square.
- Finish the Block: Once all the triangles are attached, trim any excess fabric from the edges to ensure your block is even. You may want to square up your block by trimming it to the desired size.
- Inspect Your Work: Take a moment to check your block for any imperfections or uneven edges. This is the time to make any necessary adjustments before moving on to the next block.
By following these steps, you’ll be well on your way to mastering the God’s Eye Quilt Block Pattern.
4. Adding Borders and Finishing Touches
Now that your God’s Eye Quilt Block Pattern is assembled, it’s time to add borders and complete the finishing touches:
- Choose Your Border Fabric: Select a fabric that complements your block design. A solid color often works well to frame the intricate pattern.
- Cut the Borders: Cut strips of fabric for the borders, typically 2 to 4 inches wide, depending on your preference.
- Attach the Borders: Sew the border strips to the sides of your block, starting with the top and bottom, followed by the left and right sides. Ensure to press the seams as you go for a polished look.
- Quilting Options: Decide how you want to quilt your block. You can hand quilt, machine quilt, or tie your quilt. Each method offers a unique texture and finish.
- Binding: Once quilted, cut binding strips from your chosen fabric and attach them around the edges of your quilt block to give it a clean and professional finish.
- Final Press: Give your finished block a final press with the iron to smooth out any wrinkles and prepare it for display or use.
Completing these steps will result in a beautiful God’s Eye Quilt Block Pattern that you can be proud of.
FAQ
1. What is a God’s Eye Quilt Block?
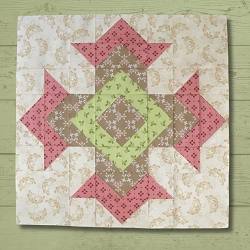
The God’s Eye Quilt Block is a traditional quilt block that features a central square surrounded by triangles, creating a visually striking design.
2. Can I use different fabrics for this block?
Absolutely! You can experiment with various fabrics and colors to create a unique look for your God’s Eye Quilt Block Pattern.
3. Is this pattern suitable for beginners?
Yes, the God’s Eye Quilt Block is a great project for beginners as it allows you to practice basic sewing and cutting skills.
4. How do I ensure my block is the right size?
Accurate cutting and consistent seam allowances are key. Always measure your fabric before cutting and press your seams flat.
5. What techniques can I use for quilting the finished block?
You can hand quilt, machine quilt, or tie your quilt. Each technique provides a different texture and appearance.
6. Can I use this block in larger quilts?
Yes, the God’s Eye Quilt Block Pattern can be used as a standalone block or combined with other blocks to create a larger quilt.
Join our VIP broadcast list and gain access to exclusive patterns, all for free. As a VIP member, you’ll receive the best patterns daily, delivered directly to your device. ✨📱 It’s a unique opportunity to stay up-to-date with the latest trends and designs, curated just for you. Don’t miss out on enhancing your projects and discovering new inspirations with the best patterns every day! 🎨🔝
Conclusion
In this tutorial, we’ve explored the God’s Eye Quilt Block Pattern, from gathering materials to completing the block with borders and finishing touches. We discussed essential steps like cutting your fabric, assembling the block, and quilting techniques. This block is not only a beautiful addition to any quilt but also a representation of cultural significance.
PATTERN HERE
We hope you found this tutorial helpful and that you feel inspired to create your own God’s Eye Quilt Block Pattern. Please leave your sincere opinions and suggestions in the comments below. Happy quilting!

