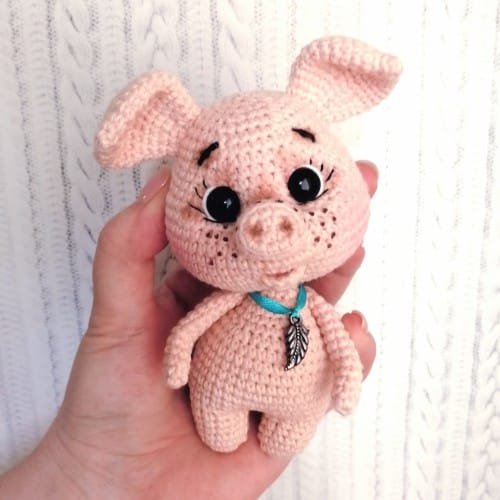
Welcome to our Cute Pig Amigurumi – Tutorial! In this guide, we will show you how to create an adorable pig that is sure to bring joy to anyone who sees it.
Amigurumi, the Japanese art of knitting or crocheting small, stuffed yarn creatures, has gained immense popularity worldwide, and this cute pig is the perfect project for both beginners and experienced crafters alike.
The Cute Pig Amigurumi is not only fun to make but also a delightful gift or decoration for your home.
In this tutorial, we’ll break down the steps required to crochet your very own Cute Pig Amigurumi. You’ll learn about the materials needed, how to crochet the body parts, and how to assemble them for the final creation.
We’ll also explore various tips and tricks to enhance your amigurumi skills. So grab your yarn and hooks, and let’s dive into this adorable project together!
The charm of the Cute Pig Amigurumi lies in its simplicity and the joy it brings. Whether you’re making it for a child, a friend, or even for yourself, this cute little pig can be personalized in countless ways.
You can experiment with colors, add accessories, or create variations in size. Let your creativity run wild as you embark on this crochet journey!
1. Materials Needed
Before we begin creating our Cute Pig Amigurumi, let’s gather all the materials you’ll need for this project. Having everything ready will make the crocheting process smooth and enjoyable. Here’s a list of essential materials:
- Yarn: Choose a soft, medium-weight yarn (worsted weight) in pink for the body, black for the eyes and nostrils, and white or cream for any accessories you might want to add. A worsted weight yarn will give your pig a nice, plush appearance.
- Crochet Hook: Select a crochet hook size that complements your yarn. For worsted weight yarn, a size G (4.0 mm) or H (5.0 mm) crochet hook works well. The hook size affects the tightness of your stitches, so pick one that feels comfortable for you.
- Fiberfill Stuffing: To give your amigurumi its shape, you’ll need fiberfill stuffing. This soft material will help your pig maintain its cute, round form.
- Safety Eyes: Using safety eyes can give your Cute Pig Amigurumi an expressive face. They come in various sizes and colors, so choose a pair that fits the overall look of your pig.
- Tapestry Needle: A tapestry needle is essential for weaving in loose ends and sewing the various parts of your pig together. Make sure it has a large enough eye to accommodate your yarn.
- Scissors: You’ll need a pair of sharp scissors for cutting your yarn at the end of each piece. Having a dedicated pair of crafting scissors will make this task easier.
2. Basic Crochet Techniques
Now that you have all your materials ready, let’s discuss some basic crochet techniques that will be helpful as we create our Cute Pig Amigurumi. Familiarity with these stitches and techniques will make the project smoother and more enjoyable:
- Magic Ring: The magic ring is a technique used to start crocheting in the round. It creates a tight center that prevents gaps in your amigurumi. To create a magic ring, wrap the yarn around your fingers, insert your hook, and pull through. Then crochet your stitches into the ring.
- Single Crochet (sc): The single crochet stitch is one of the most fundamental stitches in amigurumi. It creates a dense fabric, making it ideal for stuffed toys. To perform a single crochet, insert your hook into the stitch, yarn over, pull through, yarn over again, and pull through both loops.
- Increase (inc): An increase is used to add stitches to your work, allowing the shape of your amigurumi to grow. To increase, crochet two single crochets into the same stitch. This technique will help shape the body of your Cute Pig Amigurumi.
- Decrease (dec): The decrease stitch is used to reduce the number of stitches, which helps shape your amigurumi. To decrease, crochet two stitches together. This creates a tighter area, perfect for forming the pig’s snout or other features.
- Slip Stitch (sl st): The slip stitch is often used to join rounds or finish off pieces. To slip stitch, insert your hook into the desired stitch, yarn over, and pull the yarn through both the stitch and the loop on your hook.
- Chain Stitch (ch): The chain stitch is the foundation of many crochet patterns. To create a chain, yarn over and pull through the loop on your hook. This technique is less commonly used in amigurumi but is essential for other crochet projects.
3. Crocheting the Cute Pig
Now that you’re familiar with the materials and basic techniques, let’s start crocheting our Cute Pig Amigurumi. We will be working in rounds and using the magic ring technique to create the body parts:
- Body: Start by creating a magic ring and crocheting 6 single crochets into the ring. Pull the tail to tighten. Continue to increase for several rounds until you reach the desired size for the body, usually about 12-15 rounds, depending on the size you want.
- Head: Using the same technique, create a separate magic ring for the head. Follow the same increase pattern as the body until the head is slightly smaller than the body, usually around 10-12 rounds. This will help the head sit snugly on the body.
- Snout: For the snout, create another magic ring, and crochet 4 single crochets into the ring. After the first round, continue to work in rows to create a small rectangular shape. The snout should be about 4-5 rounds long.
- Ears: The ears can be made separately. Start with a magic ring and crochet 4 single crochets into the ring. For the next few rounds, create a flat triangle shape by adding increases on either side. Make two ears for your pig.
- Legs: Create four legs by crocheting small cylindrical shapes. Start with a magic ring and crochet around for several rounds. The legs should be proportionate to the body size. Stuff them lightly before attaching.
- Assembly: Once all parts are crocheted, it’s time to assemble your Cute Pig Amigurumi. Start by sewing the head to the body using a tapestry needle. Attach the snout to the front of the head and position the ears on top. Finally, sew on the legs, ensuring they are evenly spaced.
4. Adding Details and Finishing Touches
With your Cute Pig Amigurumi assembled, it’s time to add those special finishing touches that will make your pig truly stand out:
- Safety Eyes: Attach the safety eyes to the head, placing them evenly apart. If you prefer, you can embroider eyes with black yarn for a softer look.
- Nostrils: Use black yarn to create the nostrils on the snout. You can embroider two small oval shapes to give your pig character.
- Blush: Add a touch of charm by embroidering blush marks on the cheeks with pink yarn. This small detail can bring your pig to life and enhance its cuteness.
- Tail: To create a curly tail, crochet a small chain and roll it up. Attach the tail to the back of the body for an adorable finish.
- Personalization: Feel free to personalize your Cute Pig Amigurumi! You can dress it up with accessories like a scarf or a bow. Changing the colors and patterns can also give your pig a unique personality.
- Final Check: Once you’ve added all the details, give your amigurumi a final check. Make sure all parts are securely attached and that there are no loose ends. Your Cute Pig Amigurumi is now complete!
FAQ
1. What is amigurumi?
Amigurumi is the Japanese art of knitting or crocheting small, stuffed yarn creatures. These cute and whimsical creations can be made in various shapes and sizes.
2. What materials do I need to make a Cute Pig Amigurumi?
You will need yarn, a crochet hook, fiberfill stuffing, safety eyes, a tapestry needle, and scissors to create your Cute Pig Amigurumi.
3. How do I start crocheting my pig?
Begin by creating a magic ring and crocheting single crochets into it. This technique is essential for starting the round shape of your Cute Pig Amigurumi.
4. Can I customize my Cute Pig Amigurumi?
Absolutely! You can customize your pig by changing colors, adding accessories, or embroidering different facial features to create a unique character.
5. What if I’m a beginner?
This Cute Pig Amigurumi – Tutorial is suitable for beginners. Follow the steps closely, and don’t hesitate to revisit basic techniques if needed.
6. How long does it take to make an amigurumi?
The time it takes to complete your Cute Pig Amigurumi will vary depending on your skill level and the complexity of the design. Generally, it may take a few hours to a couple of days.
Join our VIP broadcast list and gain access to exclusive patterns, all for free. As a VIP member, you’ll receive the best patterns daily, delivered directly to your device. ✨📱 It’s a unique opportunity to stay up-to-date with the latest trends and designs, curated just for you. Don’t miss out on enhancing your projects and discovering new inspirations with the best patterns every day! 🎨🔝
Conclusion
In this Cute Pig Amigurumi – Tutorial, we’ve walked you through the entire process of creating your very own adorable pig. From gathering materials to mastering basic crochet techniques, and finally assembling the cute creature, each step is designed to help you craft a delightful finished product. Don’t forget to add your unique touches to make it truly yours!
We hope this tutorial has inspired you to dive into the world of amigurumi. If you have any questions or suggestions, please leave your honest feedback and share your experiences in the comments below! Happy crocheting!