Welcome to our Last Minute Christmas Gift Block – Tutorial! As the holiday season approaches, many of us find ourselves scrambling to find the perfect gifts for friends and family.
The beauty of handmade gifts lies in the personal touch and love that goes into creating them. In this tutorial, we will guide you step-by-step in making a charming Christmas gift block that can be used as a decorative item or even as a cozy pillow. This project is not only quick but also allows you to showcase your creativity, making it the ideal last-minute gift solution.
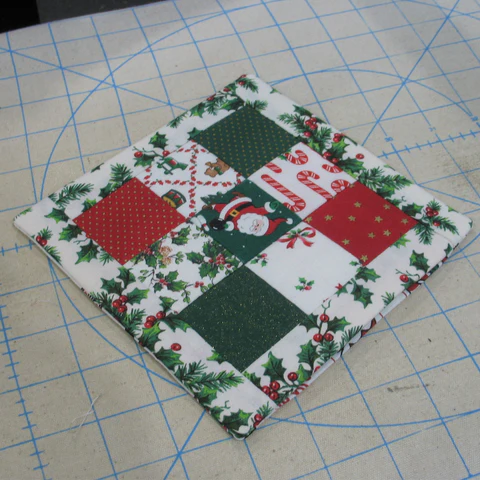
Creating a Last Minute Christmas Gift Block can be a rewarding experience, especially when you see the joy it brings to your loved ones. The design is simple yet beautiful, making it suitable for quilters of all skill levels.
Whether you are an experienced quilter or a beginner looking to make something special, this project will help you create a unique gift in no time.
Throughout this article, we will cover everything you need to know to make your own Last Minute Christmas Gift Block. From selecting materials and cutting your fabric to assembling and finishing your block, we’ll provide tips and tricks to ensure a successful project. Let’s dive in and get started on your festive crafting journey!
1. Selecting Your Materials
The first step in creating your Last Minute Christmas Gift Block is choosing the right materials. The fabrics and tools you select will greatly influence the outcome of your project. Here are some essential considerations:
- Choose Festive Fabrics: Opt for fabrics that reflect the Christmas spirit. Look for reds, greens, golds, and whites that evoke the holiday season. Festive prints, such as snowflakes, ornaments, or holiday-themed patterns, can add a charming touch.
- Fabric Quality Matters: When selecting fabrics, consider the quality. Cotton is a popular choice for quilting due to its durability and ease of handling. Choose high-quality quilting cottons for a professional finish.
- Gather Your Tools: Make sure you have all the necessary tools at hand. You will need a rotary cutter, a cutting mat, a quilting ruler, and a sewing machine. Having everything ready will streamline your process.
- Thread Selection: Choose a thread that complements your fabric choices. A neutral color often works well, but if you’re feeling adventurous, select a thread that matches one of your fabric colors for a more cohesive look.
- Optional Embellishments: Consider adding some embellishments to your gift block, such as buttons, ribbons, or embroidery. These small details can elevate your project and make it feel even more special.
- Pre-Washing Fabrics: It’s always a good practice to pre-wash your fabrics before starting your project. This helps to remove any sizing and prevents future shrinkage after you’ve finished your Last Minute Christmas Gift Block.
2. Cutting Your Fabric Pieces
With your materials selected, it’s time to cut your fabric pieces. Accurate cutting is crucial for ensuring that your Last Minute Christmas Gift Block assembles neatly. Follow these steps for precise cutting:
- Measure Carefully: Before cutting, take the time to measure your fabric pieces according to your chosen pattern. Precision is key, so use a quilting ruler and a rotary cutter for straight cuts.
- Cutting Rectangles and Squares: For the gift block, you will likely need a combination of rectangles and squares. Carefully cut these pieces, paying attention to the sizes specified in your pattern.
- Using Templates: If your design includes specific shapes, consider using templates. You can create templates from cardstock or use purchased templates to ensure accuracy.
- Organizing Cut Pieces: As you cut, organize your fabric pieces by type and size. Keeping everything sorted will make the assembly process smoother and help prevent any confusion.
- Double-Check Measurements: After cutting, double-check your measurements. It’s always a good idea to verify that everything is correct before moving on to the next step.
- Prepare for Sewing: Once you have all your pieces cut, stack them neatly and keep them in order. This preparation will save time and make your sewing process more efficient.
3. Assembling the Block
Now that your pieces are cut, it’s time to assemble your Last Minute Christmas Gift Block! Follow these steps to bring your project to life:
- Layout Your Design: Start by laying out your cut pieces on a flat surface. This will give you a visual representation of how your block will look and allow you to make any adjustments before sewing.
- Sewing the Pieces Together: Begin sewing your pieces together according to your layout. Use a quarter-inch seam allowance for accuracy. Always backstitch at the beginning and end of each seam to secure the stitches.
- Pressing Seams: After sewing each seam, press it open or to one side with an iron. Pressing helps to flatten the seams and gives your block a professional finish.
- Joining Sections: Once you have sewn the smaller sections together, start joining them to form the entire block. Take your time to ensure all pieces align properly for a clean look.
- Final Assembly Check: After assembling your block, take a moment to check for accuracy. Make any necessary adjustments and trim any excess fabric to ensure neat edges.
- Press the Completed Block: Give your finished block a final press with the iron. This will help eliminate any wrinkles and make your Last Minute Christmas Gift Block look crisp and polished.
4. Finishing Touches
With your Last Minute Christmas Gift Block assembled, it’s time to add the finishing touches that will make it truly special. Follow these steps to complete your project:
- Trimming to Size: Check the dimensions of your finished block and trim it to the desired size if necessary. Ensure that all edges are even for a clean finish.
- Adding Borders: Consider adding a border around your block to frame the design. Choose a fabric that complements the colors of your block while adding a touch of elegance.
- Layering for Quilting: If you plan to turn your block into a pillow or decorative item, layer it with batting and backing fabric. This will give your project dimension and softness.
- Quilting Your Block: Choose a quilting pattern that enhances the design of your Last Minute Christmas Gift Block. Straight-line quilting or free-motion quilting can add texture and interest to your piece.
- Binding the Edges: Once you have quilted your block, add binding to the edges. This not only protects the edges but also provides a polished finish. Choose a binding fabric that ties your design together.
- Labeling Your Gift: Don’t forget to label your gift block! Add a personal touch by including your name, the date, and a special message. This thoughtful detail will make your gift even more meaningful.
FAQ
1. What is a Last Minute Christmas Gift Block? The Last Minute Christmas Gift Block is a quick and easy quilting project designed for creating unique and thoughtful holiday gifts.
2. How long does it take to make a Last Minute Christmas Gift Block? Depending on your skill level, you can typically complete a Last Minute Christmas Gift Block in a few hours, making it perfect for last-minute gift-making.
3. What materials do I need? You will need quilting cotton, a rotary cutter, a cutting mat, a quilting ruler, thread, and optional embellishments to create your Last Minute Christmas Gift Block.
4. Can I use scraps for this project? Absolutely! The Last Minute Christmas Gift Block is an excellent opportunity to use fabric scraps, allowing for a creative and personalized touch.
5. Is this project suitable for beginners? Yes! The Last Minute Christmas Gift Block is beginner-friendly and offers a great way to practice basic quilting skills.
6. How can I make my block more unique? Consider adding embellishments such as buttons or embroidery, or experiment with different fabric combinations to make your Last Minute Christmas Gift Block stand out.
Join our VIP broadcast list and gain access to exclusive patterns, all for free. As a VIP member, you’ll receive the best patterns daily, delivered directly to your device. ✨📱 It’s a unique opportunity to stay up-to-date with the latest trends and designs, curated just for you. Don’t miss out on enhancing your projects and discovering new inspirations with the best patterns every day! 🎨🔝
Conclusion
In this Last Minute Christmas Gift Block – Tutorial, we have walked you through the entire process, from selecting materials and cutting fabric to assembling and finishing your gift block.
With this guide, you should feel empowered to create a beautiful and personalized Christmas gift that will surely delight your loved ones. We encourage you to share your thoughts and suggestions in the comments below, and we hope you enjoy making your Last Minute Christmas Gift Block! Happy quilting and Merry Christmas!

