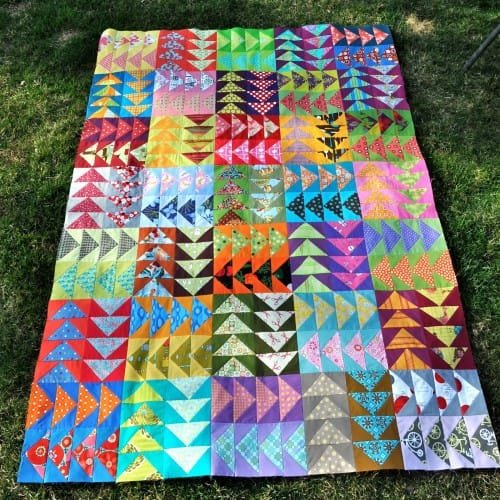
Welcome to this detailed Perfect Flying Geese Quilt – Tutorial! If you’re looking to elevate your quilting skills, this project is an excellent choice. The Flying Geese block is a classic pattern known for its elegance and versatility, making it a favorite among quilters.
With its distinctive triangular shapes that create the illusion of movement, the Perfect Flying Geese Quilt can enhance any quilt design, whether it’s for a cozy throw, a bedspread, or a wall hanging.
In this tutorial, we’ll guide you through the steps to create perfect Flying Geese units, ensuring that each triangle aligns beautifully.
The Flying Geese pattern is not only stunning but also offers a fantastic way to use up fabric scraps or showcase your favorite fabrics.
Throughout the tutorial, we will provide tips and techniques to help you achieve precision in your quilting, making the process enjoyable and fulfilling.
Ready to get started? Gather your materials and let’s dive into the world of Flying Geese quilting! By the end of this tutorial, you will have a beautiful quilt block that you can proudly display or incorporate into a larger quilt project. Let’s embark on this creative journey together!
1. Gathering Your Materials
Before you can begin your Perfect Flying Geese Quilt, it’s essential to gather all the necessary materials. Start with the fabric. Choose a combination of fabrics that will create contrast and visual interest in your quilt. You’ll need two different fabrics: one for the geese and another for the background.
Typically, the Flying Geese pattern requires a light and a dark fabric to make the triangles pop. For instance, you might select a vibrant print for the geese and a solid or softer print for the background. Aim for high-quality cotton fabric, which is durable and easy to work with.
In addition to fabric, gather your sewing essentials, including a rotary cutter, cutting mat, ruler, pins, and an iron. A quarter-inch seam allowance is standard in quilting, so having a seam guide on your sewing machine can help ensure accuracy. It’s also helpful to have a pressing mat and iron nearby, as pressing seams often throughout the process will give you cleaner results.
Don’t forget to pre-wash your fabrics to eliminate any chemicals or sizing that might interfere with your quilting. This step also helps prevent future shrinkage, which can distort your quilt blocks. After washing and drying, press your fabric to remove any wrinkles before cutting.
With your materials ready, you’re one step closer to creating your Perfect Flying Geese Quilt. Let’s move on to cutting the fabric for your Flying Geese units!
2. Cutting Your Fabric
Accurate cutting is vital to achieving the perfect Flying Geese units. Start by determining the size of your finished Flying Geese blocks. Common sizes for these blocks are 3×6 inches, 4×8 inches, or 5×10 inches, but you can customize the dimensions based on your project.
To cut the fabric, use your rotary cutter and ruler for precision. From the fabric chosen for the geese, cut rectangles measuring twice the desired height of the finished unit plus one inch. For example, if you want a finished height of 3 inches, you would cut rectangles measuring 7 inches long. From the background fabric, cut smaller squares, typically measuring one inch smaller than half the width of the rectangle.
For a 3×6 inch Flying Geese unit, you would cut 2.5-inch squares. It’s essential to cut accurately, as even a small discrepancy can lead to misalignment later in the process. Organize your cut pieces in a way that makes it easy to keep track of which pieces belong together.
As you cut, take your time and double-check your measurements. Ensuring that your pieces are uniform in size will make piecing them together much easier and will improve the overall quality of your finished quilt block. Once you have all your pieces cut, you’re ready to start assembling your Flying Geese units!
3. Assembling the Flying Geese Units
Now that you have all your pieces cut, it’s time to start assembling the Flying Geese units. Begin by taking one of your larger rectangles and placing it right side up on your work surface. Then, take one of the smaller squares from your background fabric and place it right sides together with one end of the rectangle.
Pin the square in place to prevent it from shifting while you sew. Using a quarter-inch seam allowance, sew along the edge of the square, starting from the top of the rectangle. After sewing, press the seam open, then fold the square down over the rectangle, creating the first triangle of your Flying Geese unit.
Next, repeat this process with the second square from your background fabric on the opposite end of the rectangle. Once you have both background squares sewn to the rectangle, you should see the shape of the Flying Geese starting to take form. Press the seams again to ensure everything lies flat.
Now it’s time to trim your Flying Geese unit. Using your rotary cutter and ruler, trim the unit down to the desired size, ensuring it measures correctly and has crisp edges. Trimming will give you that perfect shape that is characteristic of the Perfect Flying Geese Quilt.
Continue this process until you have all your Flying Geese units assembled. Depending on your quilt design, you might need several units, so be sure to plan accordingly.
4. Piecing the Quilt Top
With all your Flying Geese units completed, it’s time to piece them together to form the quilt top. Start by laying out your units on a design wall or flat surface to visualize the final arrangement. This step is essential, as it allows you to experiment with different layouts and ensure a balanced distribution of colors and patterns throughout the quilt.
Once you’re happy with the layout, begin sewing the units together in rows. Pin the units together, ensuring that the points of the triangles align neatly for a polished look. Again, use a quarter-inch seam allowance to maintain consistency throughout your quilt top.
After sewing the first row, press the seams open or to one side, depending on your preference. This step is crucial for reducing bulk and ensuring that your quilt lays flat. Continue this process for each row of Flying Geese units, taking care to maintain the integrity of the design.
When all rows are sewn together, you can join them to complete the quilt top. Align the rows carefully, pinning at the seams to ensure everything matches perfectly. Once everything is sewn together, press the seams again to set them.
Now that your quilt top is complete, you can choose to add a border to frame the design if desired. Selecting a fabric for the border that complements your Perfect Flying Geese Quilt will enhance the overall look and finish of your project.
FAQ
Q1: What is a Flying Geese quilt block?
A: A Flying Geese quilt block is a traditional quilt pattern made up of a large rectangle flanked by two smaller triangles, creating a shape that resembles flying geese in formation.
Q2: How do I choose the right fabric for my Flying Geese quilt?
A: Choose contrasting fabrics for the geese and the background to create visual interest. Solid fabrics work well, but you can also experiment with prints for a unique look.
Q3: What are common sizes for Flying Geese units?
A: Common sizes include 3×6 inches, 4×8 inches, and 5×10 inches, but you can customize your dimensions based on your specific project.
Q4: Do I need to pre-wash my fabrics?
A: Yes, pre-washing helps remove chemicals and sizing from the fabric, preventing shrinkage and ensuring better results in your finished quilt.
Q5: Can I use scrap fabric for my Flying Geese quilt?
A: Absolutely! Using scrap fabric is a fantastic way to create a unique Perfect Flying Geese Quilt while also minimizing waste.
Q6: How can I achieve perfect points on my Flying Geese units?
A: Accurate cutting, precise seam allowances, and careful pressing are key to achieving sharp points on your Flying Geese units.
Join our VIP broadcast list and gain access to exclusive patterns, all for free. As a VIP member, you’ll receive the best patterns daily, delivered directly to your device. ✨📱 It’s a unique opportunity to stay up-to-date with the latest trends and designs, curated just for you. Don’t miss out on enhancing your projects and discovering new inspirations with the best patterns every day! 🎨🔝
Conclusion
In this Perfect Flying Geese Quilt – Tutorial, you’ve learned how to gather your materials, cut fabric accurately, assemble Flying Geese units, and piece together a beautiful quilt top. This classic quilting technique allows for endless creativity and personalization, making it a wonderful addition to any quilter’s repertoire.
We encourage you to explore different fabric combinations and layouts to make your quilt truly unique. Your feedback and suggestions are valuable to us, so please share your thoughts and any ideas you have for future tutorials. Happy quilting!

