If you’re looking for an adorable and easy quilt pattern for a baby, this Lattice Baby Quilt – Tutorial is perfect for you! A Lattice Baby Quilt is a charming and classic design that adds an elegant touch to any nursery.
The lattice pattern is versatile, allowing you to play with different colors and prints to suit the baby’s room or your personal style. Whether you’re a beginner or an experienced quilter, this tutorial will guide you step by step to create a beautiful quilt that any parent will love.
The Lattice Baby Quilt is not only visually appealing, but it’s also practical, providing warmth and comfort for a little one. The simple geometric pattern creates a lattice effect, making the quilt look intricate without being overly complicated.
Plus, it’s a great project if you want to use up your fabric scraps or work with a specific color scheme.
In this Lattice Baby Quilt – Tutorial, we will cover everything from selecting your materials to finishing the quilt with a polished binding.
You’ll learn how to cut, piece, quilt, and bind, ensuring you end up with a quilt that looks professional and handmade with love. Let’s get started!
1. Materials Needed for the Lattice Baby Quilt
To create the perfect Lattice Baby Quilt, the first step is gathering all the necessary materials. The following items will ensure you’re well-prepared before diving into the quilting process.
- Fabric Selection: The fabric choice is key to achieving the lattice design. You will need at least two different fabric colors—one for the lattice strips and another for the background squares. Pre-cut charm packs or fat quarters work well for this project. A soft cotton or flannel fabric is recommended for baby quilts because it is gentle on the baby’s skin.
- Backing Fabric: You’ll need enough fabric to cover the back of the quilt. This fabric can match or contrast the front, depending on your preference. Make sure it is wide enough to cover the entire quilt top without having to piece it together.
- Batting: Batting provides the soft, cushioned layer inside the quilt. Choose a lightweight cotton batting for a baby quilt to ensure the quilt is warm but not too heavy.
- Rotary Cutter and Cutting Mat: These tools are essential for cutting your fabric accurately. A rotary cutter makes straight, clean cuts, while a cutting mat protects your surface and helps you measure.
- Sewing Machine and Thread: A sewing machine is required to piece together the quilt top and attach the layers. Select thread that matches or complements your fabric colors for a seamless look.
- Pins or Fabric Clips: These will help hold the fabric pieces together as you sew. Pins are especially useful for keeping your lattice strips aligned with the background squares.
Once you have gathered all your materials, it’s time to begin cutting and assembling your Lattice Baby Quilt.
2. Cutting and Piecing the Lattice Baby Quilt
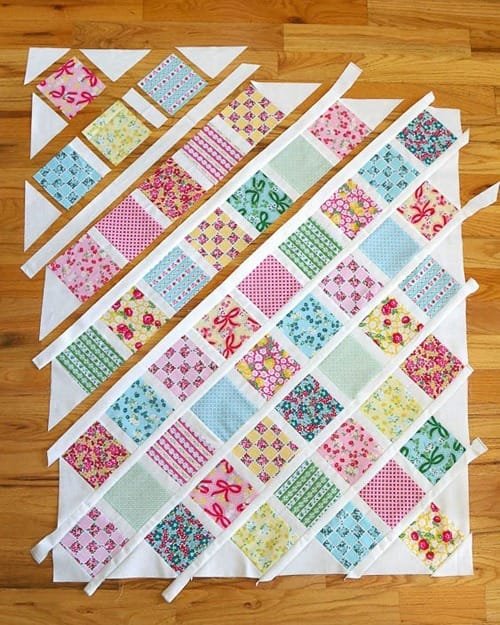
The next step in this Lattice Baby Quilt – Tutorial is to cut and piece your fabric. This is where you’ll start to see the lattice pattern take shape.
- Cutting the Fabric Strips: Begin by cutting your fabric into strips for the lattice design. Each strip should be the same width, typically 2.5 inches wide. These strips will be used to create the grid-like lattice pattern. You will also need to cut your background fabric into squares that fit between the lattice strips.
- Arranging the Pieces: Once your strips and squares are cut, lay them out in the lattice pattern. The lattice strips should intersect to form a criss-cross pattern, while the background squares fill in the spaces between. Take time to arrange the pieces until you’re happy with the overall look.
- Sewing the Rows: After arranging the pieces, it’s time to start sewing. Begin by sewing the background squares to the lattice strips, creating long rows. Use a 1/4-inch seam allowance for consistency. Press the seams open with an iron to reduce bulk and create a flat surface.
- Assembling the Quilt Top: Once the individual rows are sewn, start assembling the quilt top by sewing the rows together. Align the lattice strips so they create continuous lines across the quilt top. Pin the rows together before sewing to ensure the lattice pattern stays aligned.
- Trimming the Edges: After sewing all the rows together, trim the edges of the quilt top to create straight, even sides. This will make the next steps, including quilting and binding, much easier.
- Pressing the Quilt Top: Give the entire quilt top a final press to smooth out any wrinkles and ensure the seams lie flat. This will give your Lattice Baby Quilt a professional, polished look.
With your quilt top assembled, you’re now ready to move on to the quilting process.
3. Quilting the Lattice Baby Quilt
Quilting the layers of your Lattice Baby Quilt together is a crucial step. It adds texture, stability, and durability to the quilt, ensuring it will last through many washes and cuddles.
- Making the Quilt Sandwich: To begin quilting, you’ll need to create a quilt sandwich. Lay the backing fabric down first, with the wrong side facing up. Next, place the batting on top of the backing, followed by the quilt top, right side up. Make sure all the layers are smooth and free of wrinkles.
- Basting the Layers: Once the quilt sandwich is assembled, baste the layers together to prevent shifting during quilting. You can use safety pins, basting spray, or large stitches to temporarily hold the layers in place.
- Choosing a Quilting Pattern: For the Lattice Baby Quilt, a simple straight-line quilting pattern is ideal. You can quilt along the lattice strips, following the grid pattern to enhance the lattice design. Alternatively, you can opt for free-motion quilting for a more decorative look.
- Starting to Quilt: Begin quilting by stitching in the ditch, which means sewing directly along the seams of the lattice strips. This method creates a clean, subtle look while securing all three layers of the quilt. Be sure to start in the middle of the quilt and work your way outward to avoid puckering.
- Quilting the Background Squares: For added texture, you can quilt additional designs in the background squares, such as diagonal lines or simple motifs like hearts or stars. This extra quilting will make the quilt more durable and add visual interest.
- Trimming the Excess Batting and Backing: After quilting, trim away any excess batting and backing fabric from the edges of the quilt. Make sure the edges are straight and even, as this will make binding much easier.
Your Lattice Baby Quilt is now quilted, and it’s time to finish the project by adding the binding.
4. Binding and Finishing the Lattice Baby Quilt
The final step in this Lattice Baby Quilt – Tutorial is binding the quilt. This will cover the raw edges and give your quilt a polished, professional finish.
- Cutting the Binding Strips: Cut your binding fabric into strips that are 2.5 inches wide. You’ll need enough strips to go around the entire perimeter of the quilt. Fold each strip in half lengthwise and press with an iron to create a crisp fold.
- Attaching the Binding: Start sewing the binding to the front of the quilt, aligning the raw edges with the edge of the quilt top. Use a 1/4-inch seam allowance and miter the corners for a neat, professional finish.
- Folding the Binding to the Back: Once the binding is sewn to the front, fold it over to the back of the quilt and secure it with pins or clips. Make sure the folded edge covers the stitching line from the front.
- Hand Stitching or Machine Stitching the Binding: You can either hand stitch the binding to the back of the quilt for an invisible finish, or you can use a sewing machine for a quicker finish. Both methods work well, depending on your preference.
- Pressing the Finished Quilt: After the binding is attached, give the quilt a final press to smooth out any wrinkles and ensure everything is securely in place.
- Admiring Your Work: Congratulations! You’ve completed your Lattice Baby Quilt. It’s ready to be gifted or used to decorate a nursery.
FAQ About the Lattice Baby Quilt – Tutorial
Q1: What is the typical size of a Lattice Baby Quilt?
A Lattice Baby Quilt usually measures around 36 x 48 inches, but the size can vary depending on your preference and the intended use.
Q2: Can I use fabric scraps for the lattice design?
Yes, fabric scraps are a great way to create a unique lattice design. Just make sure the scraps are large enough to cut into uniform strips.
Q3: Do I need a special sewing machine for quilting?
A standard sewing machine works fine for quilting, but a machine with a quilting foot or free-motion quilting capability can make the process easier.
Q4: How do I keep the lattice strips aligned?
Pinning the lattice strips before sewing and taking your time during piecing will help keep the strips aligned and ensure a clean, consistent pattern.
Q5: Can I hand quilt the Lattice Baby Quilt?
Yes, hand quilting is an option, though it may take more time. Hand quilting adds a personal touch and creates a soft, vintage feel.
Q6: How long does it take to make a Lattice Baby Quilt?
The time it takes depends on your skill level and available time. This project can be completed in a few days or over the course of a week.
Join our VIP broadcast list and gain access to exclusive patterns, all for free. As a VIP member, you’ll receive the best patterns daily, delivered directly to your device. ✨📱 It’s a unique opportunity to stay up-to-date with the latest trends and designs, curated just for you. Don’t miss out on enhancing your projects and discovering new inspirations with the best patterns every day! 🎨🔝
Conclusion
In this Lattice Baby Quilt – Tutorial, we’ve guided you through the process of creating a charming baby quilt from start to finish. From gathering materials to cutting, piecing, quilting, and binding, this project is perfect for beginners and experienced quilters alike.
We hope this tutorial has inspired you to try your hand at making a beautiful Lattice Baby Quilt. Please share your thoughts, feedback, or questions in the comments below—we’d love to hear from you!

