The My Scrappy Cross Roads Block – Tutorial is perfect for quilters who love using leftover fabrics to create something beautiful.
This versatile block is a great way to make use of your fabric scraps and can be easily incorporated into various quilting projects. Whether you’re a beginner or an experienced quilter, the Scrappy Cross Roads Block offers endless creative possibilities.
Using scraps is not only economical but also brings a unique charm to your quilts. Every block tells its own story through the different fabric pieces, making each one truly one-of-a-kind.
The Scrappy Cross Roads Block combines traditional techniques with a modern twist, creating a visually striking pattern that’s perfect for quilts, wall hangings, or even pillow covers.
In this tutorial, I’ll guide you step by step through the process of creating the Scrappy Cross Roads Block. From selecting your scraps to assembling the block, you’ll learn everything you need to complete this fun and satisfying project. Let’s dive into the world of scrappy quilting!
1. Choosing and Preparing Your Scraps
The first step in creating the My Scrappy Cross Roads Block is selecting your fabric scraps. Since this block is designed to use up smaller pieces of fabric, feel free to mix and match colors and prints. The beauty of a scrappy quilt lies in its randomness and diversity.
Begin by gathering all your leftover fabric pieces. These can come from previous quilting projects, garments, or any other source of cotton fabric. Aim for a variety of colors and patterns, but try to keep a consistent color scheme to avoid visual clutter. For instance, you might want to focus on warm tones (reds, oranges, yellows) or cool tones (blues, greens, purples) to tie the block together.
Before you start cutting, iron your scraps to eliminate wrinkles and ensure accurate measurements. You’ll need squares of fabric cut to the size specified in the pattern, which typically requires 2.5-inch squares. Cut your scraps as precisely as possible to make sure everything fits together nicely in your Scrappy Cross Roads Block.
Once your scraps are prepared and cut, you’re ready to move on to the next stage of the project.
2. Assembling the Cross Roads Block
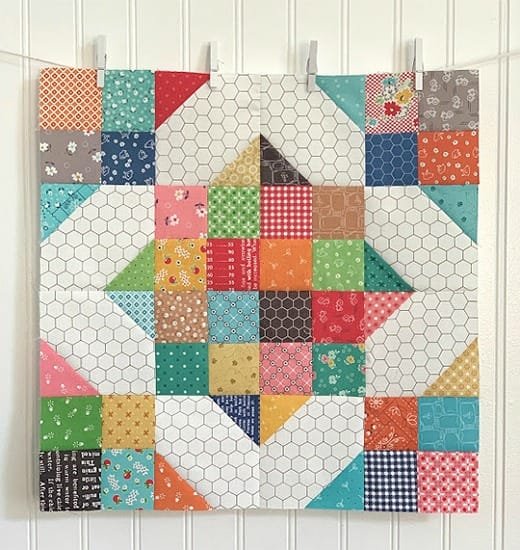
Now that your fabric pieces are ready, it’s time to start assembling the My Scrappy Cross Roads Block. The block is built using a combination of small squares and rectangles to form a cross pattern in the center, with additional rows radiating outward.
Begin by laying out your fabric squares in a grid. You’ll need to create a 3×3 grid to form the core of your Scrappy Cross Roads Block. The center square should be a solid color or a contrasting fabric to make the cross stand out, while the surrounding squares can be a mix of your fabric scraps.
Once your layout is set, start by sewing the squares together row by row. Use a ¼-inch seam allowance and press the seams open as you go. This will help reduce bulk and ensure your block lies flat.
After completing the center grid, you’ll need to add the additional rows to extend the cross pattern outward. Sew the rows in the same way, pressing seams open between each row. When you’ve completed all the rows, you should see the distinct cross pattern emerge in the center of your block.
3. Pressing and Trimming the Block
Once your My Scrappy Cross Roads Block is assembled, it’s time to press and trim the block to ensure it’s square and even. Pressing is an essential step in quilting because it helps the fabric lie flat and makes your quilt blocks easier to work with.
Use a hot iron to press the block flat, making sure to press the seams in the same direction for a clean finish. You can press your seams to one side or open them up, depending on your preference. For this block, pressing seams open will reduce bulk and make it easier to align the pieces.
After pressing, use a ruler and rotary cutter to trim the edges of your block. Be sure to measure carefully and trim evenly, making sure your block is squared up to the desired size. This step is crucial because it ensures that your Scrappy Cross Roads Block will fit perfectly with the other blocks in your quilt.
Trimming the block also helps eliminate any excess fabric from the seams, giving your block a polished and professional look.
4. Adding Borders and Finishing Touches
To give your My Scrappy Cross Roads Block a finished look, consider adding a border around the block. This can be a simple strip of fabric in a solid color or a contrasting print that complements your scrap fabrics.
Cut strips of fabric for the border, making sure they’re the same width on all sides. Sew the strips to the outer edges of the block, using a ¼-inch seam allowance. Press the seams open, and then give the entire block one final press to ensure everything is flat and smooth.
Once the borders are added, your Scrappy Cross Roads Block is complete! At this point, you can use the block on its own or combine it with other blocks to create a larger project such as a quilt top, pillow cover, or wall hanging.
If you plan on making an entire quilt, repeat the process for each block and then sew the blocks together to form rows. Join the rows using the same method as described earlier, and soon you’ll have a beautiful scrappy quilt made from your leftover fabrics.
FAQ About My Scrappy Cross Roads Block
Q1: Can I use different-sized scraps for this block?
Yes, you can adjust the size of the scraps, but be sure to maintain consistent measurements across each block. Using different-sized scraps could alter the symmetry of the cross pattern.
Q2: How do I ensure my seams align properly?
To ensure your seams align perfectly, press them open and use pins to hold the fabric in place before sewing. You can also finger press the seams before ironing to help keep everything lined up.
Q3: What type of fabric works best for the Scrappy Cross Roads Block?
Cotton quilting fabric is the best choice for this block because it’s durable, easy to work with, and provides a crisp finish. Avoid using stretchy or slippery fabrics, as they may not hold their shape as well.
Q4: Can I make this block larger or smaller?
Yes, you can easily resize the My Scrappy Cross Roads Block by increasing or decreasing the size of the squares and rectangles. Just be sure to adjust your measurements consistently throughout the block.
Q5: What if my block turns out uneven?
If your block is uneven, use a rotary cutter and ruler to trim the edges and square it up. Be careful not to trim too much, as this could affect the final size of your block.
Q6: How can I make this block part of a larger quilt?
To incorporate this block into a larger quilt, repeat the steps for each block and then sew them together into rows. You can alternate the Scrappy Cross Roads Block with solid blocks or other designs to add variety.
Join our VIP broadcast list and gain access to exclusive patterns, all for free. As a VIP member, you’ll receive the best patterns daily, delivered directly to your device. ✨📱 It’s a unique opportunity to stay up-to-date with the latest trends and designs, curated just for you. Don’t miss out on enhancing your projects and discovering new inspirations with the best patterns every day! 🎨🔝
Conclusion
The My Scrappy Cross Roads Block – Tutorial provides an enjoyable and creative way to use up your fabric scraps and craft something beautiful. With simple steps and a bit of patience, you can create a visually stunning quilt block that’s full of personality and charm. Whether you’re a seasoned quilter or just getting started, this block is a fun addition to your quilting repertoire.
We hope this tutorial has inspired you to try your hand at making a scrappy quilt block. If you have any feedback, questions, or suggestions, please leave a comment below. We’d love to hear about your experience and see your creative projects!

