Creating a quilt is a labor of love, and the Blooming Love Quilt Pattern – Tutorial is no exception. This beautiful design combines intricate details with a timeless romantic theme, making it perfect for those who want to gift something meaningful or add a touch of elegance to their home décor.
In this tutorial, we’ll walk you through each step of creating the Blooming Love Quilt Pattern, from selecting your fabric to finishing the final stitches, so you can complete your project with ease.
Whether you’re an experienced quilter or just getting started, the Blooming Love Quilt Pattern provides the perfect balance of challenge and creativity.
The combination of vibrant floral patterns and symbolic heart shapes creates a stunning visual effect that can be customized to suit your style. As you work through this tutorial, you’ll not only learn essential quilting techniques but also gain the satisfaction of crafting something truly special.
Before we dive into the details, it’s important to understand the significance of planning and preparing your project.
Quilting requires patience, precision, and attention to detail. With the right materials and a clear step-by-step guide, you’ll be able to create a Blooming Love Quilt that showcases your skills and passion for quilting.
1. Choosing the Perfect Fabric for Your Blooming Love Quilt
When starting the Blooming Love Quilt Pattern – Tutorial, the first and most critical step is choosing the right fabric. The fabric selection will determine the overall aesthetic of your quilt, so it’s essential to make thoughtful choices.
First, decide on a color palette that reflects the theme of the Blooming Love Quilt. Since this design features floral patterns and heart shapes, many quilters opt for soft pinks, reds, and pastel hues to evoke feelings of love and romance. However, you can also experiment with bold, contrasting colors like deep reds and dark blues for a more modern take on this classic design.
Next, choose high-quality quilting cotton as your base fabric. Quilting cotton is durable and easy to work with, making it the perfect choice for a project like this. If you want to add texture and dimension to your quilt, consider incorporating fabrics like linen or silk for a luxurious touch. The key is to balance the variety of textures while ensuring the fabrics complement each other.
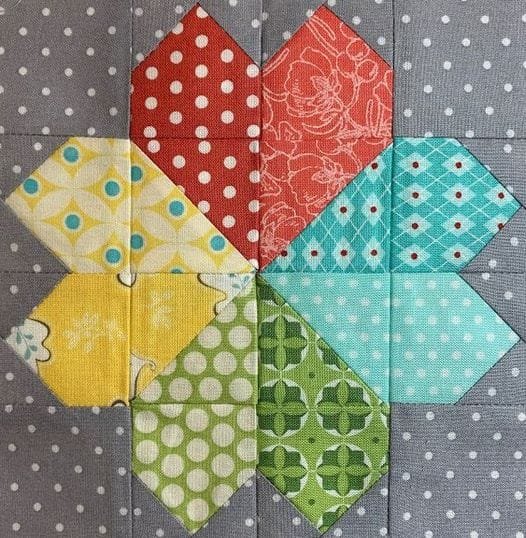
Patterned fabrics are an excellent addition to the Blooming Love Quilt. Floral prints, polka dots, or even vintage-inspired designs can bring your quilt to life. Mix and match fabrics for the heart and flower elements to create visual interest and ensure the finished quilt has a dynamic, layered look.
Once you’ve selected your fabrics, pre-wash them to prevent any shrinkage or bleeding of colors. Pre-washing also softens the fabrics, making them easier to work with and ensuring the longevity of your quilt.
Finally, calculate the amount of fabric you’ll need based on the size of your quilt. For a standard lap quilt, you’ll need around 2 to 3 yards of the main fabric and additional yardage for backing and binding. It’s always a good idea to buy extra fabric, just in case of mistakes or adjustments.
2. Cutting and Assembling Quilt Blocks
After gathering your materials, the next step in the Blooming Love Quilt Pattern – Tutorial is to cut and assemble your quilt blocks. Precision is key in this phase, as well-cut fabric pieces will ensure your quilt comes together smoothly.
Start by cutting your fabric into the necessary shapes for the quilt blocks. The Blooming Love Quilt Pattern typically involves square blocks, heart-shaped appliqués, and floral motifs. Use a rotary cutter and ruler to make clean, straight cuts. Ensure that your blocks are consistent in size, as this will help your quilt lay flat and align properly during assembly.
Once the fabric pieces are cut, lay them out on your workspace to visualize the overall design of your quilt. This step allows you to see how the colors and patterns will interact with one another. Feel free to rearrange the pieces until you’re satisfied with the layout. This is also a good time to decide on the placement of your heart and flower appliqués.
Next, it’s time to sew the quilt blocks together. Using a ¼ inch seam allowance, begin by stitching the smaller blocks together to create rows. After completing the rows, sew them together to form the larger quilt top. Take your time to ensure that the seams line up neatly for a polished finish.
If you’re adding heart appliqués to your quilt, prepare them by tracing the heart shape onto your chosen fabric. Cut out the hearts and attach them to the quilt top using an appliqué stitch or zigzag stitch. For the floral motifs, you can either appliqué or piece them into the quilt blocks, depending on your preferred technique.
Press your seams as you go. This ensures that the quilt top remains flat and prevents puckering. Use an iron on medium heat, and press each seam open or to one side, depending on the pattern instructions.
3. Quilting Techniques for the Blooming Love Quilt
Now that your quilt top is assembled, it’s time to move on to quilting techniques. This step in the Blooming Love Quilt Pattern – Tutorial will bring texture and depth to your project, turning it from a simple fabric assembly into a work of art.
First, create your quilt sandwich by layering the quilt top, batting, and backing fabric. Ensure that the backing fabric extends slightly beyond the quilt top to accommodate any shifting during the quilting process. Secure the layers together using safety pins or basting spray.
For the Blooming Love Quilt, free-motion quilting or hand quilting are popular choices. Free-motion quilting allows you to create intricate designs, such as swirling vines or heart shapes, which complement the romantic theme of the quilt. If you’re new to free-motion quilting, start by practicing on a small scrap of fabric to get a feel for the movement of the needle.
Hand quilting, on the other hand, gives the quilt a classic, handcrafted look. Use a quilting hoop to keep the layers taut, and stitch along the seams or outline the heart and floral motifs. Hand quilting takes time and patience, but the result is a quilt with a unique, textured appearance that emphasizes the love and care put into each stitch.
If you prefer a quicker method, you can opt for straight-line quilting using your sewing machine. This technique involves sewing parallel lines across the quilt, either diagonally or horizontally. While it’s a simpler approach, straight-line quilting still adds a professional finish to your project.
Once the quilting is complete, trim the excess batting and backing fabric to match the edges of the quilt top.
4. Finishing Your Blooming Love Quilt
The final step in the Blooming Love Quilt Pattern – Tutorial is finishing the edges of your quilt and adding the binding. This step will give your quilt a clean, polished look and ensure that the edges are protected from fraying.
First, prepare the binding by cutting strips of fabric 2.5 inches wide. The length of the strips will depend on the size of your quilt, but they should be long enough to wrap around the entire perimeter. Join the strips together by sewing them at a 45-degree angle to reduce bulk at the seams.
Next, attach the binding to the edges of the quilt using a sewing machine. Align the raw edge of the binding with the edge of the quilt, and sew it in place with a ¼ inch seam allowance. Miter the corners by folding the binding at a 45-degree angle, then continue sewing around the quilt.
Once the binding is attached, fold it over to the back of the quilt and hand stitch it in place. Use a blind stitch or slip stitch to secure the binding without visible stitches on the front of the quilt.
After the binding is complete, give your quilt a final press to remove any wrinkles and ensure that everything is neatly in place. Your Blooming Love Quilt is now ready to be displayed, gifted, or cherished as a keepsake!
FAQ about Blooming Love Quilt Pattern – Tutorial
Q1: What is the Blooming Love Quilt Pattern?
The Blooming Love Quilt Pattern is a romantic and intricate quilt design that features heart shapes and floral motifs. It’s a popular choice for those looking to create a quilt with sentimental value.
Q2: Is the Blooming Love Quilt Pattern suitable for beginners?
While the Blooming Love Quilt Pattern can be made by beginners, it’s helpful to have some basic quilting skills. The pattern involves precise cutting, sewing, and appliqué techniques that may be challenging for complete novices.
Q3: How long does it take to complete the Blooming Love Quilt?
The time required to complete the quilt depends on your skill level and the complexity of the design. On average, it can take anywhere from several days to a few weeks to finish the Blooming Love Quilt.
Q4: Can I customize the Blooming Love Quilt Pattern?
Absolutely! You can customize the quilt by choosing different fabrics, colors, and patterns for the heart and floral elements. This allows you to make a unique quilt that reflects your personal style.
Q5: What type of quilting techniques work best for this pattern?
Free-motion quilting, hand quilting, and straight-line quilting all work well for the Blooming Love Quilt. Each technique offers a different finish, so choose the one that best suits your preferences and skills.
Q6: Can I make the Blooming Love Quilt as a gift?
Yes, the Blooming Love Quilt makes a beautiful and thoughtful gift for special occasions like weddings, anniversaries, or Valentine’s Day. Its romantic theme and handmade quality add sentimental value to any gift.
Join our VIP broadcast list and gain access to exclusive patterns, all for free. As a VIP member, you’ll receive the best patterns daily, delivered directly to your device. ✨📱 It’s a unique opportunity to stay up-to-date with the latest trends and designs, curated just for you. Don’t miss out on enhancing your projects and discovering new inspirations with the best patterns every day! 🎨🔝
Conclusion
In this Blooming Love Quilt Pattern – Tutorial, we’ve walked you through every step of the quilting process, from selecting fabrics to adding the final binding. This project is a wonderful way to showcase your quilting skills and create something truly special. Whether you’re making the quilt for yourself or as a heartfelt gift, the Blooming Love Quilt is sure to be cherished for years to come.
We hope this tutorial has been helpful and inspiring. Please share your thoughts, suggestions, or any tips you’ve discovered along the way in the comments below. We’d love to hear from you and see your beautiful quilts!

